With the ![]() (Insert symbols in area) button, you can insert symbols in the desired
area via the Symbols window. You can insert symbols evenly according to their amount or
with the desired spaces.
(Insert symbols in area) button, you can insert symbols in the desired
area via the Symbols window. You can insert symbols evenly according to their amount or
with the desired spaces.
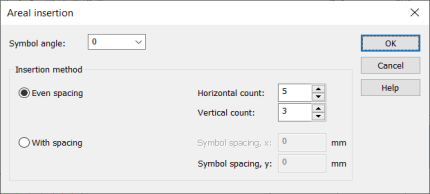
Insert with even spacing
Do the following:
-
Select a symbol in the Symbols window. Alternatively, indicate the symbol in the drawing by first pressing Enter.
The Areal insertion dialog opens.
-
Define the symbol positioning angle.
-
Define the number of the symbols in horizontal and vertical directions.
-
Click OK.
-
Indicate the area in the drawing where the symbols will be evenly positioned.

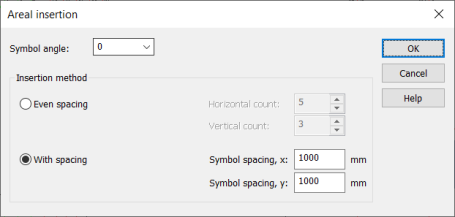
Insert with desired spacing
Do the following:
-
Select a symbol in the Symbols window. Alternatively, indicate the symbol in the drawing by first pressing Enter.
The Areal insertion dialog opens.
-
Define the symbol positioning angle.
-
Select With spacing.
-
Define the distances of the symbols in x and y directions.
-
Click OK.
-
Indicate the area in the drawing where the symbols will be evenly positioned.