Attribute settings
In the Attribute Settings view, project administrator can select which object attributes the users see in the 3D model viewer, generate new attributes, and modify all the attributes of an object via scripting. Attributes can also be exported for import to other projects.
Attributes from model file
You can edit settings that affect how users see attributes in the 3D model viewer.
Do the following:
-
Navigate to the project to edit, and then click Project Admin in the main menu. The project administration view opens.
-
Click Model Configuration. The model configuration view opens.
-
Click Attribute Settings. The Attributes from Model File section lists the attributes that are defined for the 3D model.
Note: Attributes related to keeping models separate when publishing (_origModel, Original Model), bounding box center (bndX, Bounding box center x; bndY, Bounding box center y; bndZ, Bounding box center z), bounding box min (minX, Bounding box minimum x; minY, Bounding box minimum y; minZ, Bounding box minimum z), and bounding box max (maxX, Bounding box maximum x; maxY, Bounding box maximum y; maxZ, Bounding box maximum z) are visible only when they are enabled in Model Publishing configuration. See Uploading and publishing a 3D model.
-
Abbreviation and Display Name are identifying attributes that must be unique within a project. You can change the display name of an attribute by selecting its check box in the Set Display Name column and then providing the new name in the text field.
-
In the Type column, select how objects are treated when a user searches for objects with specific attributes or attribute values.
-
Normal Attribute — All objects are handled separately, and users can search for objects that contain a specific attribute value. For example, if ten objects have the attribute Width = 500, the search Width equals 500 lists the ten objects, and clicking an individual search result displays the relevant object in the model viewer.
-
Group Defining Attribute — All objects that have the same attribute value belong to the same group, and users can search for groups of objects that have the same attribute value. For example, if ten objects have the attribute Width = 500, the search Width (Group) equals 500 returns one result, and clicking that result displays those ten objects in the model viewer.
-
Key Attribute — Attribute becomes the key (ID) attribute of the object if the object does not already have a key in the model file. Users can search for the values of this attribute using the "IDs only" (simple search) and "ID Attribute" (model and point search) options of the search tool.
Note: Each model object receives a key attribute based on the following priority order:
1. Key attribute generated by an attribute rule or transformation
2. Key attribute set in the imported model file
3. Attribute set as "Key Attribute" in the "Attributes from model file" section -
Do Not Import — Attribute is not included in the published model.
-
In the Data Type column, select what type of data is stored in the attribute. For example, if attribute values only consists of numbers, setting the type to "Numeric" enables users to search for objects whose attribute value is within a specified range.
- String — Attribute values are handled as text strings.
- Date — Attribute values are handled as Unix dates, in the format YYYY‑MM‑DD HH‑MM‑SS, instead of the Unix epoch time format. Fields used for selecting a date display a calendar control.
- Numeric — Attribute values are treated as numeric values.
-
Click Save to save your changes.

Results
Publishing the 3D model applies the attribute transformations to objects.
Derived attributes
In the Attribute Settings view, the Derived Attributes section allows you to define rules that generate new attributes from the values of existing attributes. Generating of new attributes can involve one or several of the following steps:
-
Extracts parts (text strings) from the value of an existing attribute, as described in Creating attributes by extracting values from existing attributes.
-
Replace text strings in the values of existing attributes and in extracted parts, as described in Creating attributes by replacing characters in existing attribute values.
-
Combine attribute values, extracted strings, replaced strings, and fixed text strings, as described in Creating attributes by combining existing attributes.
-
Create new attributes which are assigned the value of an existing attribute, based on its existence on an object, as described in Creating attributes based on existence of other attributes.
Creating attributes by extracting values from existing attributes
In the Attribute Settings view, the Rules for Extracting Attribute Fragments section allows you to define rules that create new attributes by extracting parts from the value of an existing attribute and assigning each extracted value to another attribute. For example, from the attribute value "102-ER-10" you could extract the values "102", "ER", and "10", and assign them to three different attributes.
Extraction is performed using .NET regular expressions that contain "named capture groups". When the rule is applied and the regular expression matches attribute values found in the objects in the 3D model, for these objects a new attribute is created for each named capture group. The name of the capture group is the Abbreviation of the new attribute.

Prerequisites
- You are familiar with creating regular expressions. See About .NET regular expressions.
Do the following:
-
Navigate to the project to edit, and then click Project Admin in the main menu. The project administration view opens.
-
Click Model Configuration. The model configuration view opens.
-
Click Attribute Settings. The Attribute Settings view opens.
-
In the Rules for Extracting Attribute Fragments section, click Add new.
-
In the Source Attribute field, select the attribute from which to extract information.
-
In the Pattern field, define the regular expression to use for extracting information.
Example: To generate a new attribute cm whose value is derived from the first three letters of the component manufacturer, considering only manufacturers with alphanumeric characters in the name, select "Component Manufacturer" as the source attribute and specify Pattern as (?<cm>...)[A-Za-z0-9].
Note: AI support can be configured by system administrator to assist in creating a regular expression pattern. When AI support is enabled, Ask AI button is shown. See AI assistant.
-
Click Test to test the rule, and review the results. The test is performed on the attributes of a pending model; if a pending model is not present, the test is performed on the attributes of the latest published model.
-
In the Definition of Fragment Attributes section, edit the attribute's Display Name if needed.
-
Select attribute Type to be one of the following:
- Normal Attribute — Attribute values are handled as text strings.
-
Key Attribute — Attribute becomes the key (ID) attribute of the object. Users can search for the values of this attribute using the "IDs only" (simple search) and "ID Attribute" (model and point search) options of the search tool.
-
Group Defining Attribute — All objects that have the same attribute value belong to the same group. Because the system creates an additional attribute that identifies the group, users can also search for the group itself, in addition to searching for the objects in the group. The Abbreviation of this group attribute is the same as that of the grouped attribute, but in square brackets (sys becomes [sys]), and its Display Name is the same as that of the grouped attribute, but appended with (Group) (System becomes System (Group)).
-
Temporary Attribute — Attribute is used only temporarily, as input for another data transformation; it is not published to the model as a separate attribute.
-
In the Data Type column, select what type of data is stored in the attribute. For example, if attribute values only consists of numbers, setting the type to "Numeric" enables users to search for objects whose attribute value is within a specified range.
- String — Attribute values are handled as text strings.
- Date — Attribute values are handled as Unix dates, in the format YYYY‑MM‑DD HH‑MM‑SS, instead of the Unix epoch time format. Fields used for selecting a date display a calendar control.
- Numeric — Attribute values are treated as numeric values.
-
Click Save.
Results
Publishing the 3D model applies the attribute transformations to objects.
Creating attributes by replacing characters in existing attribute values
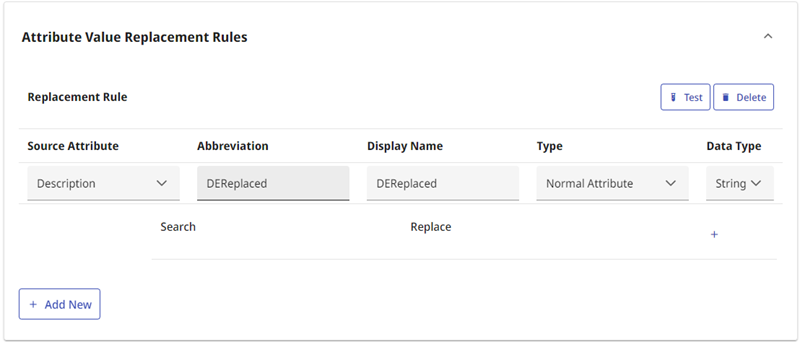
In the Attribute Settings view, the Attribute Value Replacement Rules section allows you to create new attributes by replacing text found in existing attribute values. You can use this for example to remove spaces from the attribute value.
Do the following:
-
Navigate to the project to edit, and then click Project Admin in the main menu. The project administration view opens.
-
Click Model Configuration. The model configuration view opens.
-
Click Attribute Settings. The Attribute Settings view opens.
-
In the Attribute Value Replacement Rules section, click Add New.
-
In the Source Attribute field, select the attribute to use in value replacement.
-
Abbreviation and Display Name are by default the same as the abbreviation of the source attribute, but appended with Replaced (sys becomes sysReplaced). Edit if needed.
-
Select the Type of the attribute:
-
Normal Attribute — Attribute values are handled as text strings.
-
Key Attribute — Attribute becomes the key (ID) attribute of the object. Users can search for the values of this attribute using the "IDs only" (simple search) and "ID Attribute" (model and point search) options of the search tool.
-
Group Defining Attribute — All objects that have the same attribute value belong to the same group. Because the system creates an additional attribute that identifies the group, users can also search for the group itself, in addition to the objects in the group. The abbreviation of this group attribute is the same as the abbreviation of the grouped attribute, but in square brackets (sys becomes [sys]), and its display name is the same as that of the grouped attribute, but appended with (Group) (System becomes System (Group)).
-
Temporary Attribute — Attribute is used only temporarily, as input for another data transformation; it is not published to the model as a separate attribute.
-
-
In the Data Type column, select what type of data is stored in the attribute. For example, if attribute values only consists of numbers, setting the type to "Numeric" enables users to search for objects whose attribute value is within a specified range.
- String — Attribute values are handled as text strings.
- Date — Attribute values are handled as Unix dates, in the format YYYY‑MM‑DD HH‑MM‑SS, instead of the Unix epoch time format. Fields used for selecting a date display a calendar control.
- Numeric — Attribute values are treated as numeric values.
-
Perform the following as many as times as needed to define the strings to replace:
-
In the Search field, specify the string to find from existing attribute values.
-
In the Replace field, specify the replacement string to use in the new attribute.
-
To add more rows, click +.
Examples:
To replace spaces with underscores, enter a space in the Search field and the underscore character in the Replace field.
To remove text, enter the text in the Search field and leave the Replace field empty.Note: The replacements are performed according to the list, from top to bottom. If you have several rules that match the same string, the rule that is highest on the list gets applied first.
-
-
Click Test to test the rule, and review the results. The test is performed on the attributes of a pending model; if a pending model is not present, the test is performed on the attributes of the latest published model.
-
Click Save.
Results
Publishing the 3D model applies the attribute transformations to objects.
Creating attributes by combining existing attributes
In the Attribute Settings view, the Combined Attributes section allows you to create new attributes by combining the values of multiple attributes and free text.

Do the following:
-
Navigate to the project to edit, and then click Project Admin in the main menu. The project administration view opens.
-
Click Model Configuration. The model configuration view opens.
-
Click Attribute Settings. The Attribute Settings view opens.
-
In the Combined Attributes section, click Add New.
-
Enter an Abbreviation and Display Name for the new attribute.
-
Specify the Pattern to use. The pattern can mix attribute names and free text; the values of attributes listed in the pattern will be used to construct the value of the combined attribute. When you start typing in this field, a list of attributes whose display name matches your input is displayed—select an attribute from the list to add it to the pattern. Typing the exclamation mark (!) lists all available attributes. Press Enter after typing a text string.
Example: To create a new attribute whose value combines the values of the attributes Height and Weight separated by underscores, enter the pattern Height_Width by selecting the two attributes from the drop-down list and typing the underscores in-between.

Note: The new attribute will only be added to objects that have all the attributes specified in the pattern.
You can edit or remove an element (attribute or free text) from the pattern using the edit and remove icons.
- Select the Type of the attribute:
-
Normal Attribute — Attribute values are handled as text strings.
-
Key Attribute — Attribute becomes the key (ID) attribute of the object. Users can search for the values of this attribute using the "IDs only" (simple search) and "ID Attribute" (model and point search) options of the search tool.
-
Group Defining Attribute — All objects that have the same attribute value belong to the same group. Because the system creates an additional attribute that identifies the group, users can also search for the group itself, in addition to the objects in the group. The abbreviation of this group attribute is the same as the abbreviation of the grouped attribute, but in square brackets (sys becomes [sys]), and its display name is the same as that of the grouped attribute, but appended with (Group) (System becomes System (Group)).
-
Temporary Attribute — Attribute is used only temporarily, as input for another data transformation; it is not published to the model as a separate attribute.
-
In the Data Type column, select what type of data is stored in the attribute. For example, if attribute values only consists of numbers, setting the type to "Numeric" enables users to search for objects whose attribute value is within a specified range.
- String — Attribute values are handled as text strings.
- Date — Attribute values are handled as Unix dates, in the format YYYY‑MM‑DD HH‑MM‑SS, instead of the Unix epoch time format. Fields used for selecting a date display a calendar control.
- Numeric — Attribute values are treated as numeric values.
-
Click Test to test the rule, and review the results. The test is performed on the attributes of a pending model; if a pending model is not present, the test is performed on the attributes of the latest published model.
-
Click Save.
Results
Publishing the 3D model applies the attribute transformations to objects.
Creating attributes based on existence of other attributes
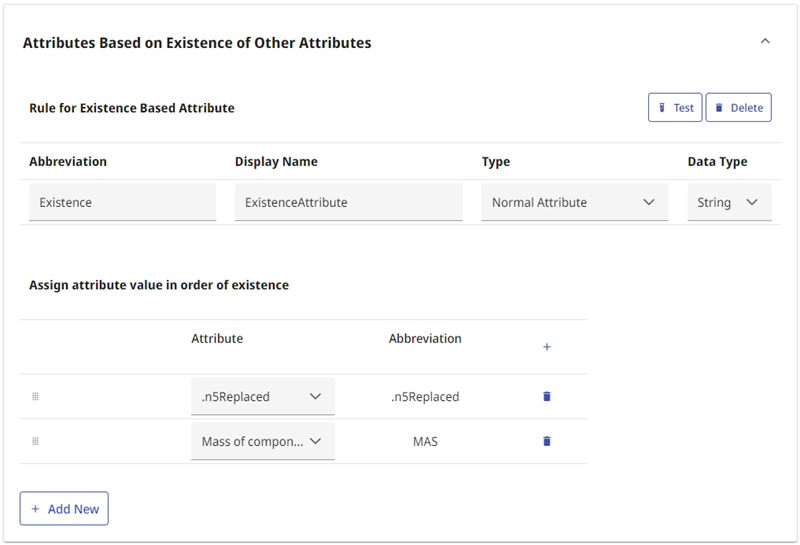
In the Attribute Settings view, the Attributes Based on Existence of Other Attributes section allows you to create new attributes with value assigned by an attribute existing in the model, based on the existence of attributes.
Do the following:
-
Navigate to the project to edit, and then click Project Admin in the main menu. The project administration view opens.
-
Click Model Configuration. The model configuration view opens.
-
Click Attribute Settings. The Attribute Settings view opens.
-
In the Attributes Based on Existence of Other Attributes section, click Add New.
-
Enter an Abbreviation and Display Name for the new attribute.
- Select the Type of the attribute:
-
Normal Attribute — Attribute values are handled as text strings.
-
Key Attribute — Attribute becomes the key (ID) attribute of the object. Users can search for the values of this attribute using the "IDs only" (simple search) and "ID Attribute" (model and point search) options of the search tool.
-
Group Defining Attribute — All objects that have the same attribute value belong to the same group. Because the system creates an additional attribute that identifies the group, users can also search for the group itself, in addition to the objects in the group. The abbreviation of this group attribute is the same as the abbreviation of the grouped attribute, but in square brackets (sys becomes [sys]), and its display name is the same as that of the grouped attribute, but appended with (Group) (System becomes System (Group)).
-
Temporary Attribute — Attribute is used only temporarily, as input for another data transformation; it is not published to the model as a separate attribute.
-
In the Data Type column, select what type of data is stored in the attribute. For example, if attribute values only consists of numbers, setting the type to "Numeric" enables users to search for objects whose attribute value is within a specified range.
- String — Attribute values are handled as text strings.
- Date — Attribute values are handled as Unix dates, in the format YYYY‑MM‑DD HH‑MM‑SS, instead of the Unix epoch time format. Fields used for selecting a date display a calendar control.
- Numeric — Attribute values are treated as numeric values.
-
In the Assign attribute value in order of existence section, click +.
-
Select which attributes are to be used as a value for the new attribute, if they exist on an object. The rule will check the attributes one by one in the exact order listed in this section. The first attribute on the list will be checked for existence and if it exists on an object, its value is assigned to the new attribute. If the first attribute does not exist, the existence of the second attribute on the list is checked until an attribute is found or the end of list is reached.
-
Click Test to test the rule, and review the results. The test is performed on the attributes of a pending model; if a pending model is not present, the test is performed on the attributes of the latest published model.
-
Click Save.
Results
Publishing the 3D model applies the attribute transformations to objects.
Script attributes
In the Attribute Settings view, the Script Attributes section allows you to create a C# language script that mass-modifies object attributes when the 3D model is published. The script is applied to original object attributes in the model as well as to derived attributes generated by eShare. You can use the script to automatically perform any of the following tasks:
- Create new attributes
- Change attribute values
- Remove attributes
When writing the script, you can use all the features of the .NET namespaces System, System.Linq, and System.Globalization. The script is executed once per object, and the attributes of the object are available in code in a structure called attributes.
The script editor provides basic syntax highlighting and code completion, and it allows you to check whether your script can be compiled. You can get sample results from running the script on the objects of the 3D model, but actual changes to model objects will not be made until the 3D model is published, either manually or by Plant Modeller.
Using a script for attribute transformations
Perform the following to modify the attributes of objects in the 3D model via a script.
Prerequisites
- You are familiar with the C# programming language and its conventions. See Information for script writers.
Do the following:
-
Navigate to the project to edit, and then click Project Admin in the main menu. The project administration view opens.
-
Click Model Configuration. The model configuration view opens.
-
Click Attribute Settings. The Attribute Settings view opens.
-
In the Script Attributes section, click Add script. The script editor is displayed.
Note: AI support can be configured by system administrator to assist in creating a script. When AI support is enabled, Ask AI button is shown. See AI assistant.
-
If your script code will introduce completely new attributes, you have to define them first, otherwise they will not show up in the results.
Click Add Definition, enter the attribute abbreviation and display name, and select whether it is a normal attribute or a group-defining attribute.
-
Write the script code in the script editor.
-
Click Compile to check that your script is syntactically correct. Runtime errors might occur even if the script can be compiled. Any errors that occurred are listed on-screen.
-
Click Test. This compiles the script and then starts testing the attribute transformations on the objects of the 3D model. All other attribute transformations are applied first, before the script is run on a given object. Objects are processed in this way until one of the following criteria is met:
-
5 objects have been modified (if possible) and 5 objects remain unchanged by the transformations.
-
Script has encountered 200 errors.
- There are no more objects in the model.
The results of the test are shown below the script editor.
 Show Details
For modified objects the test results table displays four columns:
Abbreviation
Attribute's abbreviation
Display Name
Attribute's display name
Input
Existing attribute value
Output
New attribute value
Each row of the results table represents a single attribute of the object. The table is arranged so that first it lists attributes that have an input value but no output value, and then attributes that have both input and output values. Finally, it lists attributes that only have an output value.
Key attributes are marked with a key icon
 . If the script modifies an existing attribute value, a conflict icon
  is displayed in the Input column.
For unmodified objects (non-matching results) the test results table is otherwise similar, but the Output column and the conflict icon are not shown.
-
- Click Save.
Results
If the saved script can be compiled, whenever the 3D model is published the attribute transformations are applied to the applicable objects.
If the script encounters an error when processing an object, then that object will remain unchanged. The first error is written to the eShare log as an ERROR, and all additional errors are written to the log as TRACE level entries. A large number of errors can cause the publishing to take a long time.
If the script cannot be compiled, it is not applied to the 3D model at all.
Using a script for setting a GUID Id manually
You can set the GUID Id for an object manually using an attribute script — either directly or based on object attributes. It is also possible to read the original GUID from attributes.GuidId.
By default, new GUID Ids are generated in every publish. Using a script to set a GUID Id manually provides a way to generate a unique, persistent GUID Id from the object's attributes, which means it will stay the same from one publish to the next. Administrator needs to configure which attributes are used to generate the GUID Ids.
Example:
Generate a custom GUID Id for the object based on its attributes "vpo", ".n5", and "pli":
attributes.SetGeneratedGuidId(attributes["vpo"], attributes[".n5"], attributes["pli"]);
Set the GUID Id manually for the object with vpo 123:
if (attributes["vpo"] == "123") {
attributes.SetGuidId("cdb75546-4578-4b35-99af-988dd06d8987");
}
If you generate duplicate GUID Ids by accident (eg. two objects with the same attributes), publish will generate warnings in the publish log, and a new GUID Id will be generated for the duplicate object. The publish log persists between server restarts and is not cleared until the next republish.
Information for script writers
In CADMATIC eShare, you can use the C# programming language to create a script that performs attribute transformations. We recommend that you review the following information before writing attribute transformation scripts.
Language Conventions
C# uses the same conventions as other C-derived programming languages such as C++, Java and JavaScript, as described below.
-
// marks the beginning of a comment line. Example:
// this line does nothing
-
Strings are placed inside quotation marks "". Example:
"Equipment", "Air Conditioning"
-
Strings can be combined with the plus character +. Example:
attributes["type"] = "Lower" + "Right";
-
Statement lines end with the semicolon character ;. Example:
attributes["type"] = "Valve";
-
== is equality, != is inequality, = is assignment
-
Conditions are placed inside parenthesis ( ). Example:
if (attributes["sys"] == "Equipment")
-
After a condition, a block of statements is inside curly brackets { }. Example:
if(attributes["sys"] == "Equipment")
{ attributes["type"] = "Equipment"; }-
You can continue an if block with else.
-
In conditions, && is and, || is or, ! is not. Example:
if(attributes["sys"] == "Equipment" && attributes[".n5"] == "Air Conditioning") { attributes["type"] = "AC"; } else { attributes["type"] = "Other"; }
-
A variable can be defined using the data type: string, int, float, bool. Example:
string area;
area = "Store";
int count;
count = 5; -
A variable can be defined automatically using var, if the data type is defined by the assignment. Example:
var count = 5;
var system = attributes["sys"]; - An undefined value is called "null".
-
Attribute existence
You can check whether an object has a given attribute by testing if its value is null. If you try to compare an attribute that does not exist, you will get an error. The following example tests whether the pli attribute exists:
if(attributes["pli"] != null && attributes["pli"] == "123"){
attributes["chk"] = "Do check";
}
Key attribute
The key attribute of an object is defined by attributes.Key. It holds the abbreviation of the key attribute of the object. If attributes.Key is null, then a key attribute is not defined.
Example:
attributes.Key = ".n5";
Example:
attributes.Key = null;
Example:
if(attributes.Key == ".n5"){
attributes["type"] = "Equipment";
}
Numeric values
All attribute values are strings. If you want to perform mathematical operations on attribute values, you have to convert them to either integers or decimal values. The script is run using the InvariantCulture property of .NET by default, which might affect how for example decimal separators are parsed.
Example:
if(attributes["fii"] != null){
float fii;
if(float.TryParse(attributes["fii"], out fii)){
var fii2 = fii * 2;
attributes["fii"] = fii2.ToString();
}
}
Example:
if(attributes["CGX"] != null){
int xCenter;
if(int.TryParse(attributes["CGX"], out xCenter)){
if(xCenter > 0){
attributes["side"] = "Right";
} else {
attributes["side"] = "Left";
}
}
}
Attribute removal
You can remove an attribute from an object by setting the attribute value to null. Example:
attributes["MAS"] = null;
Iterating attributes
All the attributes of an object can be iterated. When iterating, the attributes are represented as pairs of an abbreviation (.Key) and a value (.Value).
You can convert all attributes with a given value, even if the abbreviation is not known.
Example:
foreach(var attribute in attributes.Where(a => a.Value == "1/2").ToList())
{ attributes[attribute.Key] = "0.5"; }
You can remove all attributes with a given value, even if the abbreviation is not known.
Example:
foreach(var attribute in attributes.Where(a => a.Value == "Undefined").ToList())
{ attributes[attribute.Key] = null; }
You can check if an object has a known attribute value, even if you do not know the abbreviation beforehand.
Example:
if(attributes.Any(a => a.Value == "Tag1"))
{ attributes["id"] = "Tag 1"; }
You can check if an object has an abbreviation with a known beginning.
Example:
if(attributes.Any(a => a.Key.StartsWith(".")))
{ attributes["dot"] = "True"; }
Exporting and importing attribute settings
You can export and import attribute settings in text format. You can use this to copy settings from one project to another.
Do the following:
-
Navigate to the project to edit, and then click Project Admin in the main menu. The project administration view opens.
-
Click Model Configuration. The model configuration view opens.
-
Click Attribute Settings. The Attribute Settings view opens.
-
To export settings, click Export All, and then copy the settings from the Export Attribute Settings text box.
-
To import settings, click Import, paste the required settings into the Import Attribute Settings text box, and then click Import.
About .NET regular expressions
Regular expressions are a way to define a pattern that is used to search for text strings that match the pattern. They also allow you to extract parts of the text for re-use. There are several varieties of regular expressions; CADMATIC eShare uses the regular expressions of .NET Framework, and you can read more about them for example from the following resources:
- http://msdn.microsoft.com/en-us/library/az24scfc(v=vs.110).aspx
- http://www.regular-expressions.info/dotnet.html
Example 1 — Extracting three attributes from a single source attribute value.
(?<Sequence>[0-9]*)-(?<Spec>[A-Za-z0-9]*)-(?<Size>[A-Za-z0-9]*)
This pattern can be matched to an attribute value that is comprised of three parts separated by dashes (-). The pattern expects the first part to consist of numbers between 0 and 9, and the second and third part to consist of numbers or letters (considering both upper-case and lower-case letters).
For example, if the input attribute value is "102-ER-10", the pattern would extract the following attributes and attribute values:
| Attribute | Value |
|
Sequence |
102 |
|
Spec |
ER |
|
Size |
10 |
Note that the pattern requires all three parts to be present. If the input attribute value is "102-ER", the pattern does not generate any new attributes.
Example 2 — Stripping trailing letters from an attribute value.
(?<NewLength>.*)[A-Za-z]*$
This pattern can be used to drop letters from the end of a source attribute value.
For example, if the input attribute value is "123.45in", the pattern would generate the new attribute NewLength with a value of "123.45".