Maps
A model's map represents the layout of the 3D model. eShare displays the map in the 3D model viewer. If the map is not part of the 3D model, a system administrator can import one or more maps to the model. The map can be a DWG, DXF, DGN, JPG, JPEG, PNG, TIF, TIFF, GIF, BMP, or PDF file.
After you have imported the map, define the map settings. You can define if the map should be used for only a specified range of points in the model or for the whole model, and if needed, change the map's name. The map's name can be up to 40 characters long.
If you set a specific range, the map will only show point clouds, Smart Points and Markups that are within that range.
After you have uploaded the maps, you can rearrange them by dragging in the administrator's Map view.
Prerequisites
Make sure that the map file uses the same coordinates as the 3D model. If the coordinates are different, the map and the model are not synchronized.
Plan the range of points that the map should use. You can check the coordinates from the Model view. To view the coordinates, select Visualization Control from the main toolbar and then Show Coordinate Display. See Visualization control.
Do the following:
-
Navigate to the project to edit, and then click Project Admin in the main toolbar. The project administration view opens.
-
Click Maps. The Map Configuration view opens.
-
In the Map Configuration view, click Upload Map.
-
Select the map file from your computer's file system and click Open. You can select multiple map files at once with Ctrl or Shift key. eShare loads the map.
-
Edit the map properties. In the Map Configuration view, click on the name of the map, or
 button in Actions column and select Edit. The Edit Map view opens.
-
Change the name of the map, if needed. By default, eShare uses the file name of the map.
-
Define if the map should show points from a specified range or for the whole model.
-
If the map should show points only for a specified range, define the start Z value in the Z-Value From and the end Z value in the Z-Value To fields. If the model uses named coordinates, eShare automatically displays them in a drop-down menu. Select the coordinates that you need, or enter the coordinates as a number. You can select the used coordinate system from the drop-down menu.
-
If the map should show points for the whole model, define the camera level in the Camera Level field. The camera level is the Z level where the user is taken in the model when they double click on the map.
If the model uses named coordinates, eShare automatically displays them in a drop-down menu. Select the coordinate that you want to use, or enter the coordinate as a number. You can select the used coordinate system from the drop-down menu.
-
-
Define the alignment with the model.
-
Select Direct Match if the map coordinates match the model directly.
-
Select Set Manually if the coordinates do not match and they need to be manually aligned. If the map file is an image (JPG, JPEG, PNG, TIF, TIFF, GIF or BMP file) or a PDF file, only Set Manually can be selected.
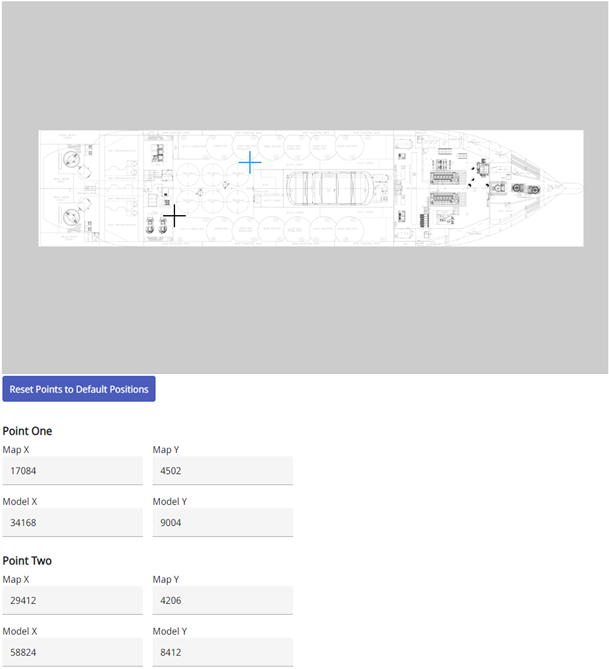
Select two points from the map in the map viewer. Select points that can be easily found in the model. The Map X and Map Y coordinates will be updated according to the location of the points in the map. You can also specify the points in the Map X and Map Y fields for Point One and Point Two. The values must be different from each other.
After the points are set, specify the coordinates of the points to Model X and Model Y fields for Point One and Point Two. This will determine the locations the points correspond to in the model. After the points are determined, eShare will scale the map accordingly.
To reset the point values back to default values, click Reset Points to Default Positions.
-
-
Click Save to save the map properties.
-
To remove a map, click
button in Actions column and select Delete.The Remove map dialog opens. Click Confirm to delete the map from the eShare server.
Managing the visibility of a map to user groups
A system administrator can configure in the map properties which user groups are allowed to view a map.
Do the following:
-
Navigate to the project to edit, and then click Admin in the main menu. The project administration view opens.
-
Click Maps. The Map Configuration view opens.
-
Click on the name of the map, or click
button in Actions column and select Editfor the map you want to manage. The Edit map view opens. -
To add new user groups, select Add, select user groups in the Add user groups dialog, then select Add. To delete user groups, select Delete button
 for the user group.
-
Click Save to save the map properties.
Replacing an existing map
An existing map in the configuration can be replaced with a new map file. The following file types can be uploaded as a map: DWG, DXF, DGN, JPG, JPEG, PNG, TIF, TIFF, GIF, BMP, and PDF.
Do the following:
-
Navigate to the project to edit, and then click Project Admin in the main menu. The project administration view opens.
-
Click Map. The Map Configuration view opens.
-
Click on the name of the map, or
button in Actions column and select Edit. -
Click Change Map File.
-
Select the map file from your computer's files system and click Open. A confirmation dialog opens. Click Change to replace the existing map with the new map. eShare loads the map.