REST API adapter
A REST API adapter provides access to services that provide a REST API. After you have successfully configured the REST API adapter, eShare displays the document tree, document list, and document metadata provided by the target service.
The REST API adapter gets information from REST APIs that provide JSON data, and supports different authentication schemes.
Configuring a REST API adapter requires expert-level IT skills, programming experience, and solid experience in eShare administration. To be able to configure a REST API adapter, you need to be familiar with the REST API concept, the principles how REST APIs work, and JSON. You also need to understand the service for which you are configuring the adapter, and be familiar with configuring data sources in eShare.
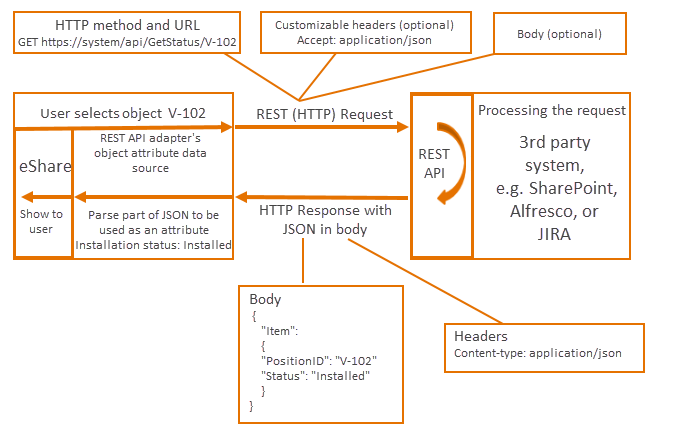
The REST API adapter works as follows:
- The user selects an object that is linked to an external service that supports the REST API.
- eShare sends the request to the external service. The request contains the HTTP method and URL, and if required, customized headers and a body.
- The external service processes the request.
- The external service sends eShare an HTTP response. The response contains a header and a body.
- eShare parses the response.
- eShare shows the response to the user.
eShare's REST API adapter allows you to test the configuration while you create it.
To configure a REST API adapter:
-
Create the REST API adapter.
-
Add the data source. A REST API adapter must have one or more data sources. The data source type depends on the needs of the project.
-
Test the configuration.
Prerequisites
Familiarize yourself with the target system and its REST API documentation. When you configure the REST API adapter, you need to enter information from the target system. This information is system-specific and project-specific, therefore this documentation cannot provide specific guidelines.
Creating a REST API adapter
Do the following:
-
Navigate to the project to edit, and then click Project Admin in the main menu. The project administration view opens.
-
Click Adapters and Data Sources. The Adapters and Data Sources configuration view opens.
-
Click Add.
-
In the Available Adapter Types section, select REST API Adapter, and then click Create adapter.
-
In the Adapter section, enter a name and description (optional) for the adapter, and specify whether the adapter should be enabled.
-
In the Adapter Configuration section, specify the following settings:
-
REST API base URL – Enter the URL of the system to which the REST API adapter should connect.
-
Authentication method – Define the authentication method for accessing the service.
-
None – The user can access the service without providing any credentials.
-
Basic – Define a custom username and password. You can define only one set of credentials, that is, the credentials are not user-specific but all users use the same username and password.
-
Windows – The user can access the service with his or her Windows credentials. If you use Windows authentication, define also if client impersonation is enabled or disabled. If you enable impersonation, the credentials are user-specific. If you disable impersonation, the system will use the Internet Information Services (IIS) identity. Note that not all systems support client impersonation.
-
Windows (custom) – Define a custom username and password that work in the domain. You can define only one set of credentials, that is, the credentials are not user-specific but all users use the same username and password.
-
-
Use Authentication Request – Authentication requests are needed for session-based services. If set to Enabled, select Auth Type.
-
If you select Generic, the request to be sent must be configured with the following settings:
 Show/hide details
- Request URL – The endpoint for authentication.
-
Custom Headers (optional) – If you want to add and define custom headers to be sent with the request, click Add Header. Enter the name and value for the header. Values from the model can be used.
-
HTTP request type – Select POST or GET.
-
Body Content Type – The default type is application/json.
-
Request Body – Enter the body of the request. Make sure it is in valid format to avoid failed requests.
Click Send Request to send the authentication request.
-
Authentication Response – Shows the status of the request, response headers and body.
-
Authentication Header(s) Passed for Data Sources (optional) – If you want to pass headers to be sent with Data Source requests, click Add Header and specify the following:
-
Header Text – Enter the name of the new header for the Data Source requests.
-
Append Data From – Define which part of the authentication request response is used as the value. Select Header, Body, Cookie, or None.
-
Input – Select the correct option from the drop-down list.
Click Add Header to add another header if needed.
-
-
If you select OAuth, the request to be sent must be configured with the following settings:
Show/hide details
-
In the Parameters for Access Code Request section, specify the following:
-
Authorization Endpoint – The endpoint for authorization.
-
Use Generated Parameter fields to define OAuth authorization code flow. Define which parameters are used in the Authorization request based on the target system. Select Add Parameter to add more parameters if needed.
-
Click Authorize eShare with OAuth to authorize eShare with a user account.
-
In the Parameters for Access/Token Refresh Request section, specify the following:
-
Token Endpoint – The endpoint for the request.
-
Use Generated Parameter fields to define OAuth authorization code flow. Define which parameters are used in the access token and refresh requests based on the target system. Select Add Parameter to add more parameters if needed.
-
-
-
-
-
Click Save.
Creating a REST API adapter data source
Add a data source to a REST API adapter to enable the adapter to retrieve specific type of data from the target system. You can define one or more data sources depending on the project needs.
Do the following:
-
Navigate to the project to edit, and then click Project Admin in the main menu. The project administration view opens.
-
Click Adapters and Data Sources. The Adapters and Data Sources configuration view opens.
-
On the Adapters list, click the REST API adapter to which to add the data source.
-
In the Data Sources section of the adapter settings, click Add data source.
-
In the Available Data Source Types section, select the data source type to use:
-
REST API Document Data Source – to retrieve documents from the external system.
-
REST API Categorization Data Source – to retrieve categorization data, for example, to categorize objects according to their construction status (purchased/delivered/installed) or risk level (low/medium/high). The categories have been defined and are maintained in the external system.
-
REST API Object Attributes Data Source – To display retrieved data in object attributes in the Model view.
-
-
Click Create data source, and specify the data source-specific settings.
-
Click Save.
Configuring REST API document data source
Configuring REST API categorization data source
Configuring REST API object attributes data source