Clip box tab
The Clip Box tab allows you to resize the visible area of the model so that you can easily review all the objects inside a specific block or compartment.
You can clip the model using the sides of the clip box parallel to the model's main planes (normal to main axis X, Y, and Z). If the boundaries of the clip box intersect with an object, you will not see those parts of the object that are outside the clip box.
You can store the currently visible clip box by creating a new scene. When you return to the scene, it shows the clip box. See Scene.
In Settings > Visualization you can select whether clipped objects should be visualized as solid or hollow—see Visualization.
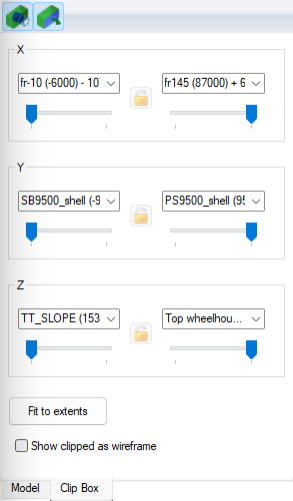
On the Clip Box tab you can perform the following.
-
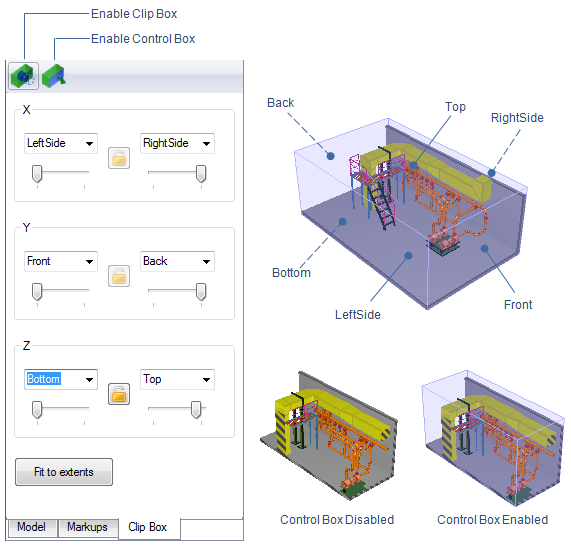
 – Click the Enable Clip Box button to enable or disable the clip box. When enabled, you only see the area defined by the clip box. When disabled, you see the complete model.
 -
 – When the clip box is enabled, click the Enable Control Box button to enable or disable the control box that allows you to resize the clip box by dragging the clipping planes in the 3D view.
 - X, Y, Z – Use the X, Y, Z settings to specify the size of the clip box. You can relocate a clipping plane in all three directions (normal to axis) in several ways, as described in Adjusting the size of the clip box. The distance between the planes in a given direction can be locked by clicking the lock button between the sliders, so that adjusting one slider automatically adjusts the other one as well.
- Fit to extents – Click the Fit to extents button to set the clip box to the size of the bounding box of the model.
- Show clipped as wireframe – When enabled, the objects outside the clip box will be shown as wireframe.
You should only enable the control box when you want to adjust the clipped view, because some other functions of the 3D view such as measuring might not be available or function as expected while the control box is enabled. See Adjusting the clip box with the control box.
In addition to defining the clip box on the Clip Box tab, you can enable the clip box as described in Other ways to set the clip box.
Adjusting the size of the clip box
There are a number of ways in which you can adjust the clip box by moving an individual clipping plane to a different location:
When the Enable Clip Box button is enabled, drag the appropriate slider on the Clip Box tab, as described in Adjusting the clip box with the control box.
When the Enable Control Box button is enabled, drag the appropriate clipping plane with the right mouse button pressed down, as described in Adjusting the clip box with the control box.
Select a predefined plane from a drop-down menu on the Clip Box tab.
Write the distance into the edit field using Cartesian coordinates or type the position using named planes. For example, CL –X 995 means that the clipping plane is 995 mm from the CL plane in –X direction (CL plane and –X direction are defined in Plant Modeller‘s coordinate reference).
Note: Named coordinates are supported only if the model has been published with Plant Modeller version 6.0 or newer.
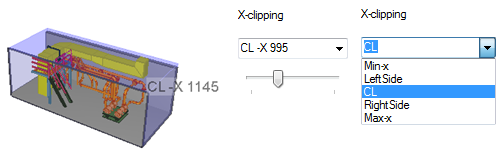
Note: Only the planes that are inside the model’s bounding box are shown in the drop-down menus.
Adjusting the clip box with the control box
The Control Box function visualizes the clipping planes in the 3D view. Move the cursor in the 3D view to highlight the clipping plane that you want to adjust, and then press down the right mouse button and drag the highlighted side of the box to adjust its location. When sides are dragged, they snap to named planes exported from Plant Modeller’s coordinate system (if present).
Other ways to set the clip box
- Enabling clip box from the model tree
- Enabling clip box from the 3D view
- Enabling clip box in examine mode
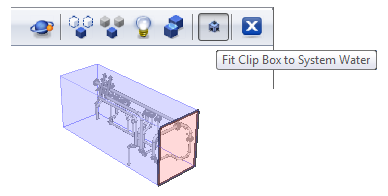
Enabling clip box from the model tree
On the Model tab, you can right-click an entity in the model tree and select to fit the clip box to the specified object or object hierarchy such as pipeline, system, or cable tray. The sidebar automatically switches to the Clip Box tab.
In the picture below, the clip box is fitted to pipeline Water-01 and all other objects are hidden so that the 3D view only shows the pipeline.
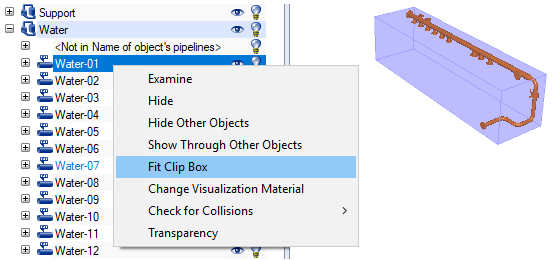
Use the Clip Box tab to disable the clip box.
Enabling clip box from the 3D view
In the 3D view, you can right-click an object and select to fit the clip box to it.
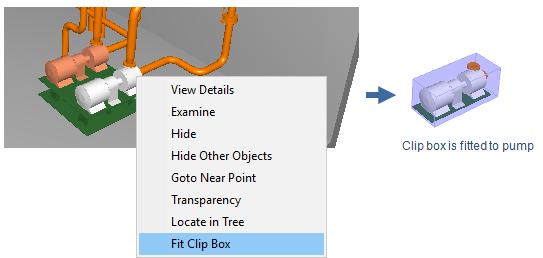
Use the Clip Box tab to disable the clip box.
Enabling clip box in examine mode
When you are examining an object, you can click the fit button of the Examine toolbar to fit the clip box to the examined object.
Click the fit button again to remove the clip box.