Smart Point and markup types
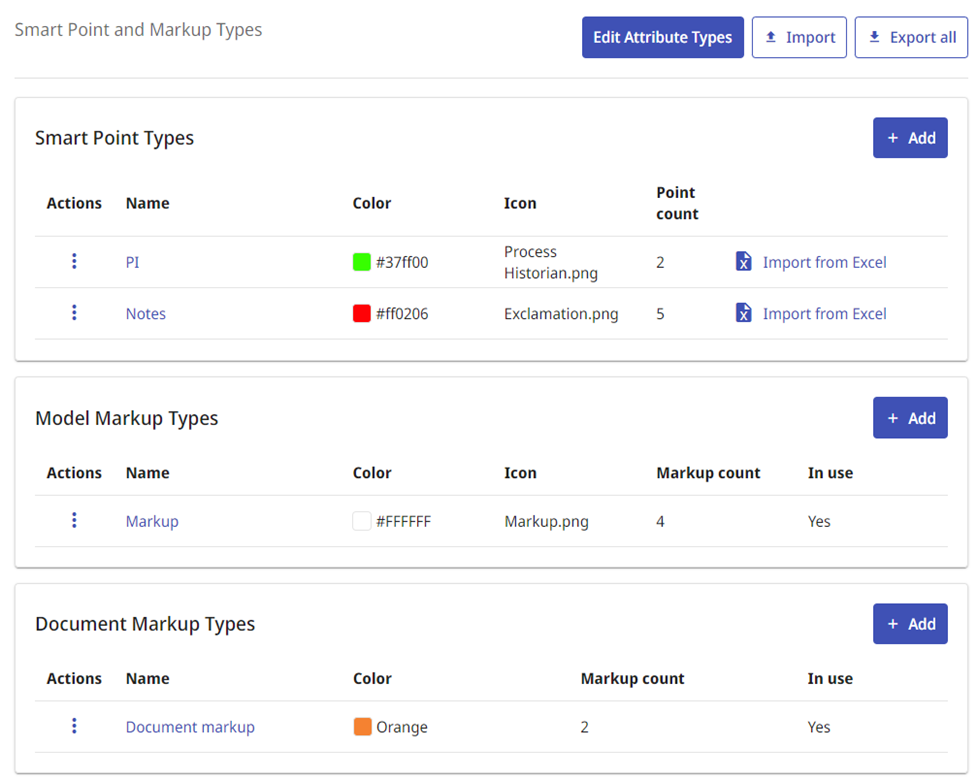
In the Smart Point and Markup Types administration view, project administrator can configure Smart Point and Markup Attribute Types, Smart Point Types, Model Markup Types, and Document Markup Types.
- Smart Point and Markup Attribute Type configuration defines custom attributes that can be used in Smart Point Types, Model Markup Types, and Document Markup Types.
- Smart Point Type configuration defines what kind of Smart Points the users can add to the 3D model.
- Model Markup Type configuration defines what kind of Model Markups the users can add to the 3D model.
- Document Markup Type configuration defines what kind of Document Markups the users can add to the documents.
Exporting and importing the Smart Point and markup type configuration
You can export and import the entire Smart Point and Markup Types configuration (Attribute Types, Smart Point Types, Model Markup Types, Document Markup Types) in text format. You can use this to copy the settings from one project to another.
Do the following:
-
Navigate to the project to edit, and then click Project Admin in the main menu. The project administration view opens.
-
Click Smart Point and Markup Types. The Smart Point and Markup Types configuration view opens.
-
To export the settings, do the following:
- Click Export All. The Export Smart Point and Markup Types text box displays the configuration in text format.
- Copy the contents of the text box to the clipboard. You can save the copied settings in a text file if needed.
-
To import the settings, do the following:
- Click Import. The Import Smart Point and Markup Types text box is displayed.
- Paste the settings to import into the text box.
-
Import default markup properties? – Select whether to import the properties of the default Markup Type (User Groups, Model Position, Assignee).
- Yes – Import the properties of the default Markup Type.
- No – Keep the current properties of the default Markup Type.
- Click Import.
Importing Smart Points from Excel
You can import Smart Points directly from an Excel file to the project.
Prerequisites
-
You have created the correct Smart Point Type. See Creating a Smart Point type
Do the following:
-
Navigate to the project to edit, and then click Project Admin in the main menu. The project administration view opens.
-
Click Smart Point and Markup Types. The Smart Point and Markup Types configuration view opens.
-
Click Import from Excel on the row of the correct Smart Point Type.
-
In the Import Smart Points from Excel pane, click Upload Excel file.
-
Select the file from your computer's file system and click Open.
-
In Excel File Configuration, specify the following settings:
-
Worksheet name – Specify which worksheet to use, if there are multiple worksheets. The default is to use the first worksheet.
-
First table row number – Specify the first table row to be included in the import.
-
Number of end data rows to skip – Specify the number of title rows to be skipped.
-
Has header row – If you select Yes, a header row is not automatically added to the import.
-
-
Click Reload and preview file with these settings. The preview shows the first 5 rows of the Excel file implementing the specified settings.
The total number of rows is shown under the preview.
-
In Smart Point Details, specify the following settings:
-
Smart Point Type – Select the correct Smart Point Type.
-
Name column – Specify the column with the name of the Smart Point.
-
External Id column – Specify the column with the External Id of the Smart Point. Only visible, if the Smart Point Type has an external Id configured.
-
Overwrite Existing Identical Points – If you select Yes, existing identical points will be overwritten. If you select No, the existing identical points will not be overwritten.
-
Attributes – Specify the Smart Point attributes. Only visible, if the Smart Point has attributes.
-
-
In Coordinates, specify the following coordinate data.
Note: The imported coordinate data should be in Project coordinates format.
-
X coordinate column – Specify the column containing the X coordinate value.
-
Y coordinate column – Specify the column containing the Y coordinate value.
-
Z coordinate column – Specify the column containing the Z coordinate value.
-
Coordinate Scaling Factor – Specify the scaling factor for the coordinates, if for example feet or meters are used.
-
-
Click Test these settings to test the configuration. The test results, the first 20 Smart Points are shown. The number of encountered errors are shown at the bottom.
-
Click Import.