WBD Shop Manager
Tools > Logistics Manager > WBD Shop Manager
With this function it is possible to automatically generate a Work BreakDown structure which:
-
Uses the WBD branch naming according to the yard's naming conventions, enabling a more product sequence oriented branch naming.
-
Contains branch and part information relevant to the specific production workflow of the yard, telling where each branch or part should be located on the shop floor when the parts are assembled together, for example information like the total weight and width of the branch.
WBD Shop Manager can update logistical data based on the WBD structure. For example, for each branch you can specify which logistical database fields to fill in for all the parts in this branch, and what kind of values these logistical fields should get.
Such WBD structure ensures that parts are placed at the correct preparation and assembly locations in the shop floor environment, and that each part and assembly goes along the correct production path in the correct order.
WBD 3D Shop Manager can also generate reference points for each WBD branch if so desired, to be used in WBD 3D sketches. The generated reference points can later be edited with the Reference Points function.
Once configured, WBD Shop Manager collects the desired logistical information for the parts in each WBD branch using scripts, and can use rules to modify any logistical information as desired. A user-defined report must be created that defines the logistical fields for which information is taken from the logistical database, per WBD branch.
Note: Which information should be collected and how it should be presented in the WBD tree depends on the production workflow and the tooling used at the yard, and cannot therefore be specified here in detail. WBD Shop Manager must always be configured for a specific production environment before using it by doing some preparations. The preparations are described below on a general level only.
The function generates Work BreakDown models which are shown in the graphical window. The models can be viewed in isometric and top views. Click on the model name in the WBD Shop Manager dialog to toggle between isometric and top views. The models can be also be rotated.
Preparations for the WBD Shop Manager
The following preparations are required before using WBD Shop Manager. The details depend on the production process.
-
Make sure the all the necessary parts have been assigned to the branches in the WBD structure.
-
Create a script named update_tree_info.cmd in the logistics subfolder of the project's norms folder. With this script you define the logistical database fields that should be filled in per branch, and the data to be filled into those fields. Also the sketch reference point generation is set up here if needed. Four labels must be included in the script: main, init, info and execute. A knowledge of the HullGUI script language is required to create the script.
-
Create a report layout for the report that the update_tree_info.cmd script uses as input when filling in the information into the WBD branches. This can be done in System Management > Production > Reports > Report Layout. The report defines the logistical fields for which information is taken from the logistical database, per WBD branch. When WBD Shop Manager is run, the system will fill the logistical information into the branches of the WBD structure.
Note the following:
-
The report must be named workshopprocess.
-
Comma (,) must be used as the separator character.
-
Space characters cannot be used in the report rows. For example, instead of HP 180x10, use HP180x10.
-
-
Create a logistical data menu named workshopprocess in System Management > Logistics > Logistical Data Menu. Include the logistical data that you want be shown in the WBD Shop Manager dialog under Information of the branch. A maximum of 20 logistical fields can be included.
Running the WBD Shop Manager
Do the following:
-
Select Production > Tools > WBD Shop Manager in the 3D-Contek application. The WBD Shop Manager dialog opens.
-
Select the parts to process in Selection criterion. Typically you would select all the parts in the block.
-
Select the WBD level from which to generate the data in Level to generate the branch data. By default data is generated only from this level, and not from the lower levels. Select a level in Create up to and incl. branch to generate data also from the lower levels.
-
To set the processing direction from top to down, select a higher level branch in Level to generate the branch data, and a lower level branch in Create up to and incl. branch.
-
To set the processing direction from bottom to up, select a lower level branch in Level to generate the branch data and a higher level branch in Create up to and incl. branch.
-
-
If so desired, you can rotate the models. When you set rotation for a model, the system rotates the model when it creates it, not immediately. Note that rotating the models in the branch affects the box values of the branch.
-
Rotation (Y180) – Enter the amount of rotation in degrees. If the axis (X,Y,Z) is not defined, the system assumes Y axis.
-
Rotate – Enter the amount of additional rotation in degrees with which the first rotation is amended. If the axis (X,Y,Z) is not defined, the system assumes Y axis.
-
after item name – Enter the name of the step in the WBD tree below which the rotation should be applied in the Work BreakDown models. Part numbers are not accepted. All models for the WBD steps after the entered WBD step are rotated.
-
-
In Weld presentation, select which weld lines to include in the WBD models:
-
None – Welds are not shown in the models.
-
Based on Manager – Welds are shown based on Weld Manager data.
-
In branch – All welds needed in the current WBD branch are shown.
-
All weld lines – All welds of all parts are shown, even welds in other WBD branches than the current one.
-
-
In Model, you can enter the desired file name, including the extension .log, for the Work BreakDown models. This is optional.
-
Click OK to populate the WBD structure with information and generate the Work BreakDown models.
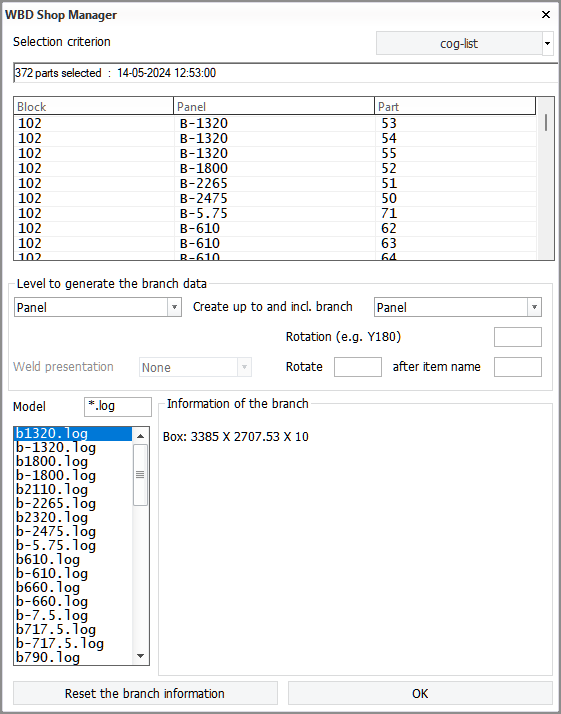
When you select a Work BreakDown model from the list, the model is shown in the graphical window. Click on the model name in the WBD Shop Manager dialog to toggle between isometric and top views.
Logistical information defined in the workshopprocess logistical menu is shown under Information of the branch. The box size of the selected branch is always shown (Length x Width x Hight). Note that rotating the models in the branch affects the box values of the branch.
Reset the branch information removes all generated data. We recommend using this option once you have defined everything, to prevent inflating the content of the block folders.