Excel
With this function you can import Excel files to drawings.
Excel file setup
To enable the Import Excel function, Microsoft Excel needs to be installed on the same workstation. Typically Excel adds a record to Windows ODBC interface which the Import Excel function uses. If the 32-bit and 64-bit ODBC Data Sources are not installed on your workstation, you will get an 'Excel is not installed' error.

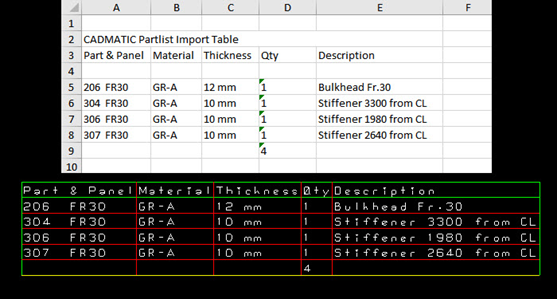
The table in Excel must have a predefined text property. Each column with this property will be shown in the imported table even if no information is present in the column. However, only rows with information will be visible after import or change.
Note: To avoid errors during the import, make sure that the Excel sheet does not contain hidden columns/rows or merged cells.
-
The first (not empty) row of the excel file will not be imported, it is the comment row.
-
The next (not empty) rows until an empty row are used for the header definition.
-
All information after the empty row is the table information.
-
Columns and rows with text property will be shown in the imported table even if no information is present.
Importing Excel files
You can either import the Excel sheet directly into the sheet drawing or you can import and save the Excel sheet as a normal drawing.
The following procedure describes how to insert an Excel sheet into a drawing.
Do the following:
-
Open the drawing in which you want to insert the table.
-
Then go to Hull > Import > Excel and open the Import Excel Table dialog.
-
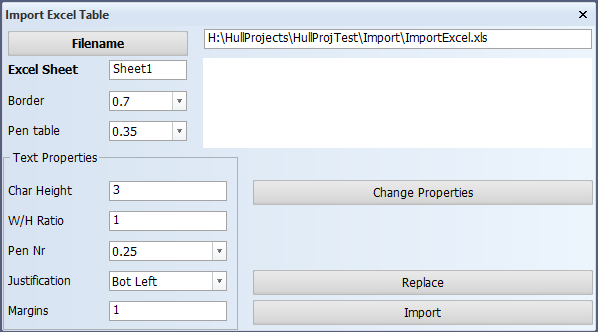
Define the path of Excel file location in the topmost input field. You can also use the Filename button to browse to the location of the .xls file.
After the file selection, the complete path will be shown in the Filename input field.
Tip: The selected Excel file can be opened for viewing by pressing the Enter key in the Filename input field.
-
Insert the name for the Excel sheet to be imported in the Excel Sheet field, for example 'Sheet1', and press either the Enter or Tab key.
The Import button becomes available.
You can also change the properties of the table, for example, the W/H ratio, border, character height, or justification, before importing the Excel file.
-
Click Import to start the import.
The table is attached to the mouse arrow, so you can drag the table to the desired position.
-
Save the drawing.
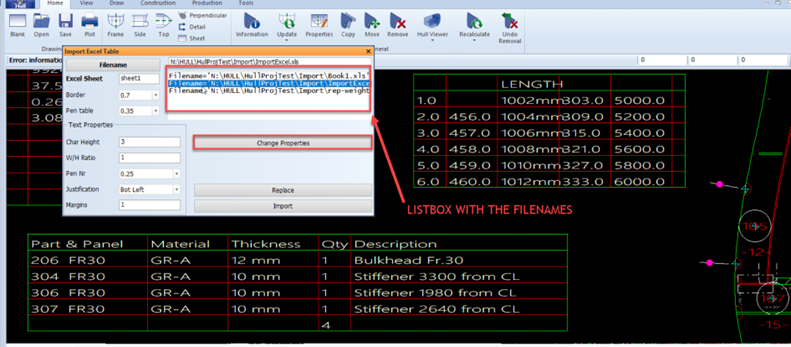
It is possible to import multiple Excel files to the same drawing. You can also import multiple instances of the same Excel file to the drawing.
-
For changing the properties of the table, open the correct table.
-
Select the table from the list. The list shows the present tables in the drawing. The selected file is highlighted.
-
Then click the Change Properties button to change the properties of the table.
You can preview the changes using the Show preview button.

The border pen definition is the pen color for the outer contour of the table and the header. The table pen definition is the pen color for each row and column.
-
-
Click OK + Replace and save the drawing when everything is ready.
Tip: The Excel file in the table can be updated by using the Replace function in the Import Excel Table dialog.
When updating a table, you have to select the file name of the table that needs to be changed and then click the Replace button. The table will have the same properties as before, but the information in it will be updated.
If there are two instances of the same table in the drawing when you replace the table, you will get a pop-up message asking you to select the table in which you want to change the information. The information will be replaced only in the selected table.
