Installing the license server
CADMATIC License Server can be installed as part of a complete CADMATIC Marine installation, or by using a stand-alone license server installer.
In a single-seat installation of CADMATIC Marine (on a laptop, for example), the license server and the licensed software products are installed on the same computer.
In a multi-user environment, the license server is installed on a computer that is accessible to every computer that will be requesting licenses from the license server. This should be a computer that is dedicated to server use, so that the computer is always up and running.
Prerequisites
-
Computer to be used as the license server computer. This can also be a virtual computer. You can find the system requirements in docs.cadmatic.com/systemrequirements.
-
Internet connection using HTTPS protocol for connecting to Cadmatic's Product Services.
-
Free, unblocked TCP/IP ports for serving license requests (default is 2999) and using the web interface (default is 2998).
-
You have received an activation key from Cadmatic.
-
You have a user account for
Do the following:
-
If you do not have the installer yet, do the following:
-
-
Locate and download the
Note: You can download any installer to manage licenses for eBrowser or eShare.
-
-
Launch the installer. To avoid permission issues that might be difficult to troubleshoot, we recommend that you run the setup file as an administrator.
-
If you are using the complete CADMATIC Marine installer, select Outfitting installation or Hull installation, and then select License server from the list of applications.
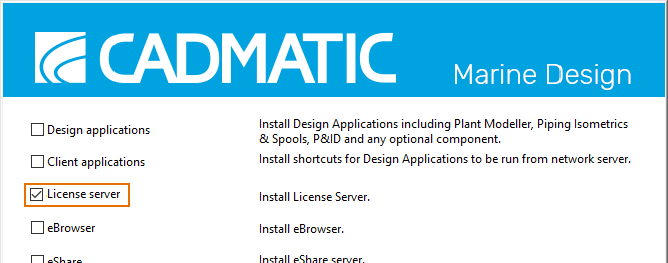
Then click Next.
-
Accept the license agreement and click Next.
-
Select the installation folder and click Next.
-
In the license server installation option, select the activation key option, and then click OK.
Note: Select License file (.cry) option ONLY if you have not been provided with an activation key (format xxxxx-xxxxx-xxxxx-xxxxx) and you have a valid .cry license file. See
-
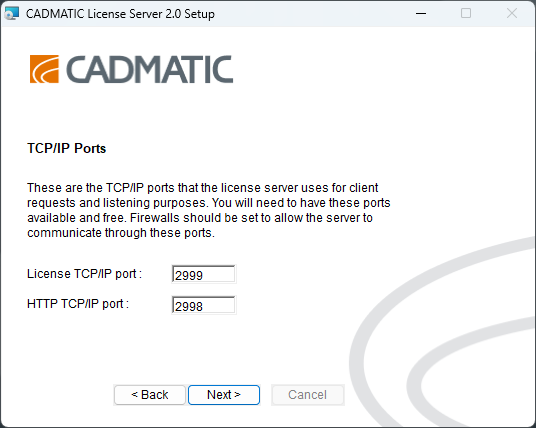
On the TCP/IP Ports page, specify the ports to use, and then click Next.
-
License TCP/IP port – Specify the port to use for serving license requests. The default port is 2999.
Important: CADMATIC Hull always uses the default port. Do not change the default port.
-
HTTP TCP/IP port – Specify the port to use for the web interface of the license server. The default port is 2998.
-
-
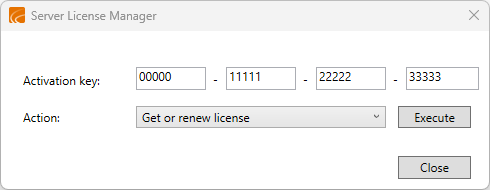
Server License Manager dialog opens. Select the user interface language for Server License Manager application for this session, and then click Select.
-
In the Server License Manager dialog, enter the activation key.
-
Select Get or renew license from the Action drop-down menu, and then click Execute.
-
Select the server license pool, if there are multiple, and then click Continue.
-
Server License Manager prompts that the license file was obtained from the server, all services have restarted and CADMATIC License Server is ready to be used.
-
Click Finish to exit the installer.
Results
The license server runs as a Windows service with the display name CADMATIC License Server 2.0 and service name dm_nlc_service2. The service starts automatically when the computer is restarted.
You can manage the license server as described in Managing licenses.
In case of problems, see Troubleshooting.