Page
On the Home tab of the document editor, the Page group contains the following tools.
Note: The buttons New and Delete are not available when editing a piping isometric because they are always one-page documents.
Change Page

On the Home tab, in the Page group, you can switch to a different page in the open document as follows:
-
Click
 to go to the previous page. On the first page this button opens the last page.
 -
Click
 to go to the next page. On the last page this button opens the first page.
 -
Click
 and then in the Select Page dialog either type the page number of the target page or click First Page, Before Active, After Active or Last Page.
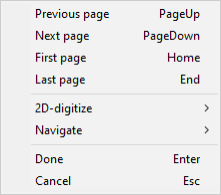
On all tabs, you can switch to a different page with these context-menu commands:

Zoom Area

You can zoom to a specific area on the active page by defining a rectangle with two corner points.
Do the following:
-
On the Home tab, in the Page group, click Zoom Area.
-
Define the area that you want to see closer: first pick one corner point and then the diagonally opposite corner point.
The page zooms to the specified area.
Zoom Extents

You can restore the default zoom level of the active page.
Do the following:
-
On the Home tab, in the Page group, click Zoom Extents.
The page zooms to the extents of the page.
New

You can add new pages to the open document.
Do the following:
-
On the Home tab, in the Page group, click New. The Define New Page dialog opens.
-
Page Number displays the total number of pages in the open document.
Specify the location of the new page:
-
To add the new page to the beginning of the document, click First Page or type "1".
-
To add the new page to the end of the document, click Last Page or type the next available page number.
-
To add the new page before or after the active page, click Before Active or After Active, respectively.
-
To add the new page to any specific location, type the intended page number.
Tip: You can change the location later in Settings.
-
-
Sheet displays the drawing sheet that the new page is to use. Click Select if you want to change the sheet.
-
Click OK.
-
If the drawing sheet has fields that need to be filled in, the Edit Fields of Sheet dialog opens. Enter the required page-specific values and click OK.
-
Press Enter if you want to add another new page.
Settings

You can change the drawing sheet of the active page or move the page to a different location.
Do the following:
-
On the Home tab, in the Page group, click Settings. The Page Settings dialog opens.
-
Sheet format displays the name of the drawing sheet that the active page is using. If you want to change the sheet, click Change and select the new sheet.
-
Page position displays the current location (page number) of the active page within the document. If you want to move the page to a different location, do one of the following:
-
Type the new page number.
-
Move the page one page at a time by clicking Move Back or Move Forward.
-
-
Click OK.
-
If you moved the page but fields on the drawing sheet still display the old page number, update the fields with the Edit fields of sheet tool. (The program does not update fields that the user has edited.)
Delete

You can remove the active page from the document.
Do the following:
-
Click Delete. A dialog opens for confirming the action.
-
Click Yes. The page is deleted.


