Change Orientation

You can use the Change Orientation tool to rotate a Standard Component or to change its orientation. If you change the orientation, the program tries to re-connect the nodes to the neighboring parts by adding, replacing or removing flanges and by adjusting the length of straight piping parts, as necessary. Doing the changes requires that the neighboring parts are checked out to you.
If changing the orientation of a Standard Component that has a hole request, the tool also tries to update the location of the hole request.
Do the following:
-
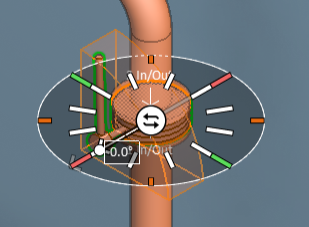
On the Piping tab, in the Standard Component group, click Change Orientation.
-
Pick the component you want to change and press Enter to accept the selection. The work view displays the direction wheel and the connection nodes of the component.
-
The rotation origin is by default at node 1, and the rotation axis is the direction axis of node 1. You can use the Other node in run context-menu command to select the other part node in the run.
-
You can rotate the component around the rotation origin by clicking a direction in the direction wheel or using the Enter rotation angle (Alt+R) context-menu command.
-
You can switch the orientation of the component by clicking the center of the direction wheel or using the Change orientation (O) context-menu command. You are prompted if the new orientation causes conflicting flow directions in the pipeline.
-
Press Enter to accept the changes. One of the following can happen:
-
You are prompted that a collision has been detected. Select whether to accept the change or continue using the tool.
-
You are prompted that bolt holes are not aligned. Select whether to accept the change or continue using the tool.
-