Cut
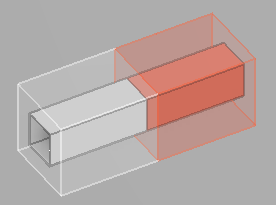
You can use the Cut tool to cut an existing air duct into two separate pieces.
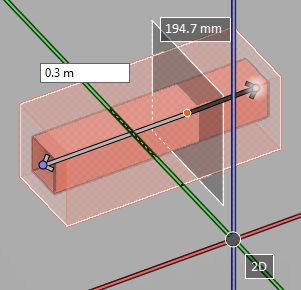
When the cut tool is enabled, moving the cursor over a duct finds the nearest centerline point, and the designated point and the cut plane are visualized to the user. There are also text labels that indicate distance from the centerline endpoints, and the distance values can be manually edited to move the cut point to a specific location.
If the currently designated location is not valid, for example if the cut would make the duct too short, the cut plane turns red and an on-screen message indicates why cutting is not allowed.
Do the following:
-
Select the Ducting tab > Duct group > Cut.
-
Move the cursor to the location where the cut is to be made.
You can also define the exact distance from an endpoint; press Ctrl+Tab to activate the required distance value, edit the value as required, and then press Enter to set the cut point in that location.
-
Press Space or Enter, or click with the mouse, to perform the cut. Both sides of the cut can now be managed as individual parts.
-
You can continue to cut duct objects or press Esc to exit the cut tool.