Insert Part
You can use the Insert Part tool to insert a duct shape or duct component into, onto, or at the end of an existing duct.
-
An into-line duct part such as a T-piece replaces a section of the existing (straight) duct part.
-
An onto-line part such as a duct valve is attached to the existing duct part which can be a straight duct part, a duct shape, or duct component.
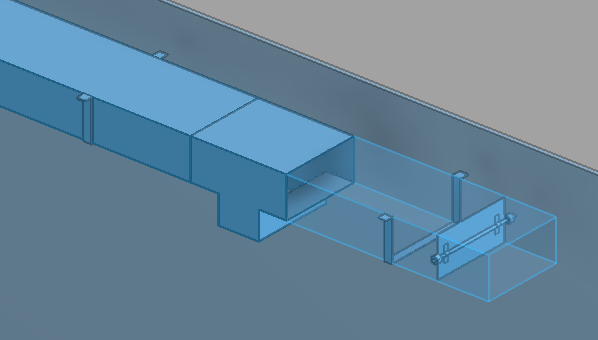
The picture below shows a straight duct part where the user has inserted an into-line part (T-piece) and some onto-line parts (duct valve and flatbar clamps).
There are separate commands for inserting the duct part either with or without a position ID.
After the insertion, you can slide an onto-line part along the air duct with the Move command on the Home tab. If you move the air duct itself, the onto-line parts are moved accordingly. Also, if you resize the air duct with the Size command on the Ducting tab, the onto-line parts are resized accordingly, if possible.
Do the following:
-
Select the Ducting tab > Duct parts group, and then one of the following:
-
Insert Part > Insert part
-
Insert Part > Insert part without position ID
-
-
Move the cursor to the required location in the target duct piece and press Space to accept that location, or use Connect (P) to connect the new part to the free connection point at the end of the target duct.
-
If connecting to the end of the existing duct, the Select Ductline and Specification dialog opens.
Select the line and the specification to use, and click OK.
-
The Select Component – Add To Duct dialog opens.
Select the duct component to use, and click OK.
-
The Apply Duct part design rule dialog opens. See 'Apply Duct part design rule' dialog for details.
-
Shape parameters that do not display a lock icon can be edited by double-clicking the parameter row. See 'Edit value of shape parameter' dialog for details.
-
Click OK. The duct part is added to the model.
-
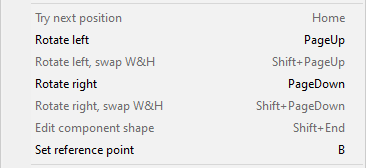
If you want to adjust the orientation or the shape parameters of the part, right-click the work view and select the required command from the context menu. See Ducting context menu for details.
-
Press Enter to accept the insertion.
-
If the part uses instance parameters, the Edit Instance Parameters dialog opens for setting the values. See Instance Parameters for details.
-
If adding a part with position ID, you are prompted for the ID to use.
-
You can continue inserting parts in the same way or press Esc to exit the tool.