Selecting groups and their members
Model objects can belong to one or more groups. Often, the group object is automatically selected when one of its members is selected. However, in some situations, you might want to specifically select the group object, either with or without its members.
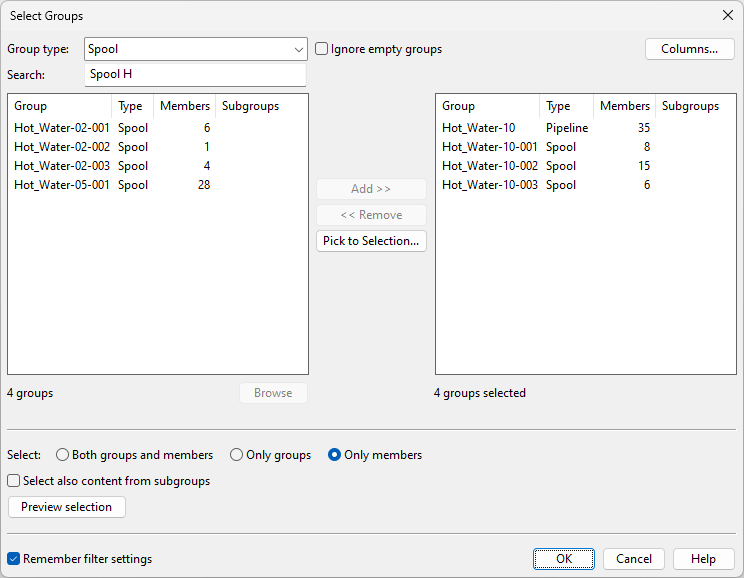
Select Groups
In the Select Groups dialog, you can define a selection set by selecting one or more groups. The resulting set can consist of groups, subgroups, and/or model objects, as defined in the dialog. The dialog opens automatically when the user is required to make a group-based selection, but it can also be opened with the Select by… Group (G) command during any pick action.
Do the following:
-
When opening the Select Groups dialog, the left pane lists the group definitions of the object that is currently behind the cursor. You can click a column header to arrange the group list based on that column. To display additional information about the listed groups, click Columns and select which columns to show in the list panes.
-
You can use these filtering settings to find the groups you are looking for:
-
Group type – Select a specific group type from the drop-down menu to list only groups of that type, or select "All" to list all existing groups.
-
Ignore empty groups – Select this option to hide empty groups.
Note: If you still see groups with no members (model objects or subgroups), the likely reason is that the members are not within your design area and therefore not visible to you.
-
Search – You can filter the group list by name by entering a search string.
-
-
You can open a shaded 3D view that shows the model objects of specific groups by selecting the groups from the left pane and clicking Browse. Press Esc or click the view to return to the selection dialog.
Tip: This shaded view can also be opened by pressing Alt+P, Ctrl+P, or Backspace when any groups are selected in the left pane.
-
Add the groups to be used in the selection to the right pane.
-
Add – Adds the selected groups to the selection.
-
Remove – Removes the selected groups from the selection.
-
Pick to Selection – Allows adding groups to the selection by selecting them from model objects.
 Show/hide details
-
Click Pick to Selection.
-
Select one or more objects from the 3D model and press Enter. A dialog opens, listing the groups that the selected objects belong to.
-
Use Shift+click or Ctrl+click to select the required groups from the list, and click OK.
-
-
-
Define what to include from the groups in the right pane.
-
Both group and members – This option selects the main group and all its members, including the subgroups of the main group. If you want also the members of the subgroups to be included, select the additional subgroup option.
-
Only groups – This option selects the main group but not its members. If you want also the subgroups (of all hierarchy levels) to be included, select the additional subgroup option.
-
Only members – This option selects all the members of the main group, including the subgroups of the main group, but not the main group itself. If you want also the members of the subgroups to be selected, select the additional subgroup option.
-
Select also content from subgroups – Select this option to include the members (model objects and groups) of any subgroups in the set.
-
-
You can open a shaded 3D view that shows the model objects currently included in the set by clicking Preview selection. Press Esc or click the view to return to the selection dialog.
Tip: This shaded view can also be opened by pressing Alt+P, Ctrl+P, or Backspace when any groups are selected in the right pane.
-
Select the option Remember filter settings if you want the current group name filters and the state of the subgroup option to be applied the next time you open this dialog.
-
Click OK to accept the selection set.