Pipeline 06
This pipeline starts with a branch that is located 400 units from the previous pipeline AA_Water-05 along the Y axis. The first segment is parallel to the Z axis and it ends at the same level as the upper elbow of the pipeline AA_Water-05. You will route the rest of the pipeline using the automatic routing feature with the Shortest Distance method and 45° angle curves.
Before you start routing, press Ctrl+2 to enable the 2D hit mode. This enables navigation to evaluate the nearby objects by ignoring the depth coordinate. Enabling the 2D hit mode makes the border around the coordinate axis marker lighter in the active view.
Do the following:
-
Select Piping > Route > Route pipe.
-
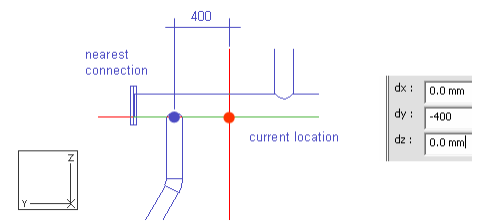
Move the cursor near the branch of the pipeline you routed in the previous exercise.
-
Press Q to lock the cursor to the connection.
-
Press D to define the relative movement.
-
For dy, enter -400 as the value.
-
Click OK.
Do not press Space to accept the start point.
-
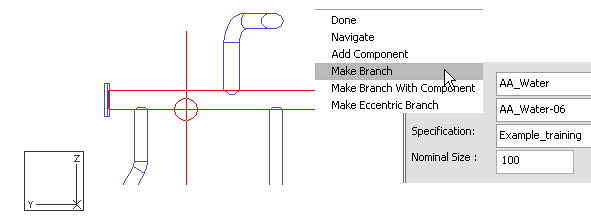
Right-click, and select Create branch > Branch.
The run pipe is highlighted.
-
Press Enter.
-
For System, select AA_Water.
-
For Line, select AA_Water-06.
-
For Nominal Size, enter 100 as the value.
-
Click OK.
-
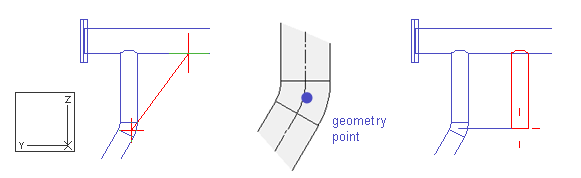
If needed, press space to be able to select the down direction with the direction selector and select down (90°) and Space to define the down direction for the branch.
-
Select the down direction for the pipe with the direction selector and press Shift+A to release the cursor.
-
Move the cursor near the white auxiliary geometry point of the upper elbow of the pipeline AA_Water-05.
-
Press W to lock the cursor to the connection.
-
Press Space to accept the end point of the pipe segment.
-
Right-click, and select Angle for flexible curves > 45.
-
Right-click, and select Auto routing method > Shortest distance.
-
Press Shift+R to get the cursor to the end of the pipe.
-
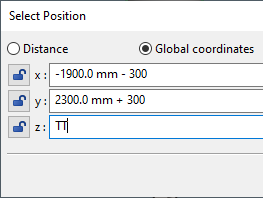
Press C to set the coordinates for the end point of the pipeline.
-
Subtract 300 mm from the X coordinate value, add 300 mm to the Y coordinate value, and enter TT in the Z value field, as shown in the picture below.
-
Click OK.
-
Right-click, and select Automatic routing.
You can also press M to activate Automatic Routing.
-
Press Enter to end routing.
Restore the settings for Auto Routing and Angle for Flexible Curves.
Do the following:
-
Select Piping > Route > Route pipe.
-
Right-click, and select Angle for flexible curves > Not fixed.
-
Right-click, and select Auto routing method > Normal.
-
Press Esc to cancel routing.
You have now routed a pipe using Auto Routing and restored the settings for Auto Routing for the next time.