Custom tools
CADMATIC users often ask Cadmatic or a local distributor to provide tools that would perform specific actions in a specific user environment. If the requested functionality is not generally applicable to other customers, the tool is implemented as a custom script. The script can be either uncompiled source code (.mac) or a compiled binary script (.bs), and the implementation may also involve custom ribbons, panels, and icons that provide user interfaces for launching and using the tools.
Customer-specific script-based tools are not included in the normal CADMATIC product installer. Instead, a separate mechanism is used to manage their distribution and installation. The files are packaged into a compressed folder, and the package can be distributed to customers as soon as the tool is ready for use. The customer's CADMATIC administrator can then install the package using the CADMATIC desktop DM Tools utility.
In most cases, the delivery of custom tools is not dependent on the official software release cycle of main releases and updates. However, the binary script format often changes in major releases, and if custom tools have been delivered as binary scripts, the script vendor must recompile the script, update the installation package, and distribute the updated version. Another situation where users may be required to update their custom tools is when the custom tools themselves are modified or enhanced after their initial release.
Custom tools that Cadmatic provides under a maintenance agreement can be downloaded from the Cadmatic Customer Support Portal. If a custom tool should be available there but cannot be found, contact Cadmatic Customer Support for assistance.
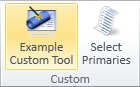
Example custom tool
In this example, a custom tool can be launched from a button in the Tools tab of Plant Modeller. The tool opens a dialog that shows a menu, from which the user can select a meal to order.
We use 'ExaCustom' in the names of the files that are used to run the tool.
Our installation package is called ExaCustom.customization. The package consists of the following files:
| customization.xml | Installation configuration file that defines what will be installed and where. The name is always customization.xml. |
| ExaCustom.mac | Custom tool script (a source code file). |
| ExaCustom.f | Frame file used by the script. |
| ExaCustomRibbon.xml | CustomUI object for launching the tool from the Plant Modeller ribbon. |
| ExaCustom.ico | Icon to show in the ribbon. |
Structure of installation configuration file
The installation configuration file, customization.xml, has the following structure:
<?xml version="1.0" encoding="UTF-8"?>
<custom_tool_installation name="Example Custom Tool" version="2.2">
    <customer name="Customer 1" />
    <customer name="Customer 2" />
    <cos_object database="LIBRARY" cos_object_type="Script Source">
        <attributes>
            .dD ExaCustom; .dG Example Custom Script; ...;;
        </attributes>
        <data import_file="ExaCustom.mac" />
    </cos_object>
    <cos_object database="LIBRARY" cos_object_type="Custom UI">
        ...
    </cos_object>
</custom_tool_installation>
The XML elements of the file are:
This is the standard XML declaration that describes the XML version and character encoding used by the document.
The custom_tool_installation element is the main element of the configuration file, and it encloses all other XML elements.
Element attributes:
-
name – Name of the tool.
-
version – Version number of the tool.
The customer element identifies a user organization that is allowed to load and use the custom tool. Define each customer as a separate element.
Element attributes:
-
name – Name of the customer.
The cos_object element specifies the database used to store the COS object and the type of COS object to create.
Element attributes:
-
database – Target database. The value must be either 'LIBRARY' or 'PROJECT'.
-
cos_object_type – Type of COS object to create.
The cos_object element has attributes and data as sub-elements.
The attributes element specifies the COS attributes and attribute values to assign to the COS object. This is done using the normal tag record format used for assigning attributes to COS objects. The content is a semi-colon separated list where each attribute is represented by its identifying tag (abbreviation of three characters or fewer) followed by the attribute value.
<tag1> <value>; <tag2> <value>; … ;;
Important: Many custom tools access runtime-specific COS user attributes. The custom tool installer cannot create new COS attributes or verify whether a given attribute exists. Therefore, the tool vendor must provide clear instructions so that the administrator performing the installation can verify any required attributes before running the installer.
The data element specifies the data to import into the COS object.
Element attributes:
-
import_file – Name of the file (located at the root level of the installation package) from which to import the data.
Example installation package files
<?xml version="1.0" encoding="UTF-8"?>
<custom_tool_installation name="Example Custom Tool" version="2.2">
    <customer name="Customer1 Ltd" />
    <customer name="Customer2 Ltd" />
    <cos_object database="LIBRARY" cos_object_type="Script Source">
        <attributes>
            .dD ExaCustom; .dG Example Custom Script; .ga 0; .gb 0; .da 1; .dc macro;;
        </attributes>
        <data import_file="ExaCustom.mac" />
    </cos_object>
    <cos_object database="LIBRARY" cos_object_type="Custom UI">
        <attributes>
            .dG Exa Custom Ribbon;;
        </attributes>
        <data import_file="ExaCustomRibbon.xml" />
    </cos_object>
    <cos_object database="LIBRARY" cos_object_type="Panel">
        <attributes>
            .dD ExaCustom.f; .fa 1;;
        </attributes>
        <data import_file="ExaCustom.f" />
    </cos_object>
    <cos_object database="LIBRARY" cos_object_type="Icon">
        <attributes>
            .dD ExaCustom.ico; .fT 1;;
        </attributes>
        <data import_file="ExaCustom.ico" />
    </cos_object>
</custom_tool_installation>/*
A custom tool demo script.
*/
#include "include/dmutil.h"
#include "include/win.h"
#include "include/win_panel.h"
#include "include/array.mac"
global handle Frame_h = 0;
global handle CtlPan_h = 0;
global handle ListW_h = 0;
/* CtlPan_h widgets: */
global handle BtnOk_h = 0;
global handle BtnCancel_h = 0;
#define NONE_SELECTED -1 /* This is a pseudo selection item id, indicating that nothing is selected */
/* Globals for controlling the list window sorting and current selection */
global int ListWSelectedItem = NONE_SELECTED;
global int ListWSortColumn = -1;
global int ListWSortDirection = -1;
/* Sort directions of the columns of the list window */
#define SORT_ASCENDING 1
#define SORT_DESCENDING 0
/* The data in the list in our example script: */
global handle Menu_h = 0; /* 2d array storing the meals selectable from the menu */
global int N_Menu_rows = 0;
/* columns of the 2d array: */
#define MEAL_NAME 0
#define MEAL_TYPE 1
#define MEAL_CALORIES 2
create_windows()
{
Frame_h = W_INIT_FRAME();
CtlPan_h = W_ADD_WINDOW(Frame_h, W_PANEL, "ctl_pan");
ListW_h = W_ADD_WINDOW(Frame_h, W_SELECTION, "lbl_list");
return(0);
}
create_ctl_panel()
{
BtnOk_h = W_ADD_PANELITEM(CtlPan_h, W_PANEL_BUTTON, "ok");
BtnCancel_h = W_ADD_PANELITEM(CtlPan_h, W_PANEL_BUTTON, "cancel");
return(0);
}
load_frame_def()
{
/* load the frame file from the COS, which actually means the Site directory */
dir = SYS_GETENV("PMS_PROJROOT") + "/"+SYS_GETENV("PMS_PROJNAME") + "/Site/pm/panel/";
frame_file = "ExaCustom.f";
if (W_LOAD_FRAME(Frame_h, frame_file, dir) != 0){
U_MESSAGEBOX("Cannot load the frame file from <" + dir + frame_file +">!", U_MB_ERROR, U_MB_OK, 0);
return(-1);
}
return(0);
}
setup_ctl_pan()
{
W_SET_PANELITEM_HANDLER(BtnOk_h, "ok_hlr");
W_SET_PANELITEM_HANDLER(BtnCancel_h, "cancel_hlr");
return(0);
}
setup_listw()
{
W_SET_WINDOW_HANDLER(ListW_h, "sel_listw_item_hlr");
/* set up the list window contents */
W_SET_WINDOW_ARGS(ListW_h,W_LISTW_INSERTROWS, N_Menu_rows);
for(i=0;i<N_Menu_rows;i=i+1;){
W_SET_WINDOW_ARGS(ListW_h,W_LISTW_ROW, i,
W_LISTW_COLUMN, MEAL_NAME,
W_LISTW_STRING, get_2darray(Menu_h,i,MEAL_NAME),
W_LISTW_COLUMN, MEAL_TYPE,
W_LISTW_STRING, get_2darray(Menu_h,i,MEAL_TYPE),
W_LISTW_COLUMN, MEAL_CALORIES,
W_LISTW_STRING, get_2darray(Menu_h,i,MEAL_CALORIES),
W_LISTW_ITEMID, i );
}
}
/* Initially the menu should be sorted according to the name of the meal */
do_initial_sort_for_listw()
{
ListWSortColumn = MEAL_NAME;
ListWSortDirection = SORT_ASCENDING;
W_SET_WINDOW_ARGS(ListW_h, W_LISTW_COLUMN, ListWSortColumn, W_LISTW_SORT, ListWSortDirection);
return(0);
}
global int RetValue = 0;
ok_hlr(item, event_type, button_value)
{
return(99);
}
cancel_hlr(item, event_type, button_value)
{
RetValue = -1;
return(99);
}
sel_listw_item_hlr(window, event_type, row, column, item_id)
{
if (event_type == W_EVENT_ITEM_SELECTED) {
if (row < 0 & column >= 0) {
/* A column header was selected; sort the items */
/* the same column selected again */
if (ListWSortColumn == column) {
/* swap the sorting direction */
if (ListWSortDirection == SORT_DESCENDING) {
ListWSortDirection = SORT_ASCENDING;
}
else {
ListWSortDirection = SORT_DESCENDING;
}
}
/* a "new" column is selected, then sort in ascending order */
else {
ListWSortDirection = SORT_ASCENDING;
}
ListWSortColumn = column;
W_SET_WINDOW_ARGS(window, W_LISTW_COLUMN, column, W_LISTW_SORT, ListWSortDirection);
}
else {
ListWSelectedItem = item_id;
}
}
else if (event_type == W_EVENT_ITEM_DOUBLECLICKED) {
ListWSelectedItem = item_id;
U_MESSAGEBOX("Meal <"+sprintf_selected_listwin_item()+"> was double clicked.\nCould e.g. open now a tool showing details of the selected item ...", U_MB_INFO, U_MB_OK, 0);
}
return(0);
}
/* return the data in the 2d array which corresponds to the current selected list window item */
sprintf_selected_listwin_item( )
{
if(ListWSelectedItem==NONE_SELECTED){
ss="No item selected";
}
else {
name=get_2darray(Menu_h,ListWSelectedItem ,MEAL_NAME);
type=get_2darray(Menu_h,ListWSelectedItem ,MEAL_TYPE);
calories=get_2darray(Menu_h,ListWSelectedItem ,MEAL_CALORIES);
ss="";
S_PRINTF(ss,"%s, %s, %s",name,type,calories);
}
return(ss);
}
/* Load the menu. In this case we simply allocate an array and set some values ... */
load_menu()
{
Menu_h = alloc_2darray(4,3);
put_2darray(Menu_h,0,MEAL_NAME, "Apple");
put_2darray(Menu_h,0,MEAL_TYPE, "Fruit");
put_2darray(Menu_h,0,MEAL_CALORIES, "80");
put_2darray(Menu_h,1,MEAL_NAME, "Orange");
put_2darray(Menu_h,1,MEAL_TYPE, "Fruit");
put_2darray(Menu_h,1,MEAL_CALORIES, "60");
put_2darray(Menu_h,2,MEAL_NAME, "Beef Steak");
put_2darray(Menu_h,2,MEAL_TYPE, "Meat");
put_2darray(Menu_h,2,MEAL_CALORIES, "1800");
put_2darray(Menu_h,3,MEAL_NAME, "Lamb Chop");
put_2darray(Menu_h,3,MEAL_TYPE, "Meat");
put_2darray(Menu_h,3,MEAL_CALORIES, "1200");
N_Menu_rows = 4;
return(0);
}
free_menu()
{
free_2darray(Menu_h);
return(0);
}
/******************************************************************
Entry point
*******************************************************************/
main()
{
info_prompt =
"This script implements an example tool to be used in demonstrating the configuration,\ninstallation and uninstallation using the Custom Tool Installer -system.";
U_MESSAGEBOX(info_prompt, U_MB_INFO, U_MB_OK, 0);
load_menu();
create_windows();
create_ctl_panel();
if(load_frame_def()) {
free_menu();
return(-1);
}
setup_listw();
do_initial_sort_for_listw();
setup_ctl_pan();
W_MAP_FRAME(Frame_h);
W_RUN_FRAME(Frame_h);
W_UNMAP_FRAME(Frame_h);
W_DESTROY_FRAME(Frame_h);
if(RetValue == -1){ /* Canceled */
free_menu();
return(-1);
}
if (ListWSelectedItem == NONE_SELECTED){
U_MESSAGEBOX("No meal was selected.", U_MB_INFO, U_MB_OK, 0);
}
else{
selected = sprintf_selected_listwin_item();
U_MESSAGEBOX("Meal <" + selected + "> was selected.", U_MB_INFO, U_MB_OK, 0);
}
free_menu();
return(0);
}/* */
id 0 tool;tit Menu: ;;
id 2 lbl_list;scb 1;cal 1;cls 60;rws 10;rsz 1;
lwc 3;
lcn 0;lch Name; lcw 150;lct 1;
lcn 1;lch Type; lcw 100;lct 1;
lcn 2;lch Calories; lcw 100;lct 2;lca 2;
;
id 1 ctl_pan -;rws 2;cls 60;blw lbl_list;;
id 1 ok;bim Order; col 35;row 1;w 8;bva 'd';;
id 1 cancel;bim Cancel; col 45;row 1;w 8;bva 'c';;
;<RibbonSettings>
<Ribbon Name="main">
<RibbonTab Name="toolsTab">
<CustomCommand Name="Example Custom Tool" CommandData="macro/ExaCustom.mac main()" Image="ExaCustom.ico"/>
</RibbonTab>
</Ribbon>
</RibbonSettings>
![]()
Creating a custom tool installation package
The files required for installing and running the custom tool are packaged into a compressed archive (zip) that uses the .customization file extension. This package must contain:
-
All files required to run the tool: scripts, frame files, custom ribbons, and icons.
-
A configuration file that references the other files and defines how to install them. Typically, the library database is preferred because the tools are then available to all projects at all replicas.
For an example of the files to include in the package, see Example custom tool.
Do the following:
-
Collect all files required to run the custom tool in the target environment.
If a binary script is required, ensure that you have the compiled .bs file.
-
Create the customization.xml configuration file to define how the tool will be installed.
In this file, specify which data files to import into COS, their COS object types, and which COS attributes to assign. For details, see Structure of installation configuration file and the example configuration file customization.xml.
-
Build the installation package.
You can use a dedicated archiving program such as 7-Zip or WinZip for this.
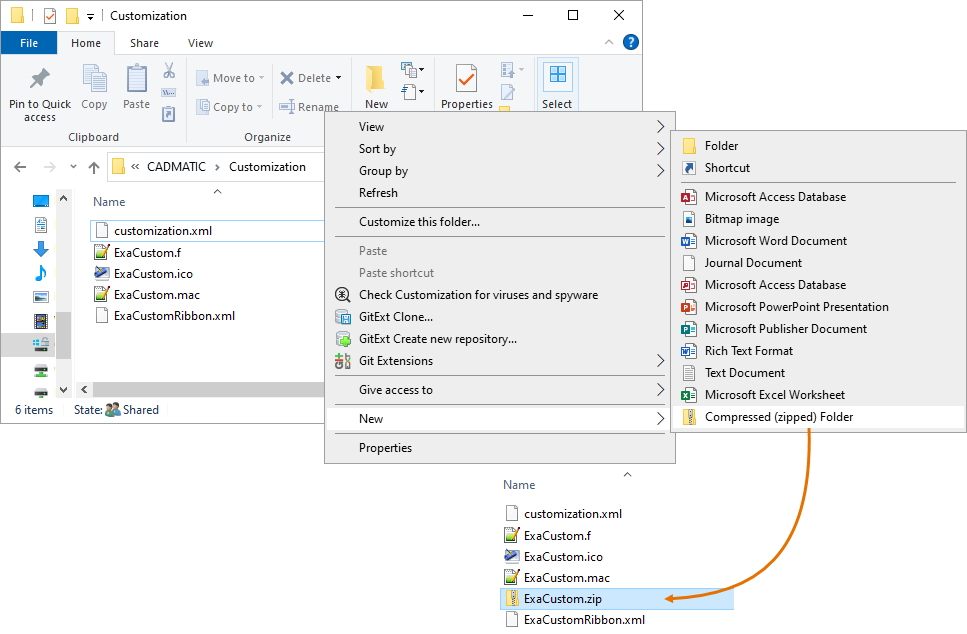
In this example, we use the built-in Microsoft Windows tools:
-
Use the Windows Explorer function New > Compressed (zipped) Folder to create a new archive, and enter a suitable name.
 Show/hide image
Here, we use the name ExaCustom.zip.
-
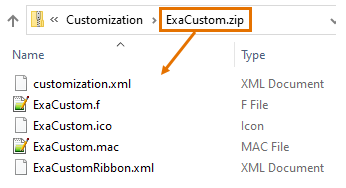
Copy or move the custom tool files and the installation configuration file into the package.
Important: All installation files must reside at the root level of the package.
-
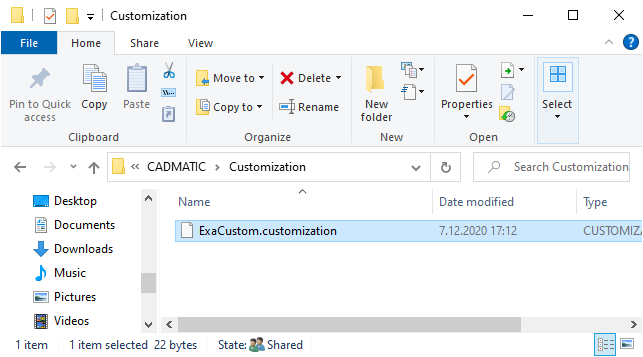
Change the '.zip' file extension to '.customization', and confirm the change.
Show/hide image
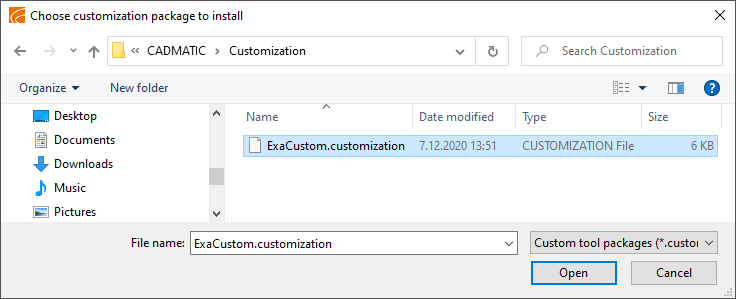
Here, we use the name ExaCustom.customization.
-
-
The installation package is now ready. If special actions are required before or after installation, prepare a document that describes those actions for administrators.
-
Deliver the .customization package and any additional instructions to the customer.
Installing custom tools
Install a custom tool from a .customization package. This creates a COS object of type 'Custom Tool Installation'
Do the following:
-
If additional instructions are provided, read them carefully.
-
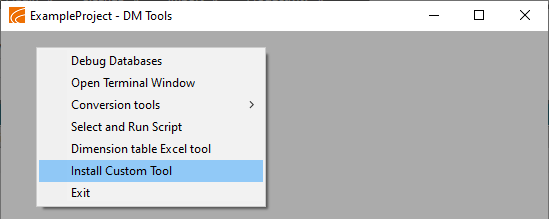
Open the CADMATIC desktop and select Object > Tools > Run DM Tools.
-
Right-click the DM Tools dialog and select Install Custom Tool.
-
Select the installation package from the file browser and click Open.
-
When installation is complete, you are prompted to open the log file located at <project>/<workspace>/CustomToolInstalLog.txt. Click Yes to open the log file.
Show/hide example
Copy[I] 2020/12/07 15:20:07 : Install customization for database: ExampleProject.lib
[I] 2020/12/07 15:20:07 : Create custom tool content object: Object type: Script Source
Database: LIBRARY
Content file: ExaCustom.mac
Attributes: .dD ExaCustom;.dG Example Custom Script; .ga 0;.gb 0;.da 1; .dc macro;;
[I] 2020/12/07 15:20:07 : Create custom tool content object: Object type: Custom UI
Database: LIBRARY
Content file: ExaCustomRibbon.xml
Attributes: .dG Exa Custom Ribbon;;
[I] 2020/12/07 15:20:07 : Create custom tool content object: Object type: Panel
Database: LIBRARY
Content file: ExaCustom.f
Attributes: .dD ExaCustom.f;.fa 1;;
[I] 2020/12/07 15:20:07 : Create custom tool content object: Object type: Icon
Database: LIBRARY
Content file: ExaCustom.ico
Attributes: .dD ExaCustom.ico; .fT 1;;
[I] 2020/12/07 15:20:07 : Create custom tool installation: Example Custom Tool
[I] 2020/12/07 15:20:07 : Install customization for database: ExampleProject.pms -
Right-click the DM Tools dialog and select Exit.
-
Open the target application and verify that the tool works as intended.
Updating custom tools
If you receive an update, install the new version in the same way as described in Installing custom tools. This updates the files in your environment.
Uninstalling custom tools
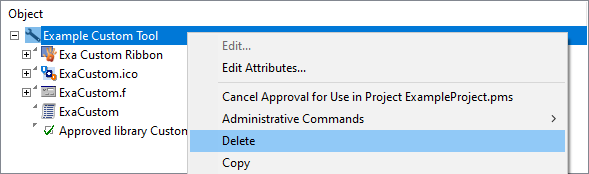
You can uninstall a custom tool by deleting its 'Custom Tool Installation' COS object. This removes all associated objects (scripts, frames, custom ribbons, icons).
Do the following:
-
In the Project Environment dialog, browse to [project] or [library] > Resources > Tool Installation.
-
Right-click the custom tool and select Delete.