Create Project B site
Step 5: Create replica (for Replica_0) installation file, including library
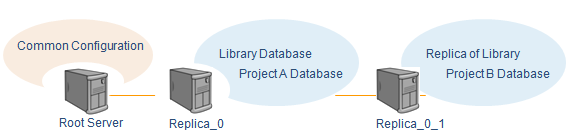
The next replica will be a Project (B) server which replicates the library from the project A server and includes project B master database.
-
In the CADMATIC desktop, select Object > Manage COS, browse to Replica_0 / CoDesigner Replication / Replica Servers and double-click to create a replica server.
-
Name the replica as Replica_0_1.
-
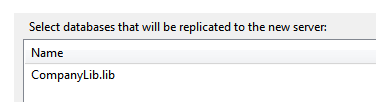
Click Add to include the library (CompanyLib) in the .cri file.
-
Select CoDesigner Site as the type of the replicas license to be able to share the server between several users and to create new replicas to this one. Remember, that this Replica_0_1 is going to host the project (B) master database.
-
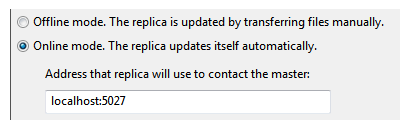
Select to update this replica in online mode. Ensure that the address refers to the Replica_0.
-
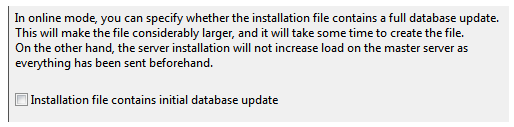
Define the location for this installation file (.cri). You can decide if you want to include the library database in the .cri file or will it be loaded during replication.
Step 6: Install Replica_0_1 server using .cri file
-
In CADMATIC installation software, select Install/upgrade COS server.
-
In Installed COS servers dialog, click New to proceed.
- Select New replica COS server installation.
-
Browse to the installation file you created previously. The name for the server is defined in the installation file (Replica_0_1).
-
Accept or change the installation paths and port number.
Note: Write down the port number, you need that information later.
-
Click Yes to set the status of the replica to be online and to start the automatic replication.
-
In the CADMATIC desktop, select Object > Manage COS, and click Connect to to bring out the installed server in the list.
You have now installed a replica which includes the replica of library. Next you will create a Project (B) into that server.

Step 7: Create project B in replica_0_1 server
-
In the CADMATIC desktop, select Object > Create Project.
-
Select server "Replica_0_1" from the server list, use Connect if needed.
-
Select CompanyLib as the library to be used.
-
Name the project Project_B, write description and set the Root Directory to …/Cadmatic_Projects/Project_B.
-
Select Base Setup as project template to include certain configuration objects in the new project and click Create.
-
Click Next to proceed the attribute mapping.
-
Click Import All and Yes if asked for verifying to import the listed objects.
-
Click Finish to proceed.