Import objects and settings
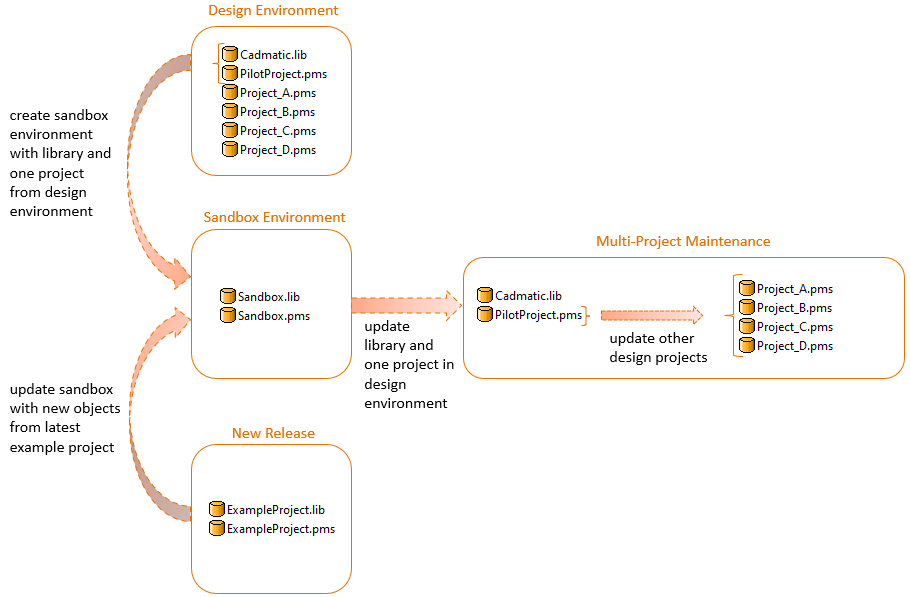
The Multi-Project Maintenance tool allows the project administrator to install a new CADMATIC release and add its new features to multiple on-going design projects at the same time. Using this tool, the administrator can prepare the required changes in an offline copy ("sandbox project") of an actual design project ("pilot project"), and then roll out the changes to all design projects ("target projects") as a single update action.
By implementing a version upgrade as described below, you have a safe environment for testing how your company's existing data works with the new features, before you proceed to upgrade an entire site to the new software release.
Before starting the implementation, make sure you fully understand the complete process described below.
General requirements
-
Your current CADMATIC environment uses some earlier version of the software and there are two or more on-going projects where you want to start using the new features of the latest CADMATIC release.
-
All the target projects that you plan to update with this tool are using the same library database.
-
You choose one of the existing design projects as the pilot project where you first implement and verify the new features before updating all the other projects.
-
You have the CADMATIC 2026H1 installation media.
Note: This can be the original R1 release or a later update release, as applicable to your situation.
Preparing the update package
First, prepare a CX file that contains the new data that you want to add to your existing design projects and verify that the projects are compatible with the new data.
Export default data from example project
Start by defining the new data that you want to extract from the CADMATIC 2026H1 example project and export the data in CX format.
Prerequisites
-
CADMATIC 2026H1 installation media.
Do the following:
-
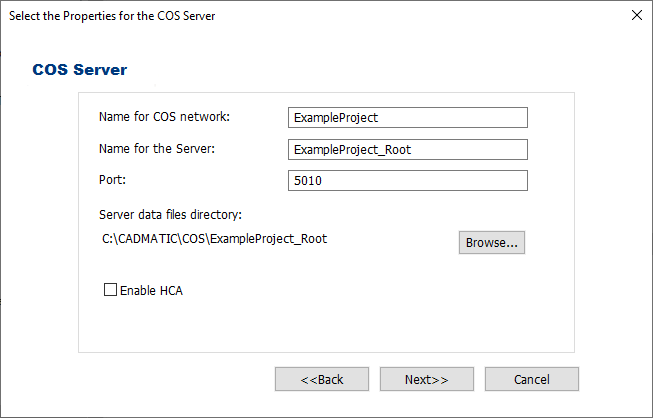
Use the CADMATIC 2026H1 product installer to create a new software installation where you install the CADMATIC design applications and a new COS server.
Note: In this example, the new COS server is named as "ExampleProject_Root".
-
In the CADMATIC desktop of your new installation, browse to your project folder and select Object > Create Project. The Create New Project dialog opens.
-
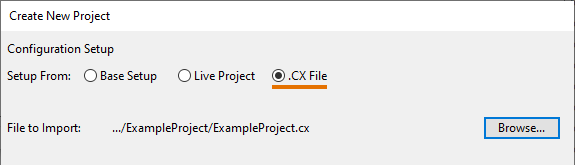
Connect to the new COS server, select to create a new library, and select the project setup to be imported from the example environment source file in the CADMATIC installation media.
Note: In this example, the new library database is named as "ExampleProject.lib", the new project as "ExampleProject", the new project database as "ExampleProject.pms", and the project setup is imported from <installation_media>/ExampleProject/ExampleProject.cx.
-
In the CADMATIC desktop of the new project, create a workspace and Plant Modeller area, and open Plant Modeller.
-
Select File > Environment > All library and project. The Project Environment dialog opens.
-
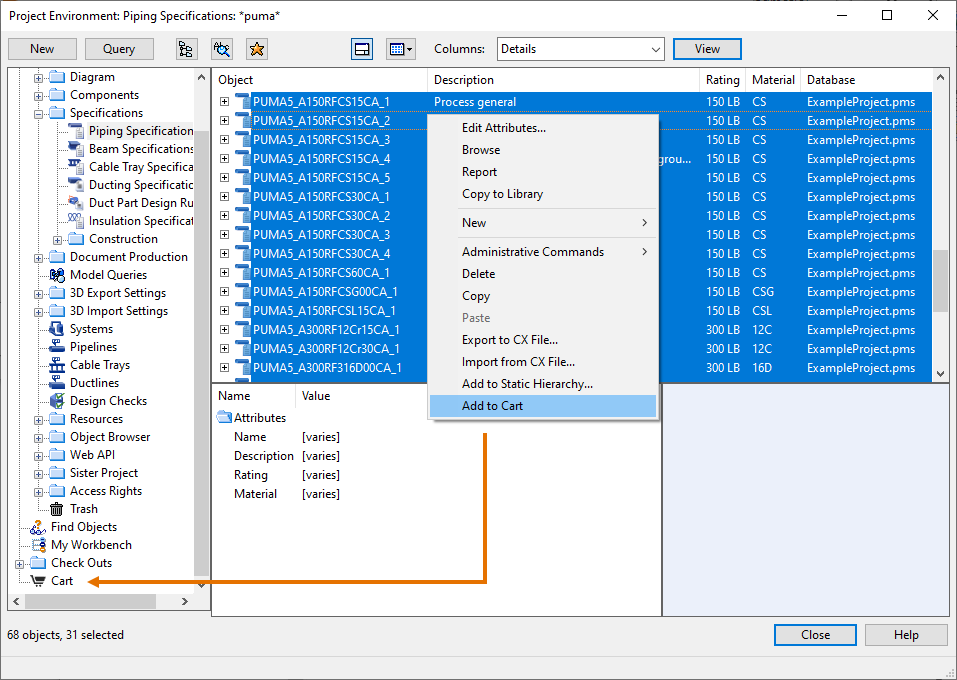
Use the Cart function to collect the new COS objects that you want to include to the new setup. (Instead of using the cart, you can also export different object types to different .cx files, but usually a single export file is more convenient.)
-
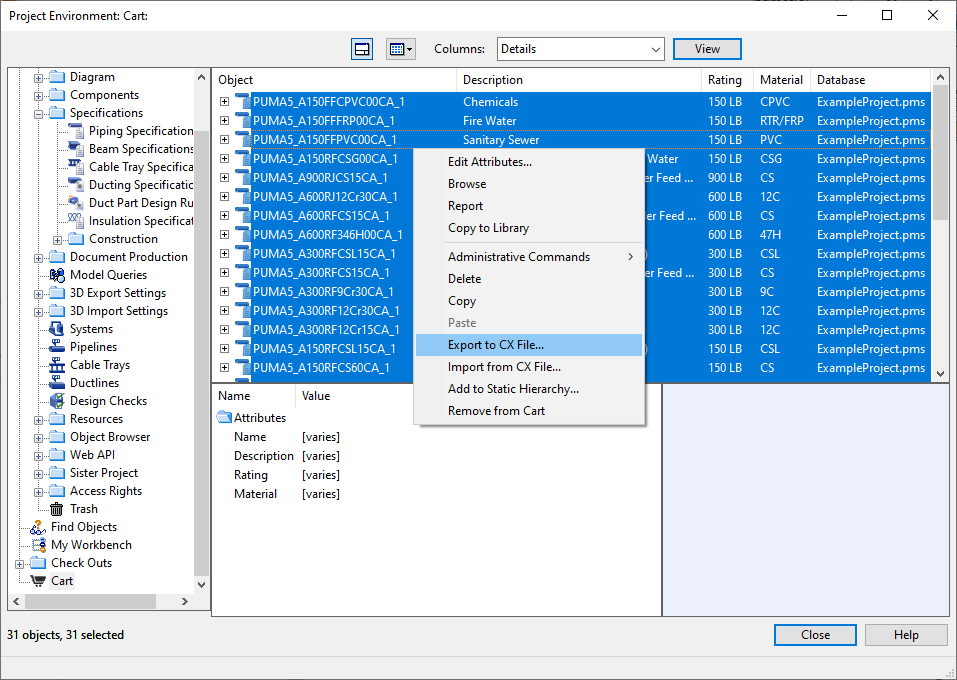
Select all the items from the cart, right-click the selection, and select Export to CX File.
-
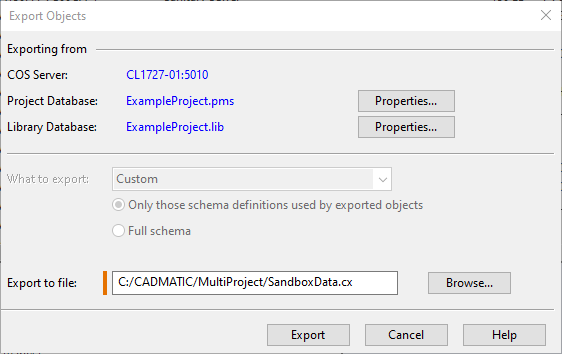
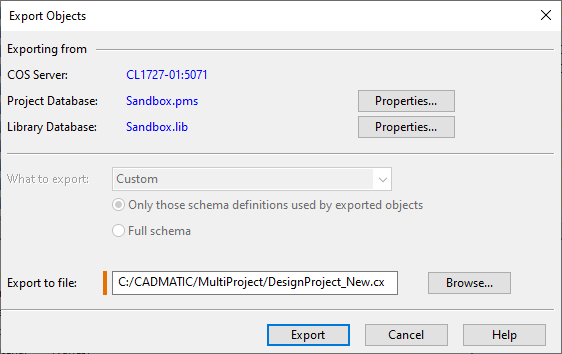
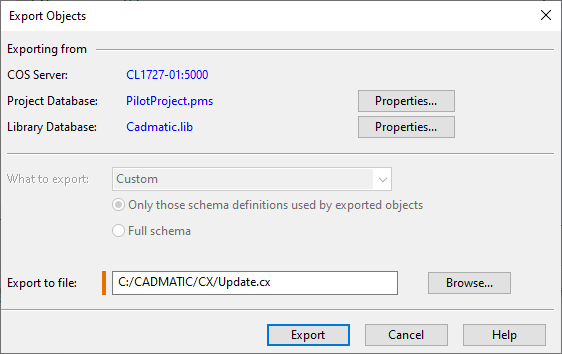
In the Export Objects dialog, specify the saving location and file name, and click Export.
Note: In this example, we export the data to SandboxData.cx.
Export all data from pilot project
Next, export the library database and the project database of the design project that you have chosen as the pilot project.
Do the following:
-
In the CADMATIC desktop of your old installation, select the pilot project and then Object > Manage Project. The Manage Project… dialog opens.
-
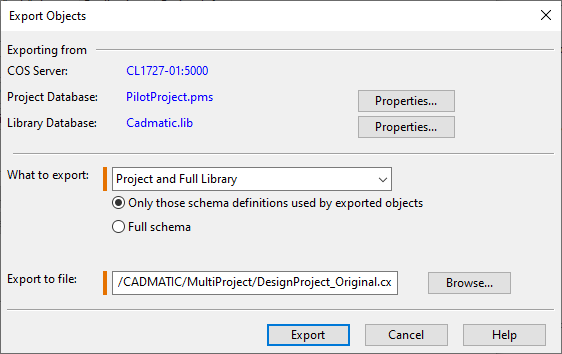
In the Actions section, click Export. The Export Objects dialog opens.
-
Export the pilot project and the full library to a .cx file.
Note: In this example, the library database is "Cadmatic.lib", the project database is "PilotProject.pms", and we export their data to DesignProject_Original.cx.
Prepare sandbox project
Next, create a sandbox project that contains the latest default data from the example project and the organization-specific data from the pilot project, and use the sandbox project to set up all the new features of the software as required.
Prerequisites
-
CADMATIC 2026H1 installation media.
Do the following:
-
Use the CADMATIC 2026H1 product installer to install a new COS server.
Note: In this example, the new COS server is named as "Sandbox_Root".
-
In the CADMATIC desktop of the new installation, browse to your project folder and select Object > Create Project. The Create New Project dialog opens.
-
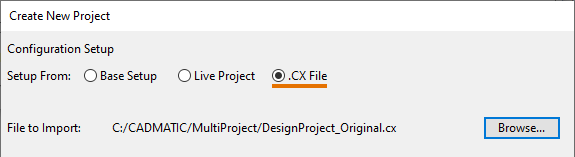
Connect to the new COS server, select to create a new library, and select the project setup to be imported from the .cx file that you exported from the pilot project.
Note: In this example, the new library database is named as "Sandbox.lib", the new project as "Sandbox", the project database as "Sandbox.pms", and the project setup is imported from DesignProject_Original.cx.
-
Open the sandbox project, create a workspace, open the workspace, create a Plant Modeller area, and open Plant Modeller.
- Select File > Environment > All library and project. The Project Environment dialog opens.
-
Right-click any configuration view and use the Import from CX File command to import the .cx file that you exported from the example project.
Note: In this example, we import the data from SandboxData.cx.
-
Now the sandbox project contains new default data from the example project and a library database and project database from your organization.
Use this environment to set up all the new functionality that you want to distribute to the design projects. Test the environment by creating new dimension tables, parts, and specifications. Also create Plant Modeller drawings, spool drawings, and other documents, and see that everything works as expected.
-
Close Plant Modeller and CADMATIC desktop.
Export new setup from sandbox project
Next, export the data that you want to transfer from the sandbox project to the design projects.
Do the following:
-
Open the file …/<sandbox>.pms/<workspace>.wsp/DmTools.prf in a text editor, add the following row, and save and close the file.
CopyDM_ALWAYS_EXPORT_WITH_ORIGINAL_OID_INFO; 1; -
Open the CADMATIC desktop and Plant Modeller of the sandbox project.
-
In the Project Environment dialog of the sandbox project, use the Cart function to collect all the COS objects that you want to transfer from the library database and the project database to the design projects.
-
Select all the items from the cart, right-click the selection, and select Export to CX File.
Note: In this example, we export the data to DesignProject_New.cx.
-
You can now close the Plant Modeller.
Analyze target projects
Next, use the Multi-Project Maintenance tool to run an analysis on the design projects that you intend to update with the new data.
Do the following:
-
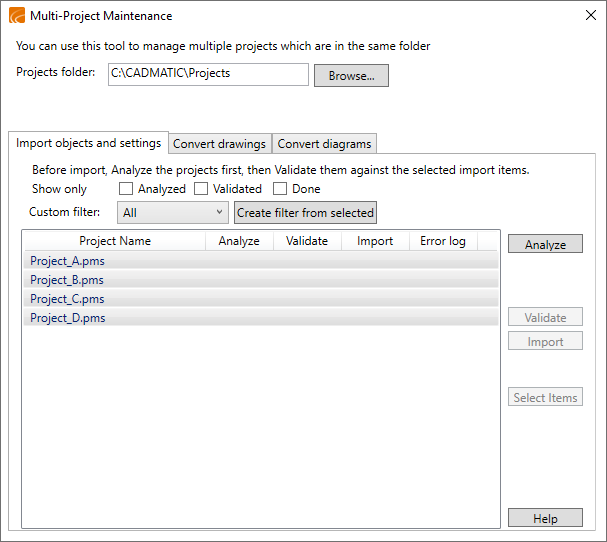
In the CADMATIC desktop of the new installation, in the user workspace folder of the sandbox project, select Object > Tools > Multi-Project Maintenance.
The Multi-Project Maintenance dialog opens, displaying the Import objects and settings tab.
-
The Projects folder field is automatically set to the parent folder of the project from which you started the tool, and the project list pane shows all the other projects in that location, but not the project from which you opened the tool. If the projects that you want to analyze are in a different location, click Browse and select the correct folder.
-
You can filter the project list to find the projects that you want to update.
-
You can select a status (Analyzed, Validated, Done) to hide all those projects that do not have the designated status.
-
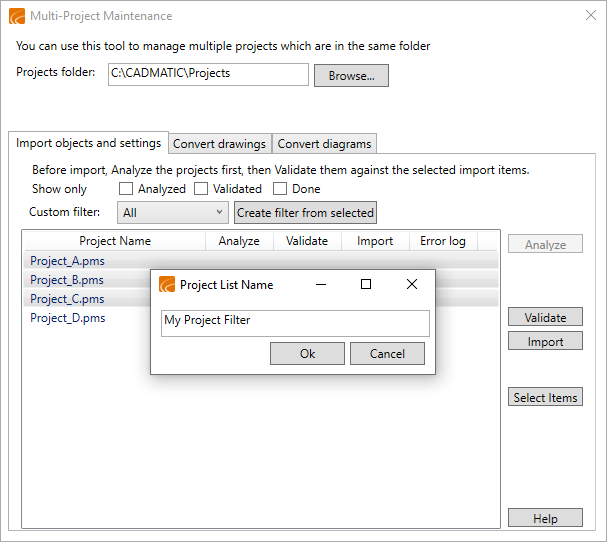
You can select projects from the list and click Create filter from selected to create a filter that only shows the selected projects and hides all the others.
Note: These custom filters disappear if you use Browse to change the project folder.
-
-
Select the projects to be analyzed.
Selecting nothing allows all the listed projects to be included in the operation. If this is not what you want, select the ones that are to be included.
(If you select projects that use a different COS server version than what is specified in the workstation profile which you will select next, then those projects will fail the analysis.)
-
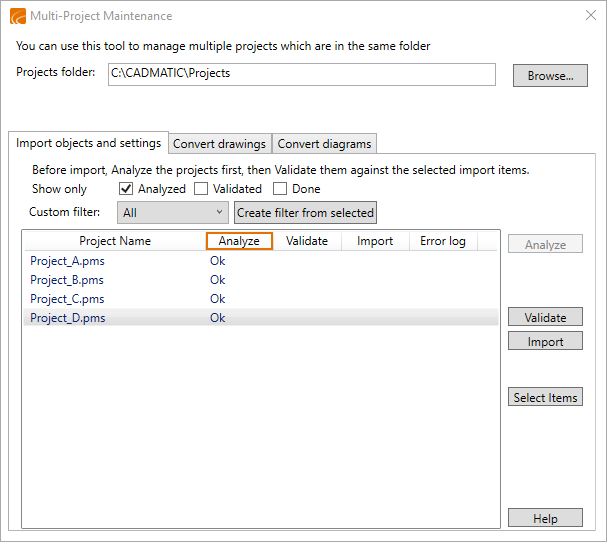
Click Analyze. You are prompted to select the workstation profile that the selected projects are using.
-
Navigate to the \Cadmatic\<version>\<computer>.stc\wsprofile\ folder of your old software installation, select the cadm_nt.prf file, and click Open.
-
When the analysis is completed, the Analyze column shows whether each project is "Ok" or "Failed".
If a project fails the analysis, investigate the reason in the analysis log file that opens, and see if you can correct the problem.
-
Close the Multi-Project Maintenance dialog.
Upgrading the COS server
When you have completed all the actions described in Preparing the update package, upgrade the COS server in the design environment to the new software version.
Upgrade COS
Upgrade the COS server to 2026H1.
Prerequisites
-
CADMATIC 2026H1 installation media.
-
Ask the users of all the target projects to stop the design work, to check in all objects if possible, and to save and update to COS.
(The check-in is not mandatory but recommended.)
Do the following:
-
If the COS server is a replica server, do the following:
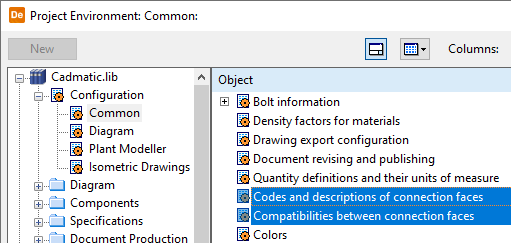
In the CADMATIC desktop of your old installation, select the pilot project, select Object > Library and Project Databases, browse to [library] > Configuration > Common, and relinquish the ownership of the configuration objects 'Codes and descriptions of connection faces' and 'Compatibilities between connection faces'.
-
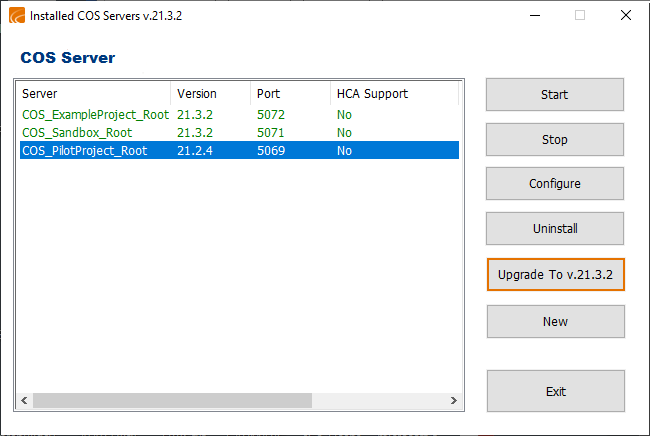
Open the CADMATIC 2026H1 product installer, select Install/upgrade COS server, and then in the COS setup program select the server(s) to be upgraded and click Upgrade To v.<version>.
Note: If the existing COS server is older than 2014, it is not a 64-bit version and therefore upgrading the COS server will take some time as the upgrade process backs up the COS server, restores the backup, and processes the server data.
Updating the pilot project
Next, add the new data to the design project that you chose as the pilot project.
Upgrade library and project databases
The library database and the project database of the pilot project are still in the old software version. Perform the normal upgrade process that makes the databases compatible with the upgraded COS server.
Do the following:
-
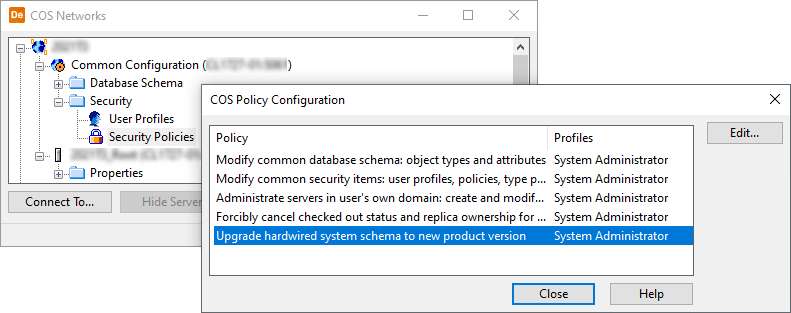
In the CADMATIC 2026H1 desktop, select Object > Manage COS Servers, open the Security Policies configuration, and enable the Upgrade hardwired system schema to new product version policy for your user account.
-
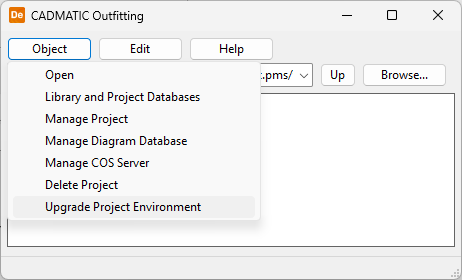
Still in the CADMATIC desktop, select the pilot project and then Object > Upgrade Project Environment.
-
Do not restore the security policy setting yet—you will need it when performing Import data to design projects.
Add sandbox data to pilot project
Next, transfer the data that you prepared in the sandbox project to the pilot project.
Do the following:
-
In the CADMATIC 2026H1 desktop, select the pilot project, select Object > Library and Project Databases, and use the Import from CX File context-menu command in any configuration view to import the .cx file that you exported from the sandbox project.
Note: In this example, we import the data from DesignProject_New.cx.
During the import, create or map the connection types, functional codes, and all other data, as prompted.
-
If the .cx file contained any library objects that must be approved to the project, do the necessary approvals now.
-
Verify that old and new features work as expected in the pilot project.
Now the library database and the project database are up-to-date and you are ready to distribute the changes in the project database to the other projects.
Preparing the roll out
Next, prepare the roll out of the new features to the other projects.
Prepare import folder
Prepare the folder from which the Multi-Project Maintenance tool will take the import data.
Do the following:
-
Create a folder for the files to be imported to the other design projects.
Note: In this example, the import folder is C:\CADMATIC\CX.
-
In the Project Environment dialog of the pilot project, use the Cart function to collect all the new objects that you want to export from the project database. (Library objects do not need to be exported, but exporting them will not cause problems.)
Note: Only one .cx file is to be created at this point! Do not close the Project Environment dialog until you have added all the needed objects to the cart and performed the export. The cart only holds its objects as long as the Project Environment dialog remains open; closing and re-opening the dialog will empty the cart. You can remove objects from the cart manually, if needed.
-
Select all the items from the cart, right-click the selection, and select Export to CX File.
-
In the Export Objects dialog, select the import folder you just created, specify the file name, and click Export.
Note: In this example, we export the data to Update.cx.
(Optional) Export list of library objects to be approved to projects
Optionally, you can create a text file that lists the library objects that are to be approved for use in the target projects. The Multi-Project Maintenance tool can use this file as part of the Validate operation.
Do the following:
-
In the Project Environment dialog of the pilot project, use the Cart function to collect the required objects from the library.
-
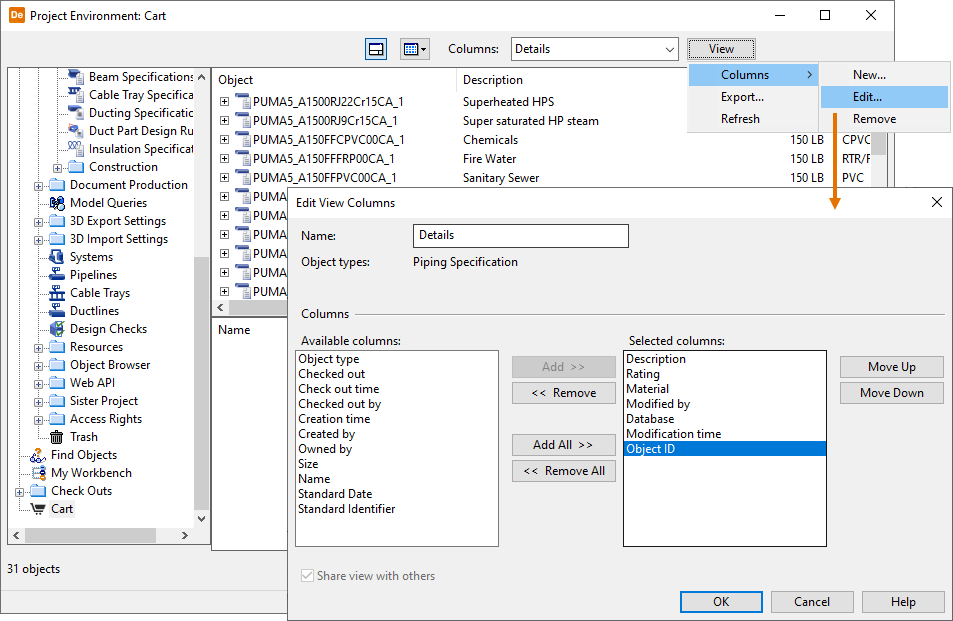
In the Cart view, select View > Columns > Edit and add the Object ID column to the view. This allows the object IDs to be included in the tag records file—if they are missing, the validation performed in the Multi-Project Maintenance dialog will fail.
-
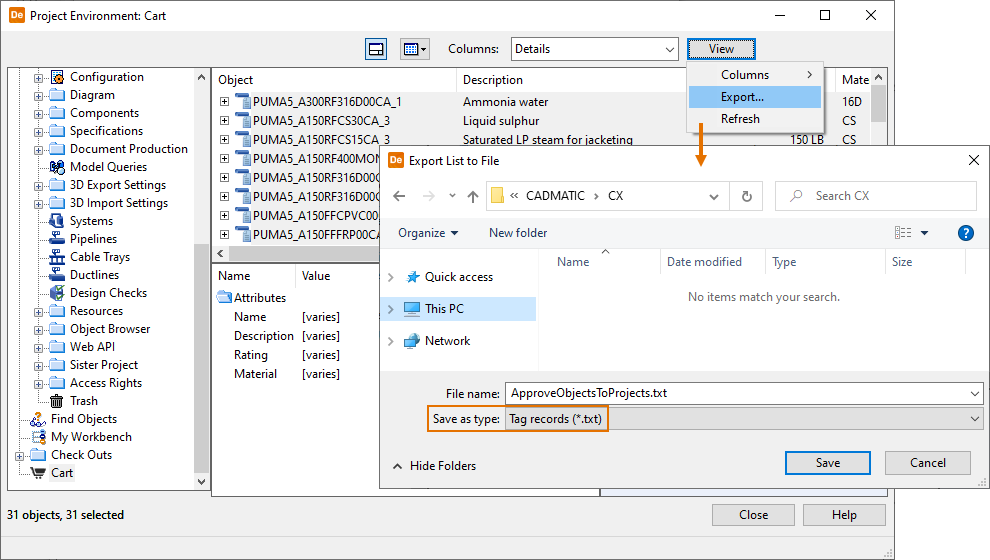
Select View > Export and export a Tag records text file to the import folder.
Note: In this example, we export the records to ApproveObjectsToProjects.txt.
(Optional) Export shared project settings
Optionally, you can create a text file that contains shared project settings that you want to take into use also in the other projects. The Multi-Project Maintenance tool can use this file as part of the Validate operation.
Important: If the copied settings contain OIDs, then those OIDs must exist in the target library or project. Otherwise, the validation performed in the Multi-Project Maintenance dialog will fail due to missing OIDs. If the objects are in the library, they must be approved to the project.
Do the following:
-
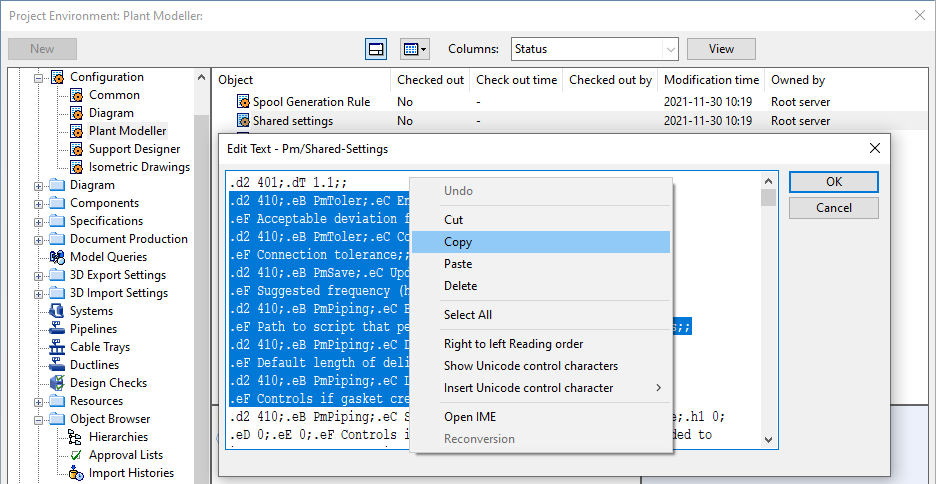
In the Project Environment dialog of the pilot project, browse to [project] > Configuration > Plant Modeller, right-click the "Shared settings" configuration object, and select Edit. The Edit Text dialog opens.
-
Select the records of the settings that you want to use also in the other projects and copy them to the clipboard.
Important: Do not copy the first row of the shared settings object as it is a version record (indicated by the tag ".dT"), not a setting record.
-
Paste the records to a new text file that you save in the import folder.
Note: In this example, we copy the records to CopyPMSharedSettings.txt.
Updating the other projects
Next, roll out the update data to the other design projects.
Validate import data
Use the Multi-Project Maintenance tool to validate the design projects against the files in the import folder.
Do the following:
-
In the CADMATIC desktop, browse to your user workspace folder in the pilot project and select Object > Tools > Multi-Project Maintenance. The Multi-Project Maintenance dialog opens.
-
Make sure Projects folder points to the folder where you have the design projects that you want to update.
-
Use a custom filter or manual selection to indicate which projects you want to validate. You can validate the projects one at a time or all at the same time, as you wish.
-
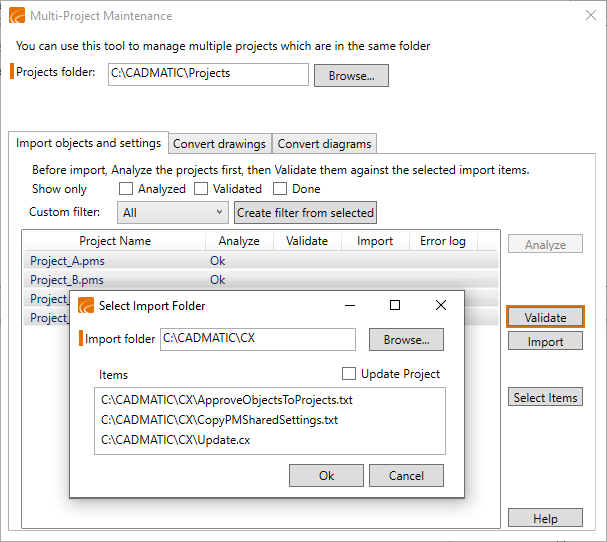
Click Validate. The Select Import Folder dialog opens.
-
Set Import folder to point to the folder where you have one .cx file and (optionally) two .txt files.
(You can ignore the Update Project option at this stage.)
-
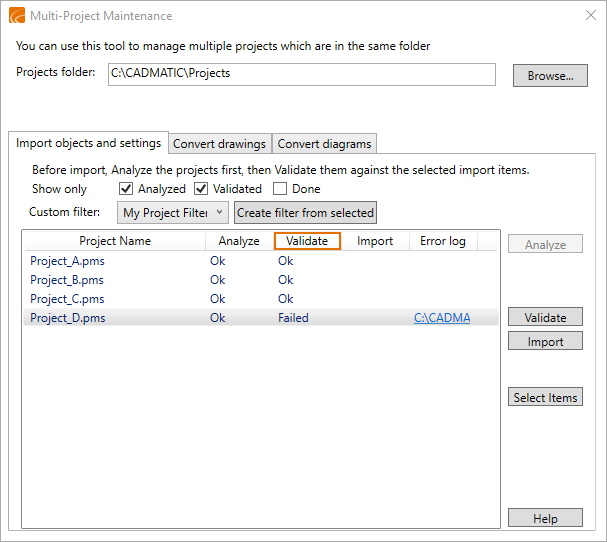
Click Ok. When the validation process is completed, the Validate column shows whether each project is "Ok" or "Failed".
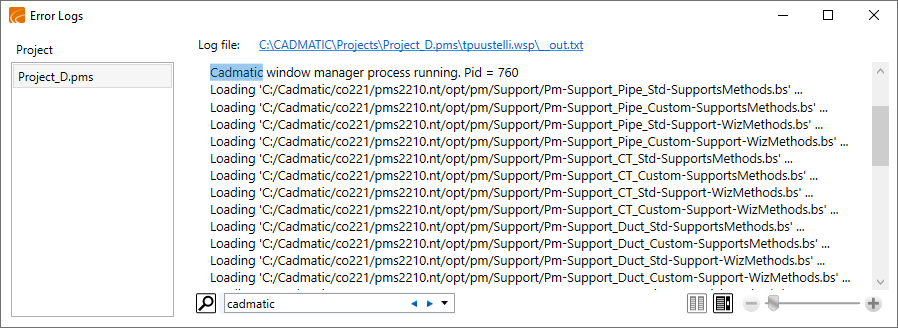
If a project failed the validation, investigate the reason in the error log that opens, and see if you can correct the problem.
Import data to design projects
After validating the design projects, use the Multi-Project Maintenance tool to import the new data to the projects.
Prerequisites
-
The security policy of the COS server is still set to allow your user profile to update the hardwired system schema.
Do the following:
-
In the Multi-Project Maintenance dialog, use a custom filter or manual selection to indicate which projects you want to update. You can update the projects one at a time or all at the same time, as you wish.
-
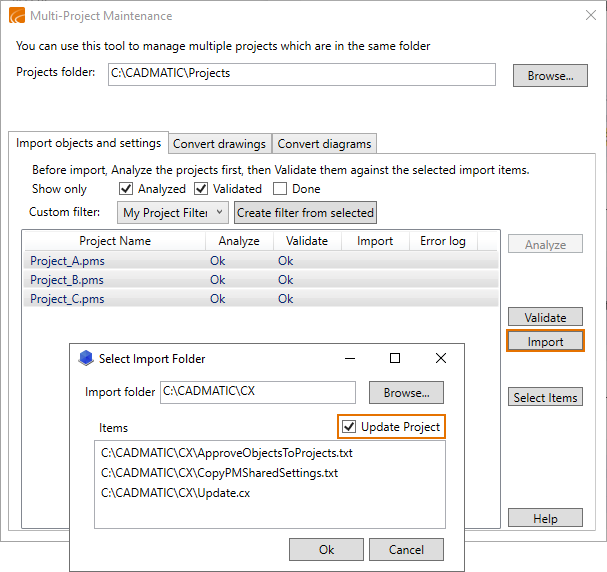
Click Import. The Select Import Folder dialog opens.
-
Make sure Import folder points to the folder where you have one .cx file and (optionally) two .txt files, and select the Update Project option.
-
Click Ok. When the import process is completed, the Import column shows whether each project is "Ok" or "Failed".
If a project failed the import, investigate the reason in the error log that opens, and see if you can correct the problem.
-
Close the Multi-Project Maintenance dialog.

(Optional) Cleaning up
When all the design projects have been updated, you can perform general clean-up, as described below.
Do the following:
-
Delete these files from the import folder or move them somewhere else to preserve them as history information:
-
The .cx file.
-
The optional .txt files.
-
-
Delete the file %localappdata%\Cadmatic\UpdateEngine\State.xmlor move it somewhere else as history information. This file contains information on the actions performed with the tool: analysis, validation, and import.
-
Set the security policy of the design environment's COS server back to not allowing your user profile to update the hardwired system schema.
-
Uninstall the temporary COS servers "ExampleProject_Root" and "Sandbox_Root", unless you plan to use them for further updates.