Desktop
The CADMATIC desktop allows you to navigate in your CADMATIC installation directory and perform various actions.
- If you are an administrator, you can use it to manage project settings, manage databases, schedule publishing of 3D models and documentation, and so on.
- If you are a designer, you can use it to manage your workspace and open design applications.
Note: The user interface and the available commands depend on whether you are using the desktop in CADMATIC Hull, CADMATIC Plant or CADMATIC Outfitting.
Opening the Desktop
In the Start ![]() menu of Microsoft Windows, do one of the following, as appropriate to your installation:
menu of Microsoft Windows, do one of the following, as appropriate to your installation:
- Select CADMATIC > CADMATIC [release] Plant. The CADMATIC Desktop dialog opens.
- Select CADMATIC Outfitting > CADMATIC [release] Outfitting. The CADMATIC Outfitting dialog opens.
You can also open the CADMATIC desktop by double-clicking its shortcut in your Windows desktop.
User Interface
The CADMATIC desktop's user interface allows you to do the following:
-
View the current directory path and navigate to a different folder. See Directory Navigation.
-
View the objects in the currently selected location. Only objects that have special meaning in the given context are shown, and from their icons you can see what a given object represents: project folder, workspace folder, data folder, or shortcut to an application or Agent.
 Show/hide details
-
 – Project
 -
 – Workspace
 -
 – Data folder
 -
 – Component Modeller application
 -
 – Plant Modeller application
 -
 – Plant Modeller for Basic Design, Detail Design, 3D Cable Design
 -
 – P&ID application
 -
 – Piping Isometrics & Spools application
 -
 – Plot Manager application
 -
 – Hull Agent
 -
 – Plant Agent, TEKLA Agent
 -
 – NAPA Agent
-
-
Manage objects by selecting the object and then a suitable command from the Object button. See Object Menu.
-
Delete objects (directories, shortcuts) by selecting the object and then Edit > Delete. See Edit Menu.
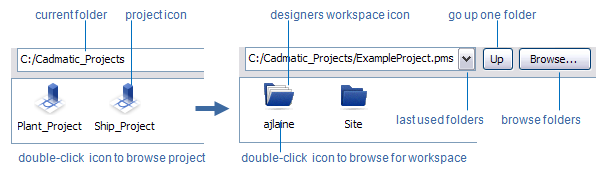
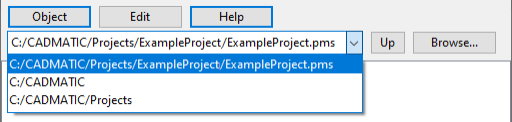
Directory Navigation
The CADMATIC desktop shows the path to the currently selected folder. You can navigate in the directory structure as follows:
- Select a previously used location from the drop-down list.
- Click Up to move from the current location to its parent folder.
- Click Browse to select a specific location with a folder browser.
Projects (.pms)
Plant Modeller is operated in the context of a project. The project data is stored in two CADMATIC Object Storage (COS) databases:
- Project database (.pms) contains data that is specific to the project.
- Library database (.lib) contains data that can be shared by several projects.
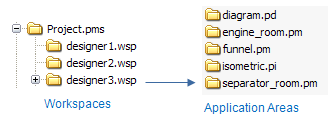
Workspaces (.wsp)
In a project, each designer works in a separate workspace. The workspace name is the same as the user's Windows login name: [username].wsp.
- You can create a workspace by navigating to the project and selecting Object > Create Workspace.
Application Areas
In their own workspace, each designer can select which CADMATIC applications to install. Each installed application has its own area in the directory structure.
When you start Plant Modeller for the first time, you are prompted to define the physical limits of the design area.
Note: One designer can have several Plant Modeller application areas in one project, but only one Piping Isometrics & Spools area and one P&ID area (because there is no need to have several).
Agent Areas
In addition to creating areas for CADMATIC applications, you can create areas for Agents.
Agents poll a shared folder and wait for service request files from a peer application to appear in it, and whenever a new service request arrives, the Agent performs the service that is specified in the file.
For more details, see Agents and service requests.
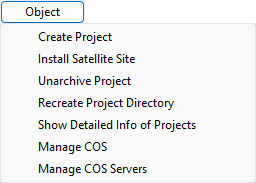
Object Menu
The CADMATIC desktop shows objects one directory at a time. The commands in the Object menu reflect where you are in the directory structure and what type of object is currently selected.
When in a folder where you can create projects and nothing is selected, the Object menu includes the following items.
|
Menu Item |
Description |
More Information |
|---|---|---|
|
Allows creating a new project. |
||
|
Allows administrator of main site to add a new satellite site. |
||
|
Allows restoring an archived project. |
||
|
Allows recreating the project directory when COS server has been restored from backup and project directory was not included in it. |
||
|
Lists the projects in the current folder and shows information on them, including the following:
Note: The database version (ProjDB Vers., LibDB Vers.) identifies the database format, which does not change with every release. For example, the 2024T1 databases are in the 23.2.0 format, not 24.1.0. If the database version already matches the new release but the new release has additional project approval objects, the database version column will display "(missing approvals)" after the version number. This message disappears after a successful conversion. |
You can select multiple projects from the list and use Object > Upgrade Project Environment to update their databases to the current software version. After the upgrade, a brief summary of the conversion results will be displayed. If the conversion fails, you can get detailed information by running Object > Upgrade Project Environment on the individual failed project. To return to the normal desktop view, select Object > Return to Normal View. |
|
|
Manage COS Servers |
Allows managing the COS network with the Manage COS Servers tool. |
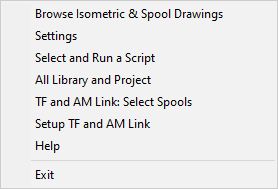
When in the workspace folder and a specific application or Agent area is selected, the Object menu contains items specific to that application or Agent.
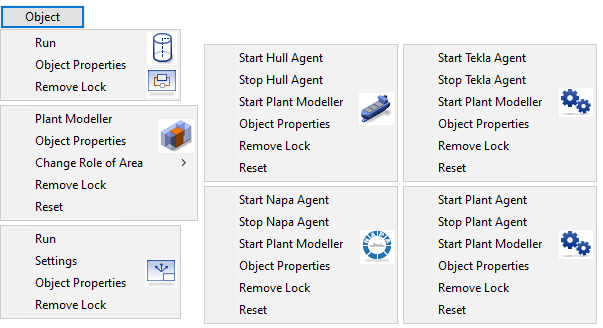
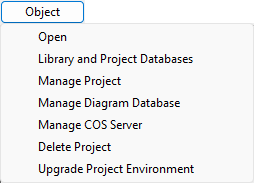
When a project is selected, or when in a workspace folder and the Parent-> icon is selected, the Object menu includes the following items.
|
Menu Item |
Description |
More Information |
|---|---|---|
|
Opens the selected folder; same as double-clicking the folder. |
— |
|
|
Opens the Project Environment object browser window where administrator can manage the library of the project and the project itself. |
||
|
Opens the Manage Project dialog where administrator can review and manage the general project settings and the replica servers of the project. |
||
|
Opens the Manage Database Server dialog where administrator can manage the SQL database of the P&ID application. |
||
|
Opens the Manage COS Servers dialog where administrator can manage the COS network. |
||
|
This command is only available at a replica site. The command relinquishes the ownership of all objects to the parent site and removes the replica P&ID database from the SQL server. Important: After closing the project site, make sure all the data is properly replicated to the master before you delete the replica server. If using online replication, use the Update command. |
||
|
Allows deleting the selected project, if no application is actively using it. |
||
|
Allows converting the library and the project to the current software version's format. Typically this must be done after upgrading to a new major version, and the program prompts the user if the task has not been done yet. |
When in the project folder or when in the workspace folder and nothing is selected, the Object menu includes the following items.
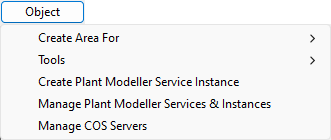
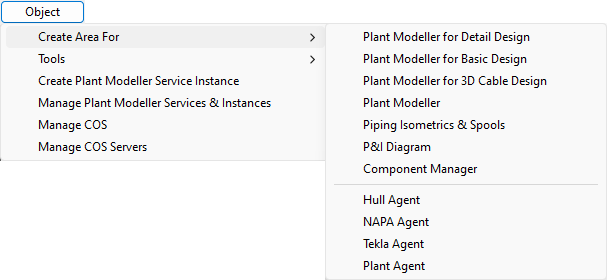
Object > Create Area For
The Object > Create Area For menu includes the following items.
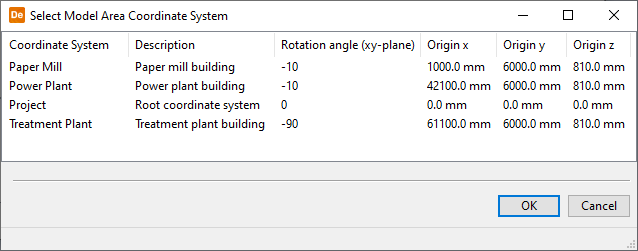
After selecting the area type to be created, if project administrator has defined local coordinate systems, you are prompted to select which coordinate system to use for the new area. The default, non-rotated coordinate system is called "Project".
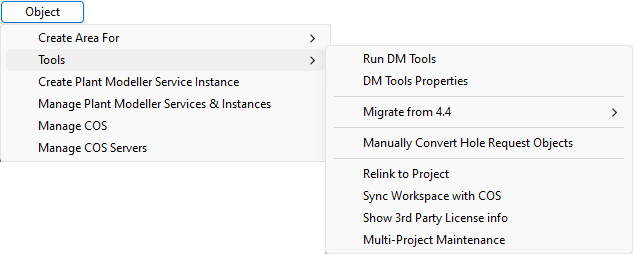
Object > Tools
The Object > Tools menu includes the following items.
|
Menu Item |
Description |
More Information |
|---|---|---|
|
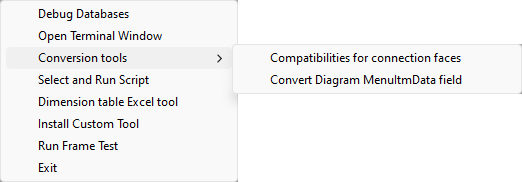
Opens the DM Tools window, which allows you to run the following commands:
See also Datamatic tools. |
— |
|
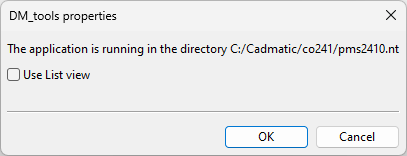
|
Opens a dialog that shows the directory where the application is running and allows selecting whether the desktop shows items as icons or as a list.
|
— |
|
|
Migrate from 4.4 |
Allows migrating Plant Modeller and Pipe (= old name of Piping Isometrics & Spools) application areas from software version 4.4. |
— |
|
Check Unicode Conversion Compatibility |
Displays a message that indicates whether your site can support or already supports Unicode. |
— |
|
Opens the Hole Request Conversion Tool dialog where you can manually convert old RFH (Request For Hole) objects to new Hole Request objects. Normally, upgrading to 2019T3 or newer converts the RFH objects automatically, but they might remain unconverted if automatic conversion has failed or the objects are checked out to an area that has not been opened in this version. The tool shows the remaining RFH objects, lists the issues found in them, and allows converting them to the new format.
|
||
|
Must be run if COS server has been restored from backup and project directory has a new path. |
||
|
Every user must run this command if COS server has been restored from backup. |
||
|
Allows updating multiple projects with data that has been exported to CX files and converting documents created in earlier software versions to the current document format. |

Edit Menu
You can delete an item shown in the CADMATIC desktop by selecting the item and then Edit > Delete.