Modify
On the Drafting tab, the Modify group contains tools that can be used to modify 2D drafting objects and to change their visual appearance. Some of the tools only work on specific object types.
Edit

You can modify a 2D drafting object.
Do the following:
-
In the Modify group, click
 Edit. The cursor displays as a crosshair.
-
Pick the object you want to edit.
-
Edit the object.
-
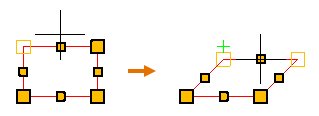
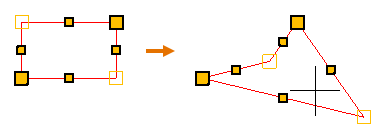
If you picked a line, multiline, rectangle or spline, its line points are displayed.
You can click and drag or use the additional tools to customize the object.
 Show/hide details
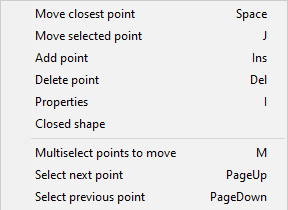
The context menu contains the following tools:
-
Move closest point (Space) – This is the same as clicking with the left mouse button; the command selects the point closest to the cursor and allows you to move that point. If you click a line segment's middle point, the command selects both end points of that segment.
Repeat the command or click to accept the move.
-
Move selected point (J) – Allows you to move the selected line point, regardless of where the cursor is when you start the command.
Repeat the command or click to accept the move.
-
Add point (Ins) – Adds a new line point.
-
Delete point (Del) – Deletes the selected line point.
-
Properties (I) – Opens the properties dialog described in Line Properties or Multiline Properties. The changes you make only affect the selected line object.
-
Closed shape – Connects the end points with one or more additional line segments to form a closed shape. If the line is already closed, removes a line segment to make the line open-ended.
-
Multiselect points to move (M) – Allows you to select several points from a line object. Press Enter to accept the set and then move the selected points to the required location.
-
Select next point (PageUp) – Selects the next line point.
-
Select previous point (PageDown) – Selects the previous line point.
-
-
If you picked an arc, its line points and center point are displayed.
You can click and drag or use the additional tools to customize the object.
 Show/hide details
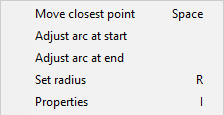
The context menu contains the following tools:
-
Move closest point (Space) – This is the same as clicking with the left mouse button; the command selects the point closest to the cursor and allows you to move that point. This can be used to change both the length and the radius.
-
Adjust arc at start – Allows adjusting the arc's length by moving the start point. The radius remains the same.
-
Adjust arc at end – Allows adjusting the arc's length by moving the end point. The radius remains the same.
-
Set radius (R) – Opens a dialog for changing the radius of the arc.
-
Properties (I) – Opens the properties dialog described in Arc Properties. The changes you make only affect the selected arc object.
-
-
If you picked a circle, its line points and center point are displayed.
You can click and drag or use the additional tools to customize the object.
 Show/hide details
The context menu contains the following tools:

- Move closest point (Space) – This is the same as clicking with the left mouse button; the command selects the point closest to the cursor and allows you to move that point. This can be used to move the circle or to change its radius.
-
Set radius (R) – Opens a dialog for changing the radius of the circle.
-
Properties (I) – Opens the properties dialog described in Circle Properties. The changes you make only affect the specified circle object.
-
If you picked a hatch pattern, the Hatch properties dialog opens. See Hatch Properties for details.
-
If you picked text, the Text Properties dialog opens. See Text.
-
If you picked a dimension, its line points are displayed.
You can click and drag or use the additional tools to customize the object.
 Show/hide details
The context menu contains the following tools:

-
Move closest point (Space) – This is the same as clicking with the left mouse button; the command selects the point closest to the cursor and allows you to move that point. This can be used to move or resize the extension lines or to move the dimension text.
-
Properties (I) – Opens the properties dialog described in Dimension Properties. The changes you make only affect the specified dimension object.
-
-
If you picked a label, the Edit label text dialog opens. See Label.
-
If you picked a 2D symbol, its origin point is displayed.
You can click and drag or use the additional tools to customize the object.
 Show/hide details
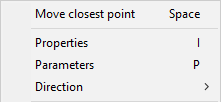
The context menu contains the following tools:
-
Move closest point (Space) – This is the same as clicking with the left mouse button; the command selects the origin point and allows you to move the symbol.
-
Properties (I) – Opens the properties dialog described in Symbol Properties. The changes you make only affect the specified symbol object.
-
Parameters (P) – Opens a symbol-specific dialog for changing the parameters of the symbol.
-
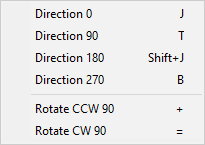
Direction – Opens a menu where you can select the direction of the symbol.
-
-
If you picked a section marker, they consist of different types of objects (lines, text, symbols), and the editing process depends on which individual element you picked; lines are edited like any other drafting lines, text like any other drafting text, and so on.
-
If you picked a table, its move point and scaling points are displayed.
You can click and drag or use the additional tools to move or resize the table.
 Show/hide details
The context menu contains the following tools:

- Move Table (M) – This is the same as clicking with the left mouse button; the command selects the move point and allows you to move the table.
-
Properties (I) – Opens the Table Properties dialog.
-
-
Press Enter to accept the modified object.
The cursor turns into a cross-hair again to indicate that you can pick another object for editing.
-
Press Enter or Esc to stop editing drafting objects.
Delete
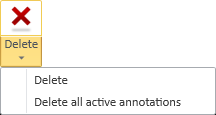
You can delete either a set of drafting objects or all of them from the active page or from an individual drawing view.
Delete
You can delete a set of annotations.
Do the following:
-
In the Settings group, in the Annotating field, select whether to delete annotations from the active page or from a specific drawing view.
-
In the Modify group, click Delete.
-
Pick the annotation objects that you want to delete and press Enter. The selected objects are deleted.
-
Press Enter again if you want to delete another set of objects.
Delete all active annotations
You can delete all annotations from the active page or view.
Do the following:
-
In the Settings group, in the Annotating field, select whether to delete all annotations from the page or from a specific drawing view.
-
In the Modify group, select Delete > Delete all active annotations. You are prompted to confirm the action.
-
If you want to delete all annotations from another target, select the new target from the Annotating field and then press Enter.
Move

You can move one or more 2D drafting objects to a different location.
Note: You can use Stretch dimension level to move dimensions so that their reference points remain where they are.
Do the following:
-
In the Modify group, click
 Move.
Move. -
Pick the objects you want to move and press Enter.
-
Pick the base point and a second point. This defines the direction and the offset and moves the objects.
-
You can pick another point, as many times as needed, to move the objects incrementally.
-
Press Enter to complete the move operation.
-
Press Enter again if you want to move another set of objects.
Rotate

You can rotate one or more 2D drafting objects around a user-defined base point.
Do the following:
-
In the Modify group, click
 Rotate.
 -
Pick the objects you want to rotate and press Enter.
-
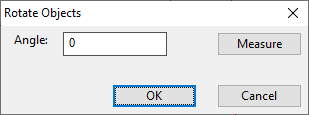
Pick the base point around which to rotate the objects. The Rotate Objects dialog opens.
-
Enter the rotation angle. Alternatively, click Measure to measure the angle using two base points and directions. Then click OK.
-
Press Enter if you want to rotate another set of objects.
Copy

You can make one or more copies of a set of 2D drafting objects. The copies are created in a given direction, with the same amount of offset between the copies. If the set contains associative
Do the following:
-
In the Modify group, click
 Copy.
Copy. -
Pick the objects you want to copy and press Enter.
-
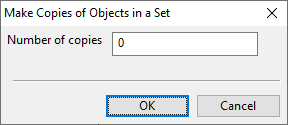
Pick the base point and a second point. This defines the direction and the offset for the copying, and the Make Copies of Objects in a Set dialog opens.
-
Enter the number of copies to create and click OK.
-
Press Enter if you want to copy another set of objects.
See also Copy to clipboard.
Scale

You can use the Scale tool to change the scale of one or more 2D drafting objects. If the set contains associative dimensions, after the scaling they are no longer associative.
Do the following:
-
In the Modify group, click
 Scale.
 -
Pick the objects you want to rescale and press Enter.
-
Pick the base point for the rescaling. The Rescale Objects in a Set dialog opens.
-
Enter the scaling factor to use and click OK.
Offset

You can copy an existing line, rectangle, arc, circle, or spline so that the new drafting object is inserted at a user-defined offset on either side of the original object. For example, if the original object is a rectangle, you can use this command to insert a smaller rectangle inside or a larger rectangle outside the original object.
Do the following:
-
In the Modify group, click
 Offset. The Offset distance dialog opens.
 -
Specify the distance from the original object to the new object, and click OK.
-
Click the object that you want to copy.
-
Move the cursor to that side of the original object where you want the new object to be placed, and click to accept the insertion.
Mirror

You can mirror one or more 2D drafting objects. You can choose whether to keep the original objects after the mirroring. If the set contains associative dimensions or hatches, the new objects do not have any associations.
Do the following:
-
In the Modify group, click
 Mirror.
 -
Pick the objects you want to mirror and press Enter.
-
Define the mirror line by picking the first point (the line rotates around this point) and the second point.
-
You are prompted whether to keep the source objects. Select Yes to keep them or No to delete them.
Trim

You can remove a part of a line, arc, or spline, up to the point where it intersects with another straight line or curve.
In this example, a straight line is trimmed three times, using the boundaries of two circles that intersect the line.

Do the following:
-
In the Modify group, click
 Trim.
Trim. -
Click the line you want to trim.
-
Click the part you want to remove from the line.
Extend

You can extend the end of a line, spline, or arc to the point where it runs into another straight line or curve.
In this example, the straight line is extended to the boundary of the nearby circle.

Do the following:
-
In the Modify group, click
 Extend.
 -
Click the line you want to extend.
-
Move the cursor in the direction you want the line to extend, and click to accept the insertion.
Align

You can align the top, bottom, left or right sides of a set of 2D drafting objects. Not all drafting objects can be aligned, and some object types have special handling, as described below.
-
Angular dimensions cannot be aligned.
-
Linear dimensions can only be aligned if all the selected entities are linear dimensions with parallel dimension lines. In this case, the dimension lines are aligned, but the reference points stay where they are.
-
Labels themselves are aligned with the other objects in the set, their reference points stay where they are.
In this example, labels are aligned using the Align Bottom command.

Do the following:
-
In the Modify group, select
 Align and then the side to align.
 -
Pick the objects you want to align and press Enter.
The object that is farthest in the given direction stays where it is, and the other objects in the set are aligned with it.
Properties

The Properties drop-down menu contains tools for temporarily changing the default properties of the annotation tools and for changing the properties of existing annotations.
Current properties | Objects in a set | Set properties in a set
Current properties
The project administrator has defined the annotation property defaults that you should use to annotate documents, as described in Annotation Property Defaults. Normally, to annotate a specific page
You can override the current administrator-defined defaults, if needed, from the Properties drop-down menu.
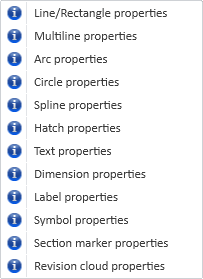
Changing these properties will make them the new defaults in the current editing session.
Label properties can only be set via this menu. The Label properties command is disabled when the Annotating field is set to "Page".
The original default values are restored if you change the page, switch to another tab, or close the document.
For more information on the different properties, see Annotation Properties.
Objects in a set
In the Properties menu, the Objects in a set section contains tools for changing the properties of several drafting objects at the same time and for deleting drafting objects that have a certain property value.

Apply properties
You can apply the current default properties to a set of 2D drafting objects. The default properties can be:
-
The default properties that the administrator has defined as described in Annotation Property Defaults.
-
The default properties of this editing session. That is, if you have modified the properties as described in Current properties, then those settings are used as the default properties until you close the document.
Be aware of these exceptions:
-
You cannot apply properties to revision clouds. (You can use the Edit tool to edit the line properties of an individual revision cloud, as described in Edit.)
-
When applying properties to a section marker, the program applies symbol properties to it.
Do the following:
-
In the Modify group, select Properties > Apply properties.
-
Pick the objects whose properties you want to change and press Enter.
The relevant properties are applied to the specified objects.
Advanced delete
You can delete objects that have a given property value such as color = red.
Do the following:
-
In the Modify group, select Properties > Advanced delete.
-
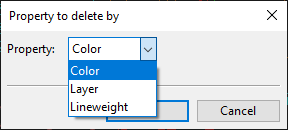
Pick the objects to include in the set and press Enter. The Property to delete by dialog opens.
-
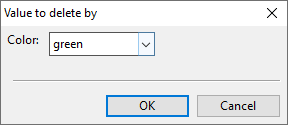
Select which property to use as the criterion, and click OK. The Value to delete by dialog opens.
-
Select which property value to use as the criterion, and click OK.
The objects that have the specified property value are deleted from the set.
Set properties in a set
In the Properties menu, the Set properties in a set section contains tools for setting a specific layer, color, or lineweight to several objects at the same time, regardless of their object type.

Do the following:
-
In the Modify group, select Properties and then Layer, Color, or Lineweight.
-
Pick the objects to include in the set and press Enter. A dialog opens for selecting the new value.
-
Select the property value to assign and click OK.
Clipboard
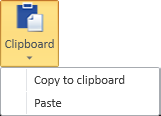
You can copy 2D drafting objects to the clipboard and then paste them to another page or document.
Copy to clipboard
You can copy 2D drafting objects to the clipboard.
Note: You cannot copy labels
Do the following:
-
In the Modify group, select Clipboard > Copy to clipboard.
-
Pick the objects you want to copy and press Enter.
-
Pick the base point to use when pasting the objects and press Enter.
Paste
You can paste 2D drafting objects from the clipboard.
Do the following:
-
In the Modify group, select Clipboard > Paste.
-
Move the cursor to the intended location of the pasted object, using the base point you defined when copying the objects, and pick that location.

