3D-Import Manager
On the Model tab of Plant Modeller, the Imports button opens the 3D-Import Manager tool that you can use for importing model data from various file formats. Project administrator can configure Plant Modeller Service Instance to automatically perform file imports defined in this tool, as described in Managed Imports tab.
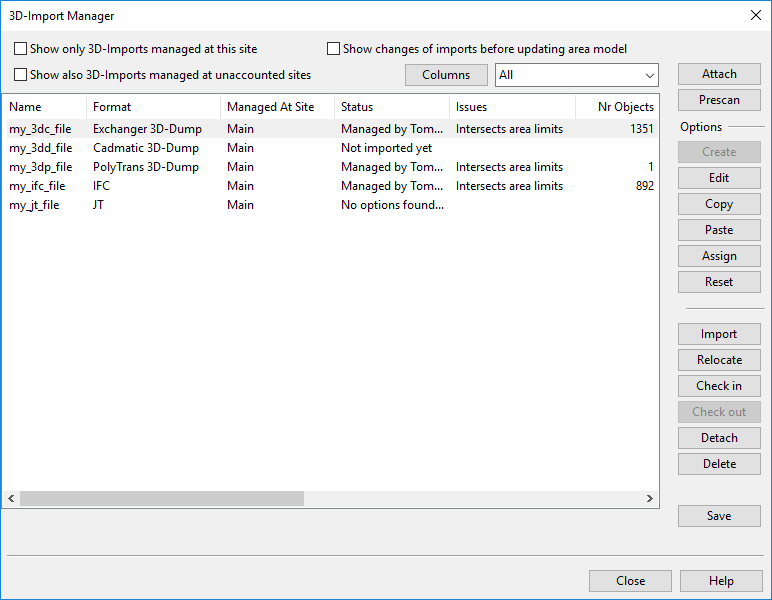
3D-Import Manager has general settings at the top, command buttons on the right, and an import list pane that displays the currently attached, possibly imported data files. You must create or assign (3DD only) import options for each attached data file.
If the import file contains information about object extents, the extents are shown in Plant Modeller work views as dimmed boxes, and selecting the file from the import list highlights the boxes. You can click a work view to temporarily hide the import manager and navigate in the model. Pressing Esc displays the import manager again.
The general import procedure is described in Importing with 3D-Import Manager.
The user interface of the import manager is described in detail below.
Settings in 3D-Import Manager
At the top of 3D-Import Manager you can specify the following general settings.

-
Show only 3D-Imports managed at this site – If selected, the import list only shows imports that are managed at this site.
If the option is not selected, the list can also show imports that are managed at other sites or sites that cannot be identified.
-
Show also 3D-imports managed at unaccounted sites – If selected, the import list shows imports that have no information about which site is managing them, for example because the data file has been detached. You are allowed to delete an unaccounted import—this removes the associated objects from the model.
If the option is not selected, files that have no site designation are not listed.
-
Show changes of imports before updating area model – If selected, starting the import displays a dialog that allows browsing work views before updating the model, selecting which pending imports to accept (new, changed, deleted, unchanged), and highlighting the incoming changes in work views.
If the option is not selected, you are only prompted to confirm the deleting of objects.

Columns in 3D-Import Manager
3D-Import Manager displays various information about the files attached for import. You can define custom column layouts and then use the drop-down menu to switch between them.

To manage column layouts, click Columns and select an action:
-
New – Opens the Select View Columns dialog for defining a new column layout.
In the layout editor, enter a name for the layout, and select which columns to show, in which order.
-
Edit – Opens the Select View Columns dialog for editing the current column layout. You cannot edit the default "All" layout.
-
Remove – Deletes the selected custom column layout.

These columns can be displayed.
|
Column |
Description |
|---|---|
|
Name |
The name of the attached data file, in lower-case letters. |
|
Format |
The format of the file. |
|
Managed At Site |
The site where the import is managed, for example "Main". "Unaccounted for" means that site information is not available for the file, for example because the data file has been detached after import. |
|
Status |
The status of the attached file. The status can indicate that the user has or has not performed some action, for example "Not imported yet", "No options found for 3D-import", or "Managed by <username>". It can also indicate if previously available data has been removed, for example "Datafile is missing" or "Missing data". If the status field is blank after import, the objects are currently checked in. |
|
Issues |
A list of issues related to the import, such as imported objects not being completely inside the area limits, or group having been trimmed to fit inside the limits. Note: When saving or checking in, you might be prompted to allow the system to trim objects that intersect the limits and to delete objects that are completely outside the limits. |
|
Nr Objects |
The number of objects in the imported group. |
|
Last Imported |
The date and time when the file was last imported. Note: To see this information, the import group must be checked out. |
|
File Modified |
The date and time when the file was last modified. Note: To see this information, the import group must be checked out. |
|
Options |
Information about the 3D import options and where they are stored. Possible values: |
|
Prescanned |
Prescanning status. Possible values:
|
|
Xmin, Xmax, Ymin, Ymax, Zmin, Zmax |
The X/Y/Z extents of the prescanned/imported group in millimeters. |
|
Attached By |
The username of the user who attached the data file. |
|
Path |
The path to the attached data file. |
|
The X/Y/Z offset for IFC and NWD models imported with a custom base point defined in 3D-Import Options > General > Miscellaneous. |
Command buttons in 3D-Import Manager
3D-Import Manager displays these command buttons.
|
Button |
Description |
|---|---|
|
Columns |
Opens a menu for managing column layouts. See Columns in 3D-Import Manager for details.
|
|
Attach |
Opens a file browser for adding files to the import list pane. The Attach command creates a link file that contains tag records that store the import configuration of the data file. For more information, see 3D-Import Manager link files. |
|
Prescan |
Scans the selected import files for object attributes and object extents. Attributes can be used to map objects to systems, and object extents are shown in the model area to indicate where the imported objects would be located. |
|
Create |
Opens a dialog for creating an import configuration for the selected file, for example, to map imported objects to systems. If prescanning has not been performed, the user is first prompted to allow scanning. See 3D-import options. After defining the options, the user can choose whether to save them locally or in COS. See Saving the import options. Note: After defining the options for one data file, the Copy–Paste buttons allow copying system mappings and attribute mappings to other imports of the same type. |
|
Edit |
Opens a dialog for editing the import options of the selected file, and for saving (a copy of) the options to COS if wanting to share the options with other imports of the same type. |
|
Copy |
Copies the system mappings and attribute mappings of the selected import. The settings can then be pasted to other imports that use the same format. |
|
Paste |
Pastes the copied system mappings and/or attribute mappings to the selected imports.
|
|
Assign |
Opens the object browser for assigning import options stored in COS to the selected import. Note: This action links the specified import to shared settings. Editing the import options and saving them to COS will affect all imports that are assigned to use those settings. |
|
Reset |
Removes import options from the selected files. |
|
Import |
Starts the import of the selected files. |
|
Relocate |
Opens a submenu with two commands: Move and Rotate. These commands allow the user to move and rotate the 3D objects of the selected, imported group as a single entity. |
|
Check in |
Checks in the selected import (group and objects). |
|
Check out |
Checks out the selected import (group and objects). |
|
Detach |
Detaches the data file by deleting the link file that the system created when the data file was attached. If the data file has already been imported, the import group and the imported objects remain in Plant Modeller, but in the import manager the status of the import becomes "Unaccounted for" and it is not possible to attach the same data file again unless the import is deleted first. |
|
Delete |
Deletes the selected import (group and objects). |
|
Save |
Saves the model and updates the project database. If some imported objects are not completely within the project area, the user is prompted to allow the objects to be trimmed. |

