Lighting Style
You can define light settings only for shaded views.
General Lighting
This property panel allows you to set the general lighting parameters.
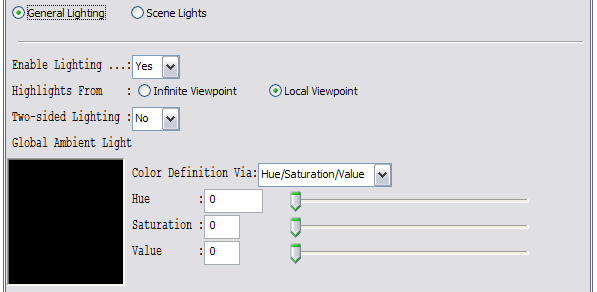
Highlights from Local or Infinite Viewpoint
Highlights caused by specular reflectance are computed either from a local or an infinite viewpoint. The local viewpoint gives more realistic images but is computationally more expensive since this requires the computation of direction between the viewpoint and each vertex in the scene. If the infinite viewpoint is selected then OpenGL uses viewing direction as the direction between viewpoint and each vertex in the scene.
Two-sided Lighting
Two-sided lighting controls how back-facing polygons are illuminated. If this is enabled then OpenGL reverses normals for back-facing polygons before it computes their illumination. The result is that back-facing polygons are correctly illuminated. However these additional operations usually make two-sided lighting to perform more slowly than one-sided lighting.
Usually 3D objects in a scene are modeled using a "closed" polygon set in which case back-facing polygons are never rendered and so two-sided lighting has no effect. However 3D objects imported from DXF™-files and objects containing open surfaces of revolution have back-facing polygons that get rendered. These will be incorrectly illuminated with one-sided lighting.
Global Ambient Light
Global ambient light specifies the amount of ambient light that is not from any particular light source. Using the enclosed color tool you can set the intensity and color for this global ambient light.
Scene Lights
In Scene Lights property panel you can configure up to 8 light sources to be used in the scene. Only one of these 8 lights is active and editable at a time. There is a choice that you use to select the active light.
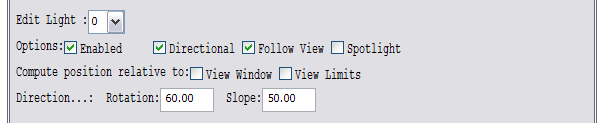
Options
There are a number of options that you can set for the active light. The state of these options activates or deactivates some other user interface components in the tool.
-
Enabled. First of all a light source can be enabled or not. If enabled then the values you have provided are used in the lighting computations. If light is not enabled then it maintains its parameters but is not included in lighting computations.
-
Directional. Select if the light source is directional or positional. A directional light source can be considered to be located infinitely far away from the scene. Light rays are parallel when they reach objects in the scene. A positional light source has an exact location within the scene and this determines its effect on objects in the scene.
-
Specify the direction to a directional light source by giving two angles: rotation and slope. Rotation is measured from the x-axis and slope from x-y plane. Positive direction for rotation is from x toward y. For slope positive direction is up from x-y plane.
-
For a positional light source you enter its {x,y,z} coordinates.
-
-
Follow View. This option specifies whether the light source is positioned relative to the camera or is stationary. If enabled then the coordinate system where you specify the location is such that z-axis points from the target object towards the camera. x-axis points to the right and y-axis points up as seen in the image. Angles for a directional light source are also given in this coordinate system if 'Follow Camera' is enabled.
-
Spotlight. You specify additional parameters that make the light source to behave as a spotlight. This option can't be enabled for directional light sources.
Attenuation
In OpenGL each positional light source can be attenuated. This means that the further the object is from the light source the less it gets illuminated by that light source. If option 'Directional' is not set then a choice item that you can use to select the type of attenuation is visible.
OpenGL computes attenuation factor at a vertex from the following formula:
1/(Kc + Kl*d + Kq*d*d),
where Kc, Kl, and Kq are settable attenuation factors and d is the distance between the light source and the vertex. In this set-up tool you have the following four types of attenuation formulas:
1) No attenuation (Kc=1, Kl=0, Kq=0),
2) 1/(1 + Kl*d),
3) 1/(1 + Kq*d*d),
4) 1/(1 + Kl*d + Kq*d*d),
The constant attenuation factor, Kc, has to be set 1.0. The linear, Kl, and quadratic, Kq, factors are computed from one or two sample points that you specify. If you decide to use formulas 1, or 2 then you will be prompted for the distance where the light will be attenuated to be 90% of the original. If you decide to use formula 4 then you will also be prompted for distance where the light has been attenuated to be 50% from the original.
The reason why Kc has been set to 1 is that you can always adjust the original intensity of the light source.
Color Components
A light source has three color components that participate in the illumination of the scene. All these components are attenuated the same way by attenuation factors and are treated the same way for spotlights.
Ambient component specifies the constant RGB (red, green, blue) intensity that light source emits to a vertex. The amount of light at the vertex is not dependent on the direction of light rays and surface normal at the vertex. Usually this component is small (if not zero) for example (50,50,50).
Diffuse component specifies the RGB intensity of light that will be used to compute diffuse reflection from surfaces of objects. White, bright light would be (255,255,255).
Specular component specifies the RGB color that is used to compute highlights on objects.
You can adjust one color component at a time. There is a choice item that you use to select which color component you want to edit.
You can set the RGB intensity for the selected color component using either RGB controls or HSV (Hue, saturation and value) controls. There are both data entry fields and sliders for each RGB (HSV) component.
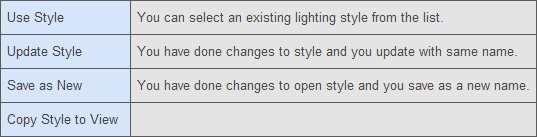
Managing lighting styles
You can manage lighting styles with the next buttons: