Filtering views by object visibility level
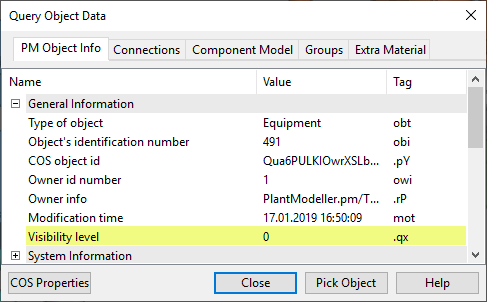
Model objects have a 'Visibility level' (.qx) attribute, which provides a simple method for filtering objects out from certain views, or even from all views.
-
New objects have a default visibility level of 0.
-
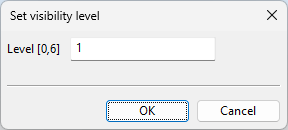
Using the command Set visibility level of objects, users can define the visibility level of each object as a value between 0 and 6, and then use these values to show or hide objects in specific views.
-
Objects that are marked as inactive have a visibility level of 7, which means that they are not visible in any view.
-
Objects can be set as active or inactive, as described in Active objects.
Views have a filter level property that defines the range of object visibility levels allowed in each view.
-
New views have a default filter level of 0–6, which means that all active objects are shown in the view.
-
Users can set each view to use a custom filter level range such as 1–3, which allows only those objects whose visibility level is within that range to be visible in the view.
The range can also be set to a single visibility level, such as 0–0.
For example, if an object uses visibility level 1 and a view is set to filter level 0–0, then the object is not shown in that view.
This visibility level based filtering is applied also when using the command Visualize only selected objects. So being filtered out by visibility level is the same as not being in the view box at all.
Example
In this example, we set visibility levels for objects so that the views Axo1, Top, Front, and RightSide would show the objects of specific systems while hiding others.
Set the Visibility Level of Objects
-
Select Home tab > Show group > Visualization control > Set visibility level of objects.
-
Select the objects whose visibility level you want to change. In this example, we use the select-by-system method to select objects whose system is Platform, Railing, or Stairs. Press Enter to confirm the selection.
-
In the Set visibility level dialog, specify the value as 1, and click OK.
-
In the same way, select objects whose system is Water (which includes all pipes), and set their visibility level to 2.
Set the Filter Level of Views
-
Select Home tab > Show group > Views.
-
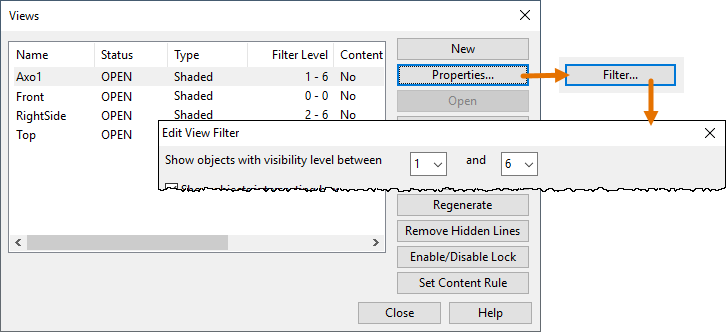
In the Views dialog, select the 'Axo1' view and click Properties.
-
In the Set Properties of View dialog, click Filter.
-
In the Edit View Filter dialog, define the value range as 1–6, and click OK.
Now objects whose visibility level is 0 (default for new objects) will not be shown in Axo1, but the objects whose visibility we just set to levels 1 and 2 are shown.
-
In the same way, set the filter levels for the other views: Front to 0–0, RightSide to 2–6, and Top to 3–6.
View the Results
In the example picture below, you can see the following results.
-
In the RightSide view, the filter level is 2–6, so only the objects (pipes) whose visibility level was set as 2 are shown (other objects are level 0 or 1).
-
In the Front view, the filter level is 0–0, so only the objects that have the default visibility level 0 are shown.
-
In the Axo1 view, the filter level is 1–6, so only the objects whose visibility level was set as 1 (System is Platform, Railing or Stairs) or 2 (System is Water) are shown.
-
In the Top view, the filter level is 3–6, so no objects are shown.
