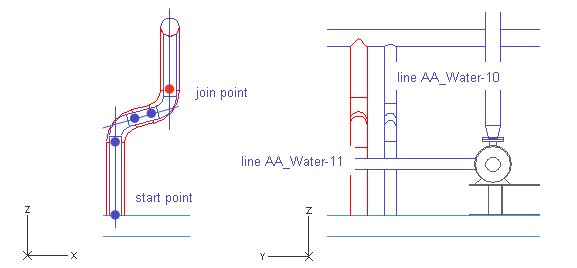
Pipeline 11
This pipeline starts at the tank top and follows the pipeline AA_Water-10 at five geometry points. This time the new pipe follows the centerline of the pipeline AA_Water-10 (distance u=0), but you could align pipelines according to their circumferences. Stop the routing at the fifth point and start routing a new pipe at the join point to get a branch into the run pipe.
Following a Pipe
Do the following:
-
To follow an existing pipe, select Piping > Follow pipe.
-
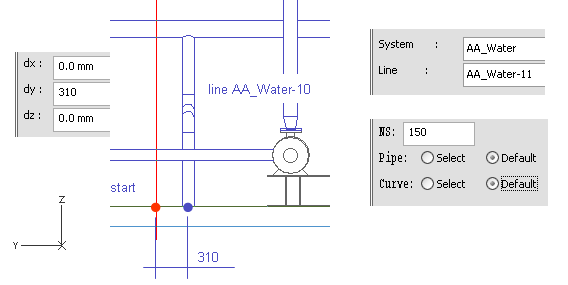
Move the cursor near the end of the pipe at the tank top.
-
Press Q to lock the cursor.
-
Press D to define the relative distances.
-
For dy, enter 310 as the value.
-
Click OK.
-
Press Space.
-
For System, select AA_Water.
-
For Line, select AA_Water-11.
-
Click Done.
-
For NS, enter 150 as the value.
-
For Pipe and Curve, select Default.
-
Click OK.
-
Move the cursor inside the pipeline AA_Water-10.
-
Press O to select it as a followed pipe.
-
Press Enter.
-
For u, enter 0.0 mm as the value.
-
For v, enter 310 as the value.
-
Click OK.
-
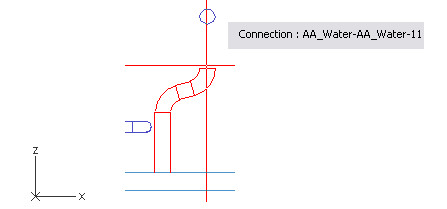
Press Space to accept the points to follow.
-
Press Enter to stop following when the geometry point of the upper elbow is selected.

-
Click OK.
You have now routed a pipe that follows the route of another pipe.
Start routing a new pipe to finish the pipe.
Do the following:
-
Select Piping > Route pipe.
-
Move the cursor near the end of the pipe.
-
Press J to connect automatically to the pipe.
-
Click Yes to accept the connection.
-
Move the cursor inside the run pipe.
-
Right-click, and select Create branch.
-
Press Enter.
-
Click Yes.
You have now routed a new pipe that follows the route of a previous pipeline and ends in the run pipe with a branch.