The drawing should always be drawn using real measures. Normally one drawing unit represents one millimeter. Therefore for example a 10 centimeters long line should be drawn as 100 drawing units long line. This makes it possible to print the drawing in various scales easily (for example 1:10 or 1:50).
Cabinets
Do the following:
- Select Home tab > Draw group > Line.
- Enter absolute coordinates800,1200on the command line for the start point of the line.
- Enter relative coordinates@0,3900 on the command line for the endpoint of the line.
- Draw similarly the following
lines:
- Start point: 800,1200 endpoint: @600,0
- Start point: 1400,1200 endpoint: @0,3900
- Start point: 800,1800 endpoint: @600,0
- Start point: 800,2400 endpoint: @600,0
- Start point: 800,3900 endpoint: @600,0
- Start point: 800,4500 endpoint: @1100,0
- Start point: 800,5100 endpoint: @1100,0
- Start point: 1900,5100 endpoint: @0,-600
- Select Home tab > Draw group >
 (Rectangle).
 - Enter 1900,4500 on the command line for the lower left corner and @600,600 for the upper right corner of the rectangle.
- Draw another cabinet using points 2500,4500 and @600,600.
Kitchen sinks
Draw two 400x350mm sized kitchen sinks.
Do the following:
- Select Home tab > Draw group > (Rectangle).
- Enter 950,2450 on the command line for the lower left corner and @400,350 for the upper right corner of the rectangle.
- Draw another cabinet using points 950,2850 and @400,350.
Kitchen table and a chair
Let's draw a kitchen table and one chair. The rest of the chairs will be drawn later.
Do the following:
- Select Home tab > Draw group >
 Circle menu > Centerpoint circle.
 - Enter 2700,2900 for the center point of the circle and 400 for the radius of the circle.
- Create
a hatch by selecting Home tab > Draw group >
 (Hatch).
 - Select hatch area as "Hatch area by closed area search" and Line for the hatch pattern (first button). Enter 50 for the pattern scale and 45 for the pattern angle. Function asks for a point close to the border. Click a point inside the circle just drawn and accept the selection by pressing Enter.
- Select Home tab > Draw group > (Rectangle) and draw a chair
using corner points 1800,2700
and @450,400.
- Add a line that represents the backrest of the chair. Draw the line in points 1850,2700 and @0,400.
Function finds automatically a closed area to be hatched.
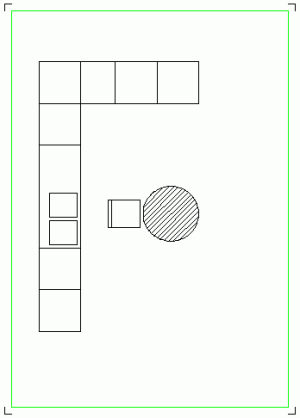
The exercise drawing should now look like this:
 Previous Previous |
Next

|