Drawings can be printed onto paper but also into PDF or PLT files.
-
PDF files – PDF (Portable Document Format) is an open file format for electronic distribution of documents developed by Adobe Corporation. You can view and print PDF files with a free Adobe Reader® program, which can be downloaded from the Adobe web site (www.adobe.com).
CAD drawings can be printed into PDF files and then sent via email, for example, to clients. This way the clients do not need a CAD program to view the document. PDF files can also be imported to CAD drawings as reference drawings.
PDF documents conform to the PDF/A standard. A PDF printer driver is not needed to print drawings into PDF as the PDFs are printed with the same printers as other drawings.
-
PLT files – Sometimes you need to print big drawings but you do not have a printer that manages big papers. You can then print the drawing into a PLT file that you can sent to a print service provider who will print it for you. The PLT file includes all the printed data in a file. All print settings are also "saved" in the PLT file (such as scale, paper size, line weights). You must use the printer used by your print service provider. It is recommended to ask for the right driver from your print service provider. PLT files can also be sent forward by email, for example.
The paper size for PDF and PLT files is selected the same way as if printing to paper. If the print area
is smaller than the selected paper size. the PLT driver will automatically remove
empty trailers. If it does not work, either the driver is not capable
of doing that (Windows driver needs to be updated) or the automatic cutter
is switched off in the Windows printer settings. By default, empty trailers
are not removed from PDF files. Empty trailers can be removed by selecting
Remove empty trailers from PDF-print in the print settings dialog (does not affect
when printing sheets or pieces).
Plot preview does not remove empty trailers.
Learn more:
Print into PDF
PDF files are created by printing normally but setting the target of the print to PDF file. The target file name and folder can be defined when printing. PDF file can be created using the same printer as when printing on paper. No special PDF driver is needed.
When printing to a PDF file, all text elements
are added as text using Windows TrueType font. This enables possibility
search or select text from PDF file. Because all CAD fonts (ftf and shx) does
not have corresponding TrueType font they must be printed to PDF using
some other font. Because of this text appearance and size may be different
comparing screen and PDF file. By default missing font is replaced with
Arial but each ftf or shx can be configured separately to use the certain
font in PDF file. Using any other font than Arial is used only if there
is more suitable TrueType font and end result looks better.
If text appearance and size is wanted to keep intact it is possible to
select "Print as graphics" for each ftf and shx separately instead
of using Arial or any other True Type font. In this case text will be
print to PDF as vectors and therefore text search functionality in PDF file
cannot be used.
CAD layers can be included in PDF print which then enables showing or hiding layers in PDF viewer application. How showing or hiding is done, depends on the PDF viewer application. The PDF print will only include the layers that are used in printed elements. By default, reference drawing layers are treated like normal layers and all reference drawing layers are added separately. By selecting Plot external reference to a single PDF layer, each reference drawing will be added to its own layer. In the Rasta application, images are always on separate layers.
Do the following:
-
Select the desire printing function, such as File > Print.
-
Define the print settings as usual.
Note: Some of CAD printing providers uses black and white settings where all colors are printed as black. In this case white is also translated as a color which means that white wipeouts and fills are printed as black covering everything else beneath. Problem can be solved if you ask your CAD printing provider to print using grayscale settings (even if you have black and white print)
-
First select Print to file and then Print PDF- file.
-
If you want to remove empty trailers, select Remove empty trailers from PDF-print (does not affect when printing sheets or pieces).
-
Enter the name for the PDF file as a full path, or select the folder by clicking the
 button.
 -
Click OK.
-
If necessary, define additional settings by clicking Advanced print settings.
 Show/hide image
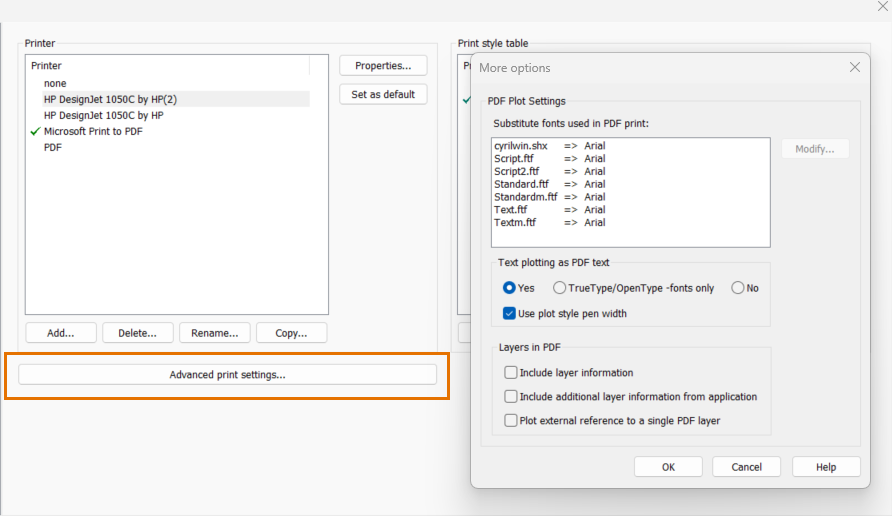
CAD layers can be included in PDFs which then enables showing or hiding layers in PDF viewer application. How showing or hiding is done, depends on the PDF viewer application.
The PDF print will only include the layers that are used in printed elements. By default, reference drawing layers are treated like normal layers and all reference drawing layers are added separately. In the Rasta application, images are always on separate layers.
By default, adding CAD layers to PDFs is disabled. Enable it by selecting Include layer information.
If you want the reference drawing added to its own layer, select Plot external reference to a single PDF layer.
Notice that images, embedded objects and PDF reference drawings cannot be printed properly to PDF document when viewed from diagonal direction.
Print into PLT
You must always use the right printer driver (such as HP DesignJet 1055CM or some other DesignJet model) when printing for a CAD printing provider company. It is recommended to ask about the driver from your print service provider.
After you have installed the correct driver, you usually need to define paper sizes for the printer driver. Usually these printers are capable of printing on big papers and the paper can be cut from a roll. A roll printer can usually cut the "waste paper" off so you can define bigger paper sizes than you usually need. They can be defined as Custom sizes (see Adding long paper size to a printer). These custom sizes are usually created for a roll paper printer so that you can print long prints. For example, some constructional designs are printed on 914 mm x 2700 mm sized paper.
PLT files cannot be opened in CADMATIC Draw, because they are not CAD files, just printed documents.
Do the following:
-
Select the desired printing function, such as File > Print.
-
Define the print settings as usual.
-
First select Print to file and then Print PLT-file .
-
Enter the name for the PLT file as a full path.
-
Click OK.
After printing, you can send the PLT files to your print service provider by email. Because all print settings are "saved" in the PLT file (such as scale, paper size, line weights) the print on paper should match exactly the preview of the print in CADMATIC Draw.