
|
Schematics tab > Devices group > Symbols |
On the  (User's symbols) tab in the Symbols window, you can create your own free marking symbols. The marking symbols you create are available for all drawing types.
In addition to the Symbols window, marking symbols can be selected in marking functions
Do the following:
-
In the Symbols window, select the
 (User's symbols) tab.
 -
Click the arrow next to the
 (Save user symbol) button and select Save user marking symbol > Free marking.
 -
Select objects to include in the symbol to be saved and press Enter.
-
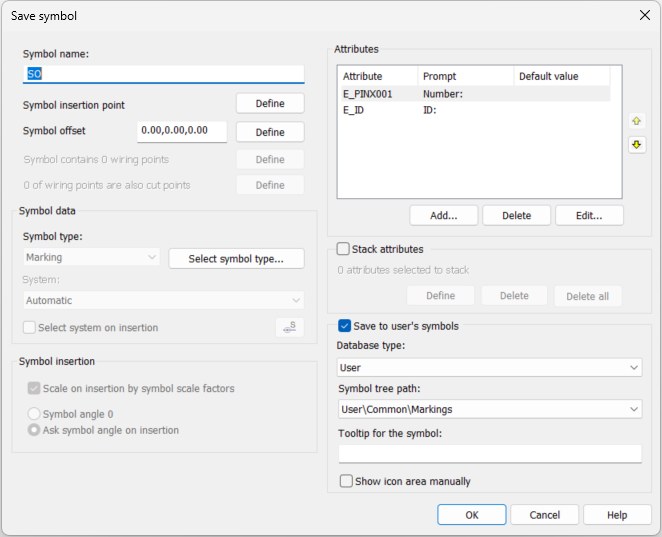
Indicate symbol's insertion point. The Save symbol dialog opens.
-
Define the following:
- Symbol name – Enter the name for the symbol to be saved. The function adds SO by default but you can name the symbols any way you want.
- Symbol insertion point – Define the insertion point by clicking Define.
- Symbol offset – Define the offset either by entering the values in the field or by clicking Define. Offset is saved using a common attribute.
- Symbol type – Define one or more subtypes for the Marking symbol type by clicking Select symbol type.
-
Attributes – The E_ID attribute (ID) is not required for marking symbols.
You can add, delete and edit the attributes.
-
Add – Select the desired attribute and insert default value if needed. Click OK and indicate the insertion point.
-
Delete – Remove an attribute.
-
Edit – Edit attribute properties (see Edit attribute properties). You can edit the order of attributes in the symbol with the arrow buttons.
- Stack attributes – Select this if you want to select attributes that are allowed to stack. Stacking means that if the attribute value is empty, another attribute can take its place, thus eliminating gaps between the attributes. Pick the attribute definition to add for the stacked attributes by clicking Define.
- Save to user's symbols – The symbol will be shown in the Symbols window and saved among the symbols in your user profile.
- Database type – Select the type of the database: User or Shared.
- Symbol tree path – Select the desired symbol tree folder from the drop-down menu, or create a new one by selecting New. By default, User\Common\Markings will be used.
- Tooltip for the symbol – Define the tooltip shown when hovering over the symbol.
- Show icon area manually – Outline the area you want to show in the symbol icon.
-
Click OK.