|
|
File > Settings > Edit icon menu, IMCUSTOMIZE |
With this function, you can create and edit icon menus.
Create icon menus
You can create a new menu to a new menu file or add it to an existing menu file; excluding program's own menu files Cads.mnu and Cads2.mnu. The first three characters in the menu file name should be OMA.
Do the following:
-
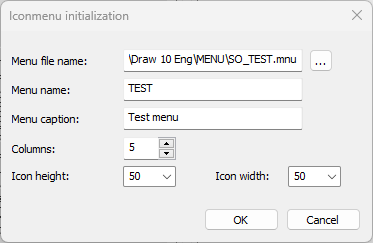
Click New. The Iconmenu initialization dialog opens.
-
Enter the menu file name, or click the
 button and select the menu file.
 -
Enter the menu name.
-
Enter a caption for the menu.
-
Select the number of columns.
-
Select the fixed width and height of the icons.

-
Click OK.
Edit icon menus
The Icon menu editor dialog consists of two windows. The All menus section on the left shows icon menus from which you can copy buttons. The User menus section on the right shows the user icon menu you are editing.
You cannot edit icon menus provided with CADMATIC Draw.
Do the following:
-
In the All menus section, select a menu file and menu from which buttons are copied.
-
In the User menus, select a menu file and menu you want to customize.
-
Copy buttons from the left side to your own menu:
-
Move the pointer on the button and grab it by pressing down the left mouse button.
-
While keeping the mouse button pressed down, drag the button to a new location in the menu.
-
Release the mouse button to insert the button to its new location.
-
-
If necessary, remove buttons from your own menu:
- Move the pointer on the button and grab it by pressing down the left mouse button.
- While keeping the mouse button pressed down, drag the button on top of the trash symbol and release the mouse button.
-
Save your changes with Save.
Customize icon menus
Do the following:
-
From the User menus section, select the menu you want to customize.
-
Click Edit.
-
Select the button to edit.
-
Edit the command or the tip text of the button.
-
Edit the properties of the button.
-
Click OK.