Settings

The Settings button opens access to view, movement, measurements, visualization, and advanced settings.
Settings
In the Settings menu, select Settings to change the following model settings.
View | Movement | Measurements | Visualization | Advanced
View
On the View tab, you can change settings that affect viewing the model and moving in it.

-
View Distance – controls the distance at which objects become visible to the user. If set to Automatic (default), all objects are visible regardless of distance. You can try to improve performance by limiting the view distance, especially if you already tried to adjust the frame rate in optimization settings and it did not help.
- Near Plane Distance – controls the distance from the camera to the plane from which the objects start to be visualized. If set to Automatic (default), the distance is set automatically. To manually define the distance, select Manual and enter the desired distance.
- Near Plane Clipped Objects – controls how the objects are rendered. If set to Hollow, the back faces of objects are drawn. If set to Solid, a solid surface is created on top of the clipped area.
-
View Angle – controls the view angle of the camera. Adjust this setting if needed. The default view angle is defined in Plant Modeller, in the Walkaround tool, and the setting is saved in the Scene.
Movement
On the Movement tab, you can change settings that affect viewing the model and moving in it.

-
Speed – adjusts the speed of moving in the model. You can try different speed settings to find a level where it feels natural to control the movements. Slower computers and larger models typically require a smaller speed because slow visualization makes it more difficult to move around. Note that you can also try to affect the visualization speed by selecting a smaller subset of objects to display or by changing the view distance.
-
Turning Speed – adjusts the speed of turning the view. You can try different speed settings to find a level where it feels natural to control the movements. Slower computers and larger models typically require a smaller speed because slow visualization makes it more difficult to move around. Note that you can also try to affect the visualization speed by selecting a smaller subset of objects to display or by changing the view distance.
-
Accelerated moving speed – If this setting enabled (default), the moving speed is accelerated. If it is disabled, the moving speed is linear.
Measurements
On the Measurements tab, you can select the unit to use in measurements. It can be one of the following: millimeters, centimeters, meters, inches, feet+inches.

Visualization
On the Visualization tab, you can set visualization settings.
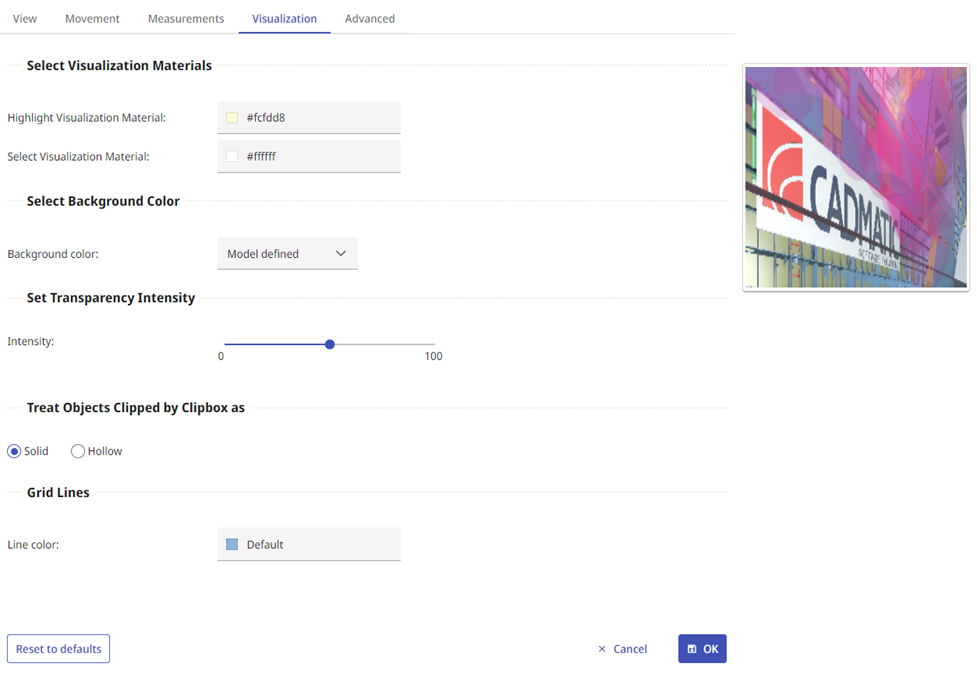
-
You can select the materials used to highlight objects and to indicate that an object is selected.
-
You can select the background color/image; see Background visualization for details. The background color setting is saved whereas the materials are not because they depend on the model’s publisher.
-
You can specify transparency intensity.
-
You can define how objects clipped by clipbox are handled.
-
You can define the line color for reference grid lines.
Advanced
On the Advanced tab, you can set advanced performance related settings.
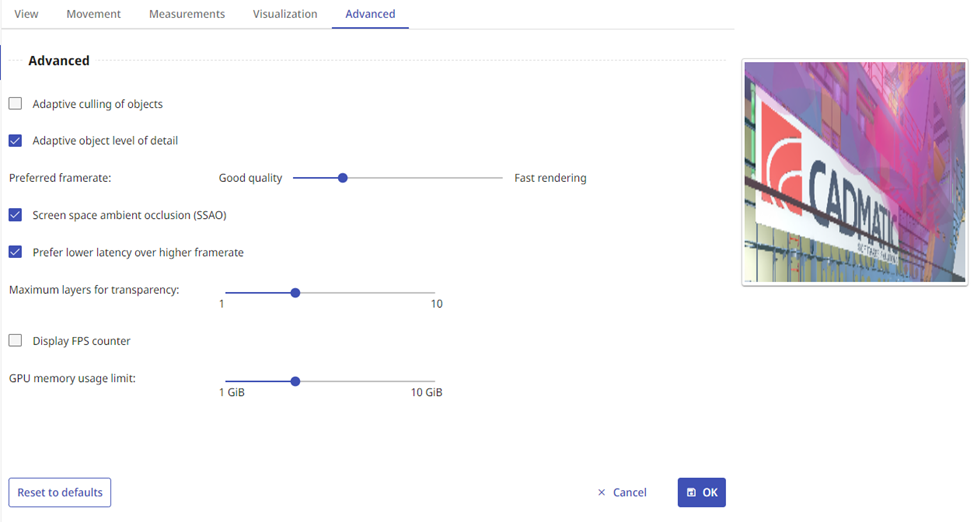
-
Adaptive culling of objects – If enabled, adaptive culling dynamically hides objects from the view during movement to achieve the preferred framerate. With large models and/or low-end hardware, this might cause significant portions of the model to be hidden.
-
Adaptive objective level of detail – If enabled, adaptive level of detail dynamically adjusts the rendered detail of objects during movement to achieve the preferred framerate. With large models and/or low-end hardware, this might cause noticeable loss of detail of the model.
-
Preferred framerate – Preferred framerate controls the target frames-per-second (FPS) of the application. The target FPS has effect only for the settings Adaptive culling of objects and Adaptive object level of detail.
-
Screen space ambient occlusion (SSAO) – SSAO is a post-processing effect that produces additional shading near surfaces that are close to each other. Disabling this might increase performance on lower-end hardware.
-
Prefer lower latency over higher framerate – If enabled, low-latency mode trades performance for faster rendering latency. Depending on the used graphics processor, this might have significant effect on reducing latency while losing minimal amount of performance. On the other hand, on some graphics processors this might reduce performance without having visible effect on latency.
-
Maximum layers for transparency – Controls how many successive layers of transparent surfaces can be visible at most. This affects situations where transparent objects are seen through other transparent objects. Lower values will increase performance.
-
Display FPS counter – If enabled, displays the current frames-per-second count in the upper right corner of the model viewport.
-
GPU memory usage limit – Controls how much GPU memory eShare is allowed to use. Higher values will increase performance with large models. The memory limit should not be set significantly higher than what is available in the used GPU. Requires restarting eShare for the setting to take effect.