Submodels
The 3D model can be too large to be downloaded into eShare for HoloLens, or the HoloLens user might otherwise be interested in seeing just some specific parts of the model. In the Submodel Division Rules view, project administrator can define settings for publishing of submodels, and then the HoloLens users can select which submodel to download into their glasses. Submodels are also available to use in eShare and eGo.
Note: Submodels in the project affect publishing time and a large number of submodels takes more time to publish.
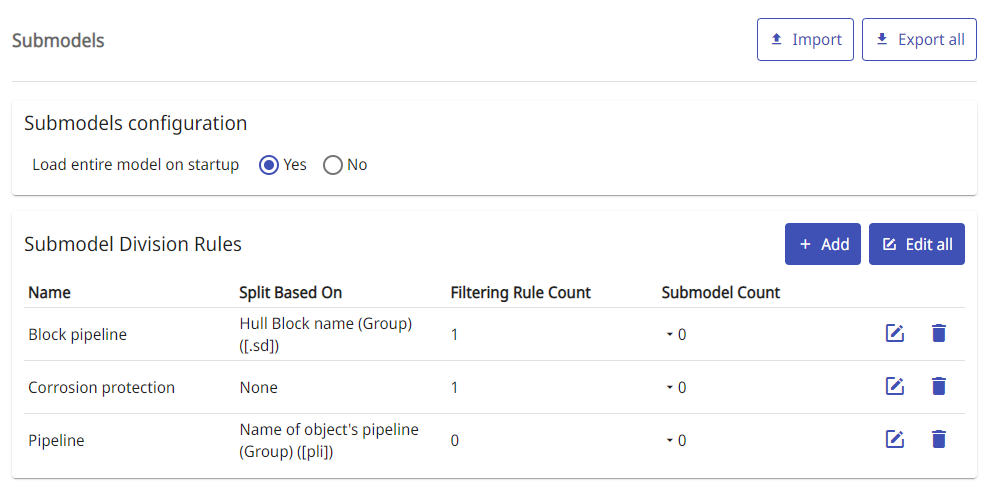
You can use the Import and Export All buttons to copy division rules from one project to another.
In Submodels configuration, if Load entire model on startup is set to Yes, the entire model is loaded on startup (selected by default) or if set to No, eShare will not automatically load the full model, and will instead show the list of submodels available that can be selected and loaded by the user.
Use the Add button to create a new submodel division rule.
Use the edit button  to edit a rule and the delete button
  to remove a rule.
You can use Edit all to edit all division rules in one view.
Click the value in Submodel Count or the down arrow to view a list of submodels found by eShare and their object count.
The submodels can be created using attribute values, filtering rules, coordinates or a combination of two.
Note: Submodels will be visible only after the model has been published.
Submodel creation by attribute
You can split the full model into smaller submodels based on the values of a group-defining attribute. Each group of objects that have a specific attribute value forms one submodel.
Prerequisites
- In the Attribute Settings view, the attribute to use is defined as a "Group Defining Attribute". See Attributes from model file.
Do the following:
-
Navigate to the project to edit, and then click Project Admin in the main menu. The project administration view opens.
-
Click Submodel. The Submodel Division Rules view opens.
-
Click Add.
- In the Unnamed Submodel Rule pane, specify the following settings:
Name – Enter a descriptive name for the rule.
Description – Enter a description of what the rule will include in the submodel.
-
In the Split Based on Attribute field, select the attribute to use.

-
Click Save.
Submodel creation by filtering rules
You can filter the submodel or submodels based on filtering rules.
Note: In large models creating an "equals" rule starting with wildcard * may cause the generation to take a long time.
Do the following:
-
Navigate to the project to edit, and then click Project Admin in the main menu. The project administration view opens.
-
Click Submodel. The Submodel Division Rules view opens.
-
Click Add.
-
In the Unnamed Submodel Rule pane, specify the following settings.
-
Name – Enter a descriptive name for the rule.
-
Description – Enter a description of what the rule will include in the submodel.
-
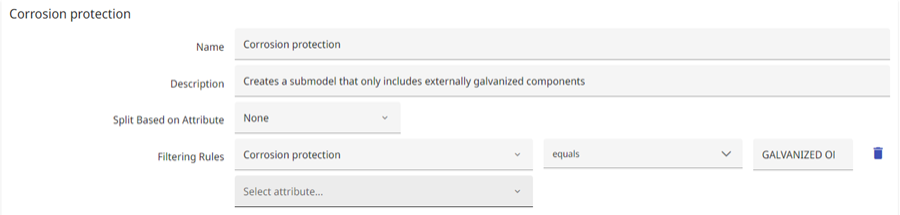
Filtering Rules – Select the attribute to use. Additional fields are displayed for defining the criteria, such as whether the attribute exists or has a specific value.
-
-
Add as many attributes to the rule as needed. The submodel will include only those model objects and groups that match every criteria of the rule.
 Show Example
In this example, the rule selects an object if the object has the attributes Corrosion Protection and the value of Corrosion protection is "Galvanized only externally".
-
Click Save.
Submodel creation by coordinates
You can filter the submodel or submodels based on geometric area by using coordinates. If set, the rule will filter out all objects from the submodel(s) generated by the rule that are not within the set coordinate values.
You can use Split Based on Attribute or Filtering Rules together with Split Based on Coordinates, in which case the coordinates will act as another filter when generating the submodel(s). If used on its own, Split Based on Coordinates will generate a single submodel, which contains all objects within the given coordinates.
Do the following:
-
Navigate to the project to edit, and then click Project Admin in the main menu. The project administration view opens.
-
Click Submodels. The Submodel Division Rules view opens.
-
Click Add.
-
In the Unnamed Submodel Rule pane, specify the following settings.
-
Name – Enter a descriptive name for the rule.
-
Description – Enter a description of what the rule will include in the submodel.
-
Split Based On Coordinates – Enter the From and To values for X, Y and Z planes.
-
-
Click Save.