Selecting objects and changing their visibility
This section provides information on selecting objects and changing their visibility. Note that just selecting an object does not move the focus in the 3D view to the object.
By selecting you can target operations to certain object or group of objects. These operations can be, for example, functions in the context menu, hiding/showing objects in the model tree
When an object or a group is selected it gets selection color in 3D view and it is highlighted in the model tree. Selections are indicated also when the tree is not fully expanded.
Selecting a cable object highlights all the objects belonging to that cable in the model tree. All the cable objects are also highlighted in the 3D view to enable visualizing the cable route.
In the model tree, dark blue color is applied to objects you have selected by clicking them, the nodes and objects that inherit the selection from the clicked object will be in a slightly lighter blue, and the parent nodes that are partially selected will be in light blue color.
When a single object is selected, right-clicking the object displays commands relevant to the object, and when multiple objects are selected, right-clicking the selection displays commands that are relevant to the group.
Selecting objects
On the Model tab and in the 3D view, click on an object. On the Model tab you can also select an object group. To select multiple objects or groups, hold down Ctrl while clicking on the objects or groups. To select all objects and groups in the 3D view, press Ctrl +A.
In the model tree, you can select a range of objects or groups by holding down Shift while selecting the first and the last object or group of the selected range.
If you double-click an object in the model tree, the object is opened in examine mode. To examine multiple objects, select the objects and then select Examine from the context menu.
When multiple objects are selected and you click an individual object without holding down Ctrl, or Shift in the model tree, only that single object gets selected.
To expand the selection to an object's parent objects, press Shift and click the object. The selection expands first to the next-level parent object (for example pipe to pipeline), then to the system, and then to the entire model.
If you continue to click the object after the model level has been selected, only the initially selected object remains selected.
Selecting objects in the 3D view by drawing a box
In the 3D view, you can select a set of objects by holding down Alt and left mouse button while drawing a rectangle around the required objects. This selects only objects that are visible in the current viewing direction, and not for example objects that are behind a wall.
-
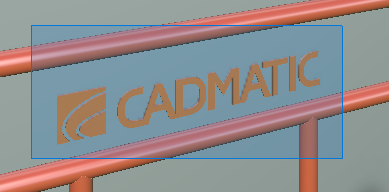
Drawing from left to right creates a blue rectangle that selects the objects which are fully inside the rectangle.
In this example, only the Cadmatic logo will be selected:
-
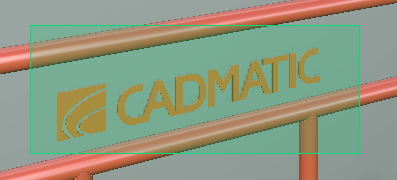
Drawing from right to left displays a green rectangle that selects the objects which either intersect the rectangle or are fully inside it.
In this example, the Cadmatic logo, the pipes that touch the rectangle, and the wall in the background will be selected:
Additionally, if you are holding down Ctrl when you release the left mouse button, the objects get added to a previously made selection. Therefore, you can draw multiple selection boxes by holding down both Ctrl and Alt while drawing.
Selecting all visible objects
In the 3D view, you can select all visible or partially visible objects by pressing Ctrl + A. The selected objects are highlighted in the Model tab.
Unselecting objects
Hold down Ctrl and click on the object or group to remove the selection only from that object or group.
To remove all selections, click on an empty area in the model or in the 3D view, or press Esc.