Model tab
The Model tab allows you to navigate to specific parts of the model and to select what the 3D view shows, using two drop-down menus and a hierarchical tree.
-
Visual Style Menu – Use the visual style drop-down menu to highlight objects in the 3D view using a color scheme that an eShare administrator has defined. For example, objects can be colorized according to their installation status. You can click the refresh button to reload the currently selected visual style, and refresh the selection of available visual styles.

Note: You can select whether the color legend at the bottom of the 3D view lists all categories in the selected visual style or just those that currently visible objects are using—see Visual styles in legend. You can hide or show the legend using the arrow on the right side of the legend.
If there are 4D sequences configured for the project, these sequences can be selected from the visual style drop-down menu. The sequences can be identified from the 4D tag in the name. See Viewing 4D sequences.
-
Hierarchy Menu – Use the hierarchy drop-down menu to arrange the model tree using a hierarchy that an eShare administrator has defined.

You can refresh the selection of available hierarchies using the refresh button next to the visual style menu. If dynamic hierarchies are used, the currently selected hierarchy will be refreshed to show any recent changes.
-
Model Tree – The model tree lists the objects of the model as a hierarchical entity tree; the displayed hierarchy is defined by the hierarchy menu.

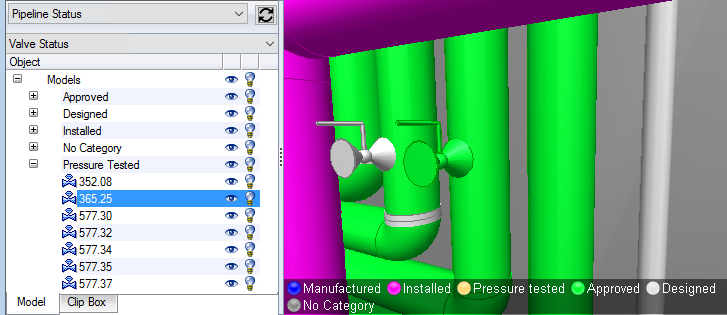
In the example below, visual style is set to Pipeline Status and hierarchy is set to Valve Status. As a result, the model tree allows the user to easily navigate to a valve that has been pressure tested, and when looking at that valve in the 3D view, the visual style in use allows the user to easily see that the related pipeline has been approved.
Model tree
In the model tree you can do the following:
-
Select one or more objects or object groups, as described in Selecting objects and changing their visibility.
-
Right-click the selection and select a command from the context menu to perform some action on the specified entities. Some of these commands are also available from the context menu of the 3D view. See Context menu.
-
Double-click a single object to examine the object in the 3D view. To examine a group, select the Examine command from the context menu.
-
Click the eye icon
 to hide objects, and click the closed eye
  to show them again.
 -
Right-click the eye
to enable x-ray mode, and click the x-ray icon  to disable the x-ray mode.
 -
Click the light bulb
 to turn highlighting of objects on, and click
  to turn it off.
 -
Click
 to show the containment areas of blocks, compartments, or 3D spaces. Click
  to hide containment areas.
 -
Right-click a point cloud to open it in a bubble view.
Containment hierarchies
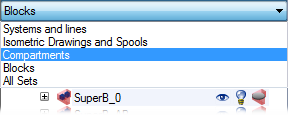
The hierarchy menu of the Model tab can list containment hierarchies such as Compartments and Blocks that you can select to review the model one containment area at a time.
A containment consists of the 3D space object that defines the geometrical volume of the containment area and the model objects that belong to the containment. In CADMATIC Plant Modeller, the available containment hierarchies are defined in the Default.xcf file.
In the picture below, we see the containment hierarchy Blocks. In the object tree, the super block SuperB_0 has been expanded to show that it contains three blocks: Block_0_M, Block_0_P, and Block_0_S. In the 3D view, we see this super block as well as super block SuperB_AB which contains six other blocks.
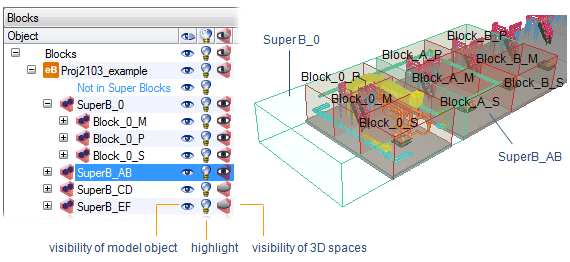
The visibility of a 3D space and the model objects it contains can be controlled using the visibility icons in the model tree.
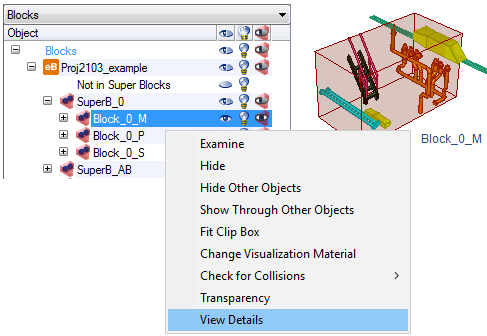
You can perform various actions on a containment from the right-click menu. For example, you can view the properties of the space object by selecting View Details from the right-click menu.