Alignment
The Alignment tool is used for placing the model in a precise location, in relation to the real world. By default, the spatial mesh starts inactive but is activated for certain stages. The tool works with two mandatory points, with the addition of other rotation points if necessary.
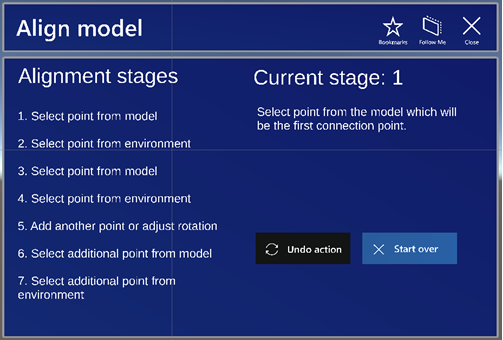
Select Undo action to undo latest changes. Select Start over to undo all changes.
Select Add point to add another point from the model or environment. Select Done to save changes and close the window.
Aligning
Do the following:
-
Select a point on the model by pointing the hand ray and air tapping.
Instead of selecting a point manually from the model, you can select a bookmarked component. The geometric center of the component is selected as the alignment point instead of waiting for a directly selected point. The bookmarks list can be activated by selecting the Bookmarks button in the top bar.
-
Select a point on the spatial mesh (which becomes enabled) or scan QR code. The model material changes to wireframe to not obstruct vision and the hand ray.
-
If spatial mesh snapping is enabled, then it will be active at this stage.
-
If direct adjustment is enabled in Settings, you can adjust the newly selected point position by selecting it and repositioning it by hand.
-
The model will be moved for the two selected points to overlap.
Instead of selecting a point from the spatial mesh, you can scan a QR code. The center of the QR code will serve as the alignment point. See QR code aligning.
-
-
Select a second point on the model manually or use a bookmark.
-
Spatial mesh and snapping is similar to the first step.
-
Model material is reverted to default.
Instead of selecting a point manually from the model, you can select a bookmarked component. The geometric center of the component is selected as the alignment point instead of waiting for a directly selected point. The bookmarks list can be activated by selecting the Bookmarks button in the top bar.
-
-
Select a second point from the spatial mesh or scan QR code.
-
Spatial mesh, model material, and snapping is similar to the second step.
-
The model will be rotated to match the two points.
-
Additionally, the model can also be scaled.
Instead of selecting a point from the spatial mesh, you can scan a QR code. The center of the QR code will serve as the alignment point. See QR code aligning.
-
-
Adjust the axis and slope of the model.
-
If the axis of the two points is almost parallel to the XoZ plane, then you will be asked if that was the intention and correct the alignment.
-
The rotation can be adjusted using the Rotation around point axis slider.
-
The slope can be adjusted using the Slope slider.
-
-
Press Add point to select more points.
Instead of selecting a point manually from the model, you can select a bookmarked component. The geometric center of the component is selected as the alignment point instead of waiting for a directly selected point. The bookmarks list can be activated by selecting the Bookmarks button in the top bar.
-
Select an additional point from the model manually or use a bookmark.
-
Model point selection steps are the same as in the others.
-
-
Select an additional point from the spatial mesh or scan QR code.
-
Spatial mesh point selection steps are the same as in the others.
-
If direct adjustment is enabled in Settings, you can adjust the newly selected point position by selecting it and repositioning it by hand.
-
The model will be rotated around the axis defined by the first 2 points.
Instead of selecting a point from the spatial mesh, you can scan a QR code. The center of the QR code will serve as the alignment point. See QR code aligning.
-
-
Select Done to confirm changes. Select Undo action to undo the latest change or Start over to undo all changes.
QR code aligning
The alignment tool will automatically detect if there is a QR code available to be used for alignment.

Check the following, if you have problems with detecting the QR code:
-
Provide a larger white zone around the QR code.
-
Use a larger QR code.
-
Use a lower version QR code if possible.
-
Increase lighting.