Document markups
Document markups functionality of CADMATIC eShare allows the participants of a design project to add comments, drawings, and areas of interest in documents viewed in eShare, and then share the information with each other.
In project administration markup types are divided to model markup Types and document markup types. A document markup type has to be defined to a project before users are able to create document markups in that project. Project administrator also defines which users have permission to view, create, update, upload, and delete document markups, as described in Markup types. Document markups can be assigned to a specific user, if project administrator has enabled this function in your project.
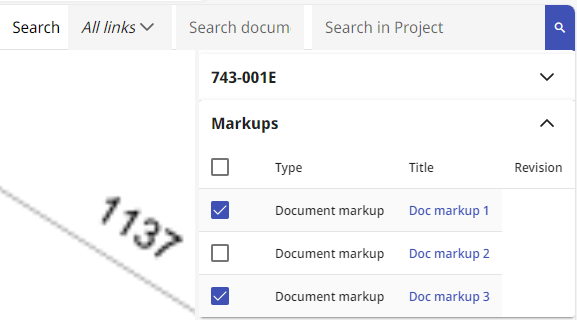
Created markups are visible on the properties pane of the opened document. The information that is contained in this table is the type, title, revision (if any) and page (if multi-page document) of the markup. Clicking on the title of the markup lets the user to view, edit, or delete the markup. The left side of the table contains checkboxes, with which the user can toggle the visibility of the document markup drawings overlaid on top of the document. Drawings are overlaid on top of the document automatically, if the document markup revision is the same as the revision of the current document, and if the document markup does not have the Markup Status attribute set to "Done".
If the document has visible document markups when printing of the document is initialized, the printed document has the document markups overlaid the same way as on the screen.
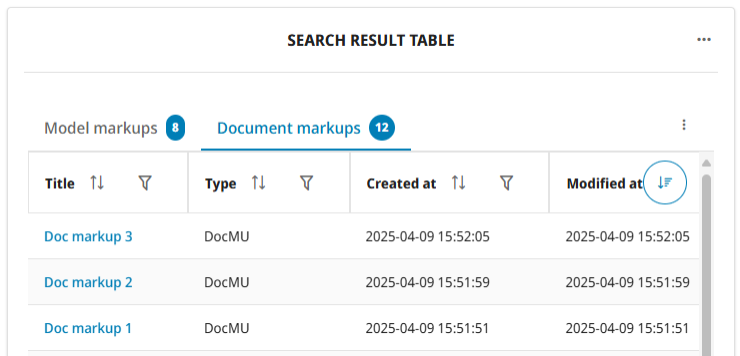
Document markups can be viewed in Home view in Home tab and search result table widget. In search (and the search result table widget) the document markups are found in their own Document Markups tab. It is also possible to search for "Any document markup" in the advanced search view. The "Recent markups" widget shows both document and model markups. Search and widgets in Home view will only show document markups if the user has both view permission to the document markup type and the document that the document markup is linked to.
Adding new document markups
In Documents Viewer, users can add document markups by opening any document, and then selecting Add markup button at the bottom of the properties pane.
The document view freezes and allows you to draw on the document. The drawing tools are available in the Markup editor toolbar above the document.

The toolbar has buttons for the following: rectangle, ellipse, freehand cloud, line, arrow, text, and highlight. There are also buttons for removing shapes or text, selecting line width and color.
The properties pane has fields for entering the following information:
- Type — Select the document markup type.
-
Title — Enter a descriptive title (required).
-
Assignee — Allows assigning the document markup to a specific project user. As you start typing the name in the field, the matching user names are listed and you can select the correct assignee from the list.
In Search > Smart points and Markups you can search document markups based on a previous assignee.
Assignee is not visible, if it has not been enabled by the project administrator.
The properties pane contains also fields for all the custom attribute types, if the project administrator has added any to the selected document markup type.
If you do not have permissions to create document markups, the Add markup option is not available.
Viewing document markups
When you open a document containing document markups in Documents Viewer, the document markups are listed in the properties pane in Markups section.

The Markups section displays the following information for the document markups: Document markup type, Title of the markup, Document markup revision (if any), Page in the document (if a document with multiple pages).
You can use the checkboxes to select which document markups are overlaid and visible in the document. When a document is opened, document markups in the document matching all of the following are visible:
-
the document markups with the same revision as the currently open document revision
-
the document markups, which do not have Status attribute set to Done.
If the document is printed when there are visible document markups, these document markups are visible also on the printed document.
Clicking on the title of the document markup displays the document markup information. In this view you can select to view change history, edit or delete the document markup. Select Close to close the document markup.
Editing document markups
Open the document with the document markup and click on the title of the document markup. Click Edit to open the document markup in edit mode. When you have made modifications, select Save to save changes and exit edit mode.
To delete a document markup, select Delete.
Accessing markups from the project's home view
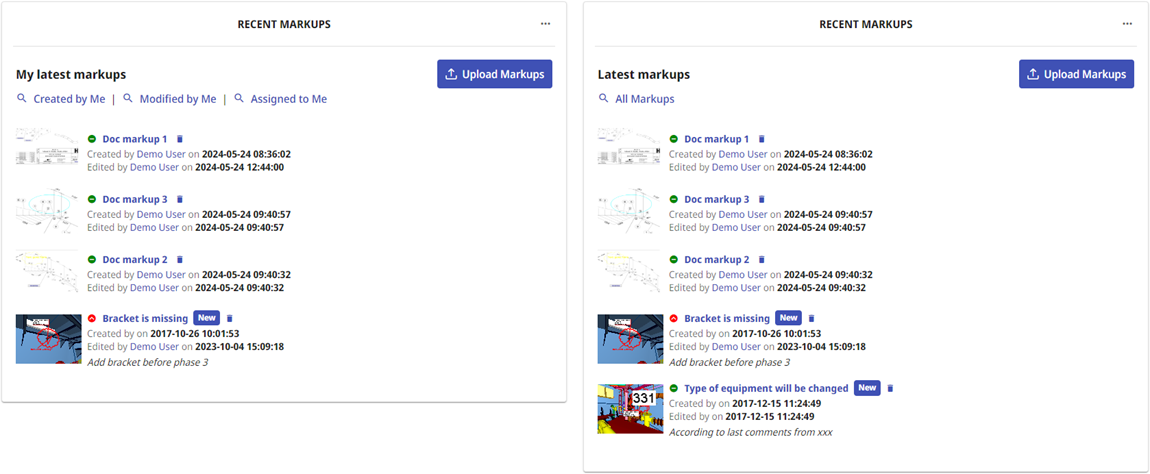
The latest model and document markups are listed as thumbnail images in the home tab of the project. Clicking the thumbnail image of the model markup opens it in the model viewer. Clicking the thumbnail image of a document markup opens it in Documents Viewer. Use the search links on the page to see more items. If you have sufficient permissions, you can update the markups. If you do not have permissions to update markups, the markups are displayed in view mode.
My latest markups – Lists the model and document markups that the current user has recently added or modified or that have recently been assigned to the current user.
- All Created by Me – Opens the Search view and lists all model markups that the current user has created.
- All Modified by Me – Opens the Search view and lists all model markups that the current user has modified.
- All Assigned to Me – Opens the Search view and lists all model markups that are assigned to the current user.
Latest markups – Lists the model and document markups that any user has recently added or modified.
- All Markups – Opens the Search view and lists all model markups in the project.
Search Result Table widget – If a search result table widget with a markup search has been configured to a tab in Home view, document markups are visible there.
Deleting document markups
Markups can be deleted in the following ways:
-
In the front page of a project, the delete button
 next to the markup's title deletes the markup, even if it was created by another user. The delete button is not available if you do not have the required permissions.
 -
In the properties pane when viewing the markup in Documents Viewer, the
 Delete button at the bottom of the properties pane deletes the markup, even if it was created by another user. The delete button is not available if you do not have the required permissions.
 -
In search results when viewing the results in list view, the delete button
 next to the markup's title deletes the markup, even if it was created by another user.. The delete button is not available if you do not have the required permissions.
Finding markups with search
In the Search view, you can use the "Smart points and Markups" search to find specific model or document markups. After performing a search, you can save the search for future use, and you can export model markups and document markups from search results to a Microsoft Excel file, or a Microsoft Word file.
When model and document markups are configured to support assignees, you can use the search to find markups based on their current or previous assignee.
See Search methods for details.

