Viewing saved collision test results
Prerequisites
-
Collision test has been performed in eShare App. See Performing collision checks.
-
Collision test results have been saved in eShare App. See Performing collision checks.
Note: In some cases the collision test results cannot be saved and rerun in the Collision tests pane, if the collision check was initiated from the model tree using such selections that cannot be rerun using the Check for Collisions dialog.
Do the following:
-
In model view, select Split screen and Model - Collisions.
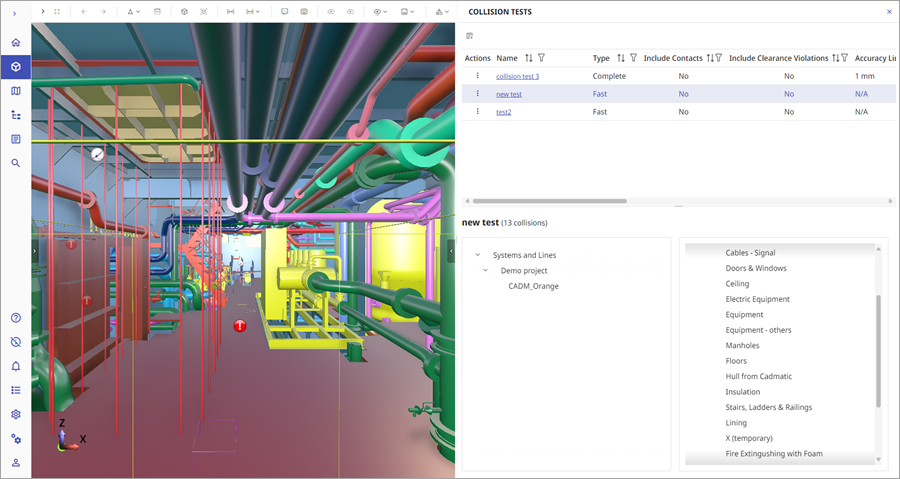
You can view information on any saved collision test by selecting the row. The summary table has links in each cell with data, which will open the collision results in a filtered view corresponding to the selected data. For example in the above image clicking on 11 with status New and type Collision shows the collision results filtered by status New and type Hard collision.
Selecting the name of the test will open the results in the collisions test pane.
The list can be filtered based on the names of the tests.
You can also select  to show only tests with open collisions with status New, Pending, Must be Fixed, or In Progress. Collisions assigned to you are shown in
  column. Open collisions assigned to a group you belong in are shown in
  column. You can click on the number of assigned collisions in the column to view only the assigned collisions. To show all collision tests, select in the toolbar.
You can copy, rename, delete, or clear the results for any test by selecting  and then the desired function.
To run a new collision check, select  and Check for Collisions dialog opens.
Note: Collision checks can be run only in eShare App.
Viewing collision test results in collisions tests pane
Do the following:
-
In model view, select Split screen and Model - Collisions from the drop-down menu.
-
In collision tests list, select the name of the collision test you want to examine.
The collision test results open in Collision tests pane.
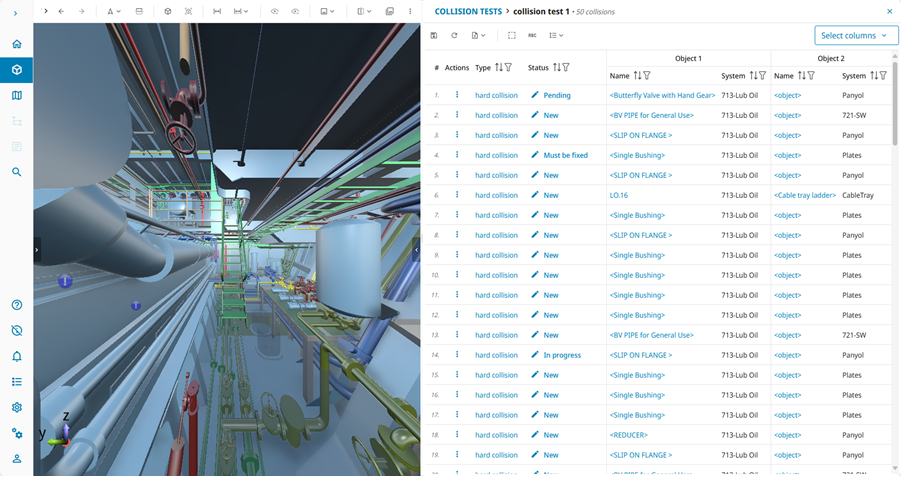
Open the collision tests list by selecting Collision tests at the top.
Viewing the collision or object in Examine mode
-
Click on the collision type in the collision test pane to view the collision in Examine mode.
When examining the collision, you can move around the camera and its position is automatically saved when the motion stops. When the collision is re-examined, the saved camera position is loaded. Note that the camera will always face the point of collision when the collision is opened in Examine mode.
-
Click on the object in collision tests pane to view it in Examine mode.
Modifying the collision test result view
- Select to hide/show Assignee column.
-
Select
 to hide/show flipped collisions.
 -
Select
 to hide/show saved attributes.
 -
Select
 to select the density of the table as Comfortable or Compact.
 -
Select displayed columns using Select columns to select and filter from the drop-down menu which columns are included in the table.
The visible attribute column selection is configured and saved individually for each collision test, and the same column configuration is visible to other users in the project viewing the test results.
-
Sort and filter the table columns using
 and
and  .
. If at least one of the collisions in a collision group matches the filter, the group row will be shown. By default the collision test are sorted in ascending order and the collision group rows are shown at the top of the list, or at the bottom when in descending order.
Editing collision test results
Select  to edit selected collision statuses and assignees.
You can edit one or multiple collisions, select the rows either by using the checkboxes, or use Ctrl or Shift key while selecting an empty space in a row. Clicking the Edit button opens a dialog where you can select to make changes to either status, assignee, or both. You can also select to create a collision group from the selected collisions, if you have two or more selected collisions. Click Confirm to make the changes and close the dialog. Save your changes.
Modifying collision test status
View and change the status of the collision in the Status column. Newly found collisions have status New, but it will automatically change to Pending, if the collision test is rerun. You can change the status manually to any other status (Pending, In progress, Must be fixed, and Ignore) except Fixed – the collision will get status Fixed when it is not detected anymore upon the subsequent collision test run. Save your changes.
If you have multiple rows selected, the status of all the selected collisions will be changed.
Grouping collisions
There are different ways to create collision groups:
-
Select the collisions in the list, either with the checkboxes or using Ctrl or Shift key while selecting an empty space in a row, and select
 to create a collision group from the selected collisions. A new collision group is added to the top of the list.
 -
Create a collision group while assigning collisions: Select the collisions in the list, either with the checkboxes or Ctrl or Shift key while selecting an empty space in a row, in the Assignee drop-down select Create collision group, and then select the assignee. Create collision group option is available when there are 2 or more collisions selected. The same assignee will be set for all the selected collisions. A new collision group is added to the top of the list.
-
Select the collisions in the list, either with the checkboxes or using Ctrl or Shift key while selecting an empty space in a row, and select
to open a dialog. Select Create group from selected collisions. Select Confirm. A new collision group is added to the top of the list. -
To create a collision group of collisions with identical object ids, select a collision row in the list, and select
in Actions column. Below Group collisions from select either Object 1 or Object 2, depending on which one you want to use for grouping. This will create a collision group of collisions with identical object1 or object2 ids. A new collision group is added to the top of the list. You can also also create a collision group based on object ids when you have multiple rows selected, but Object1/Object2 selections are active only, if all the selected collision rows have identical object ids.
The collision group can be expanded to show all the collisions, or collapsed to show only the group row.
You can rename the collision group by clicking the group name, and editing the name in the field. You can also rename or delete the collision group by selecting in Actions column.
Editing the status and assignee values of a collision group
The collision group row shows the shared status and assignee values of the collision group, or when the collisions in the group have different values, Multiple statuses and Multiple assignees are shown.
When you change the status or the assignee of the collision group, it will be changed for all the collisions in the group.
Adding collisions to an existing collision group
Select the collision(s) in the list, either with the checkboxes or using Ctrl or Shift key while selecting an empty space in a row, and select in Actions column. Add collisions to group dialog opens. Select an existing group in the drop-down menu, or filter the list to show only collisions related to objects in the selected collision(s). Select Move to selected group. You can also create a new collision group by selecting Create new group.
If the selected collisions include collisions already in another collision group, you will be prompted to either Keep in existing group or Move to new group.
Note: If you have selected rows containing both grouped and ungrouped collisions, the available options in Actions menu depend on whether the menu is opened on the row for a grouped or an upgrouped collision. The menu for a grouped collision does not have Add to collision group available.
Removing collisions from a collision group
Select the collision(s) in the list, either with the checkboxes or using Ctrl or Shift key while selecting an empty space in a row, and select in Actions column. Select Remove from collision group. Remove collisions from group dialog opens. You can select Make ungrouped to make the collision(s) ungrouped, or select target group in the drop-down menu and Move to selected group move them to another collision group.
If you have multiple collisions selected, this change will affect only the grouped collisions.
Note: If you have selected rows containing both grouped and ungrouped collisions, the available options in Actions menu depend on whether the menu is opened on the row for a grouped or an upgrouped collision. The menu for an ungrouped collision does not have Remove from collision group available.
Assigning collisions to users or groups
Assign a collision to a project user or a project group in the Assignee column. Newly found collisions have status Unassigned. You can search for and select the assignee from the drop-down menu, or select Assign to me to assign it to yourself. Save your changes.
If you have multiple rows selected, the assignee of all the selected collisions will be changed.
Saving changes to statuses or assignees
Select  to save changes.
If you are attempting to leave the view while there are unsaved changes, you will be prompted to save the changes.
Creating a markup for a collision object
In Actions column for the collision, select and then select either object in the menu to create a markup.
Rerunning the collision test
Select  to rerun the collision test.
Check for Collisions dialog opens.
Note: Collision checks can be run only in eShare App.
Exporting collision test results as an Excel file
Select  to export the results as an Excel file. Select Export All or Export Filtered.
If Export All is selected, the Excel file includes all the collisions, excluding flipped collisions, unless they have been selected visible in the collision test result view, and will then be included in the Excel file.
If option Export Filtered is selected for the report, the report reflects the column and group filters configured for the test results, and is a preferred way of keeping the group-child structure of the collisions instead of filtering and sorting in the Excel file.
Exporting collision test results as an HTML file
Select  to export the results as an HTML file. selecting Export All or Export Filtered.
The HTML report contains key data for each collision, including a snapshot of each collision (unless there are objects included which do not belong to the currently loaded submodels), which can be viewed in full size by clicking on the thumbnail image. The image opens in a frame where you can browse all of the images using the arrow buttons or keys. If there are collision groups configured for the test, they are preserved in the report, and can be expanded and collapsed. The date in Detected On column shows the date when the collision was first detected in any test, and the date can be older than the actual test generation date for the current test.
If option Export Filtered is selected for the report, the report reflects the column and group filters configured for the test results.
Reports for large tests with over 500 collisions are split into multiple files.
Note: The snapshot is not the exact image as in the model view due to different image size, coloring, and transparency settings.