Staircase
Construction > Items > Foundations > Insert > Staircase

Places a staircase. Staircases are placed between two decks.
See also Staircase.
Placing a staircase
You place a staircase by defining two points which determine the orientation of the staircase. The upper point (P1) defines the top of the staircase, and the lower point (P2) defines the base of the staircase. The points cannot be on the same plate. The points are in the middle of the staircase in width.
Once you have defined the points, you define the properties of the staircase.
Do the following:
-
Select Construction > Items > Foundations > Insert > Staircase. The Point P1 dialog opens.
-
Do one of the following:
-
Enter the coordinates of the point in the dialog.
-
Indicate the point in the graphical window.
-
-
Click OK. The Point P2 dialog opens.
-
Do one of the following:
-
Enter the coordinates of the point in the dialog.
-
Indicate the point in the graphical window.
-
-
Click OK. The system draws the staircase in the graphical window and opens the Staircase dialog.
-
Define the properties of the staircase. See Options in the Staircase dialog below for details. Press Enter after editing a value in an input field.
The staircase in the graphical window changes to reflect the changes you make in the dialog.
-
Click OK. The system creates the pillars and plates that are needed for the staircase.
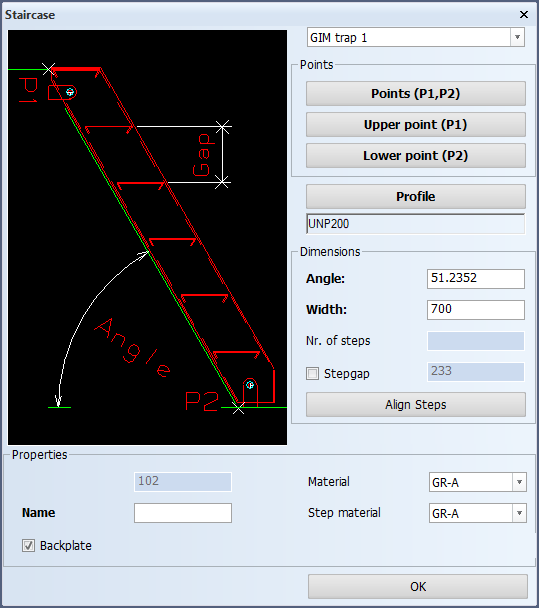
Options in the Staircase dialog
Staircase type
Select the staircase type from the following: GIM trap 1, GIM trap 2, ST.0081B, ST.0082B.
Points (P1,P2), Upper point (P1) , and Lower point (P2)
Click the desired point button to re-define the point(s). You can select either end point or both points again. If P1 is selected to be below P2, the points are swapped to keep the orientation.
Dimensions
|
Description |
Length in mm |
Width in mm |
Thickness in mm |
|---|---|---|---|
|
Main pillars on the sides: UNP profile |
200 |
60 |
6 |
|
Stair step up to width of 700 mm |
190 |
Flange 33.5 |
4 |
|
Stair step from width of 700-1000 mm |
190 |
Flange 38.5 |
4 |
|
Stair step from width of 1000-1300 mm |
190 |
Flange 43.5 |
4 |
|
Back plate |
up to 120 from top |
Width +60 |
3 |
|
Fixing plate positioned 100 mm from main pillar end |
130 |
60 |
10 |
-
Angle – The angle between the backside of the staircase and the platform on which the staircase rests. The upper point always rests on the edge of a plate.
-
Width – The width of the steps of the staircase. When viewing the staircase from the side, the width is in direction in the Z-axis. Note however that the points are in the middle of the staircase in width.
-
Nr. of steps – The number of steps in the staircase.
-
Stepgap – Shows the step gap size. The size is based on the number of steps and the length of the staircase. When this option is selected, the step gap size can be modified. The number of steps is automatically adjusted according tho the new step gap.
-
Align Steps – Divide the steps equally.
Properties
-
Block number – The staircase will be stored into the construction database of the block shown here.
-
Name – Specify a name the staircase. The name will be stored into the planelayer where the staircase is created. If an existing construction already uses this name, a message appears asking you to confirm the use of the existing name.
-
Material – Select the material for the main pillars of the staircase.
-
Step material – Select the material for the steps of the staircase.
-
Backplate – Select this to create a back plate to the staircase.
-
Add end support flat bars – Selected by default. Clear this option if you do not want to add supporting flat bar profiles to the ends of the side pillars. These profiles have straight end types. This option available only for the GIM trap 2 staircase type. The GIM trap 1 type always has the end support flat bars.