DXF/DWG/PDF
Export drawings to DXF, DWG, and PDF files. DXF/DWG/PDF export enables data exchange between CADMATIC Hull and other CAD systems.
See also DXF / DWG integration and PDF export.
Exporting drawings
The Export DXF/DWG/PDF file dialog opens when you select Hull > Export > DXF/DWG/PDF.
Do the following:
The numbers in parenthesis refer to the numbers in the image above.
-
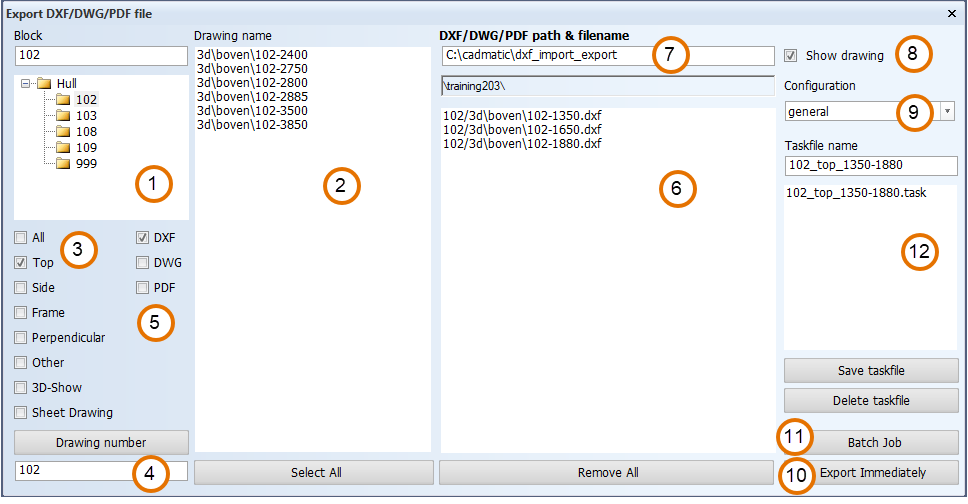
Select a block. Block groups and blocks are shown in the tree view on the left side (1). The drawings that belong to the block are shown in the Drawing name list (2).
-
You can filter the drawings that are shown by the view type (3).
-
If the drawings in the block belong to different drawing groups, click Drawing number (4) to see the groups. Select a group to show the drawings belonging to it in the Drawing name list. You can also type in the group name.
-
-
Select the export format DXF, DWG or PDF (5).
-
Select a drawing on the Drawing name list by clicking on it. The selected drawings are moved to the right (6). The currently active drawing is preselected.
-
You can browse the tree view and select drawings from different blocks.
-
Click on a drawing name to move it back to the Drawing name list (2).
-
-
Optionally, under DXF/DWG/PDF filename (7), you can change the output folder for the exports by entering the path.
The active project folder is shown underneath, and it cannot be changed.- If you change the output folder manually, make sure that the folder already exists.
- The default output folder is \cadmatic\dxf_import_export\[project_name]\[block_number]. The folder structure under that is created automatically, and follows the name of the drawing.
Example: In a picture above, a DXF file for a drawing named 3d\boven\102-1350 will be generated in the folder C:\cadmatic\dxf_import_export\training203\102\3d\boven with the file name 102-1350.dxf. - You can change the default output folder for exports in the System Management application, Import/Export > DXF/DWG/PDF > Settings.
-
Optionally, select Show drawing (8) to briefly show each drawing in the graphical window when the exports are generated.
-
Select the configuration to use in Configuration (9). You can add or delete the configurations available here in System Management > Import/Export > DXF/DWG/PDF > Configurations.
-
To export the selected drawings, click Export Immediately (10).
Batch Jobs (11)
With a batch job you can schedule an export job to a later time and date. Note that the export only starts, if you are at that time logged in to the system where the run is scheduled to happen.
The Batch Job dialog shows previously created batch jobs. A job name consists of the date and time for running the job, a follow-up number, and the user name of the job creator. A check mark indicates a finished job.
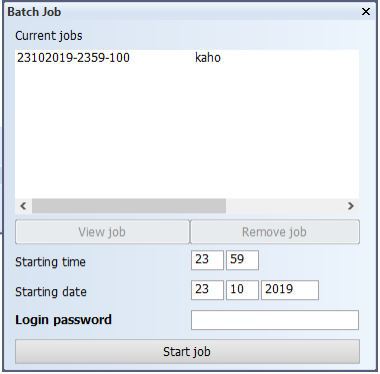
To create a batch job, do the following:
- Enter the desired time and date, and your Windows login password.
- Click Start job to create the job. The Batch Job dialog closes.
When you open the Batch Job dialog again, the new job appears on the list. Click View job to see the contents and settings of the job in the main export window.
Jobs are not removed automatically. To remove a job, select it and click Remove job.
Taskfiles (12)
Taskfiles are saved export jobs. They contain a list of files to export, and the selections you made for the export.
- Select a taskfile to use from the list. Click Export Immediately, or define a batch job to schedule the export job.
- Saving a taskfile: Select the drawings to export, define the output folder, select the configuration, and click Save taskfile.