Lines
Draw > Lines

Draw lines. Select from the following:
- Lines – Draw straight line segment(s) by indicating points.
- Line Divider – Divide the indicated line or spline into equal parts by placing construction lines.
- Line Perp. to Line – Create a line segment which is tangent to the indicated circle or arc, and perpendicular to the indicated line.
Line Segments
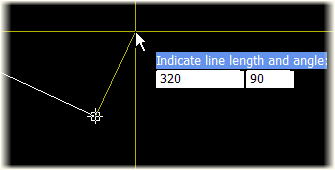
Draw straight line segment(s) by indicating points.
- Indicate first point: Press Enter to place the starting point at the current mouse position, or click the left mouse button.
- Indicate line length and angle: Press Enter to place the next point at the current mouse position, or click the left mouse button. A line segment is drawn between this point and the previous point.
- Move Cursor: Moves the cursor without drawing a line segment. You can enter an absolute point on the dynamic input. For entering a relative point, switch to the Length and Angle mode first.
- Coordinates: Switch from the active Length and Angle mode to the Coordinates mode. After switching to the Coordinates mode this option will be replaced by the Length and Angle for switching back.
- Related Angle [off / on]: Draw a line segment with an angle that is related to the previous line. The angle shown in the dynamic input is not the orthogonal angle, but an angle related to the previously drawn line (see picture below). This mode is useful when you want to leave from a line with a certain angle. If the Coordinates mode is active, switching this mode on activates the Length and Angle input mode.
Horizontal/vertical point correction
When you indicate a point by clicking in the graphical window, the drawn line segment gets corrected into a horizontal or vertical line if the drawn line segment is nearly horizontal, or nearly vertical with a margin of ±5 degrees. A point indicated using the dynamic input or the snap keys will not be corrected.
Perpendicular point correction
When you indicate a point by clicking in the graphical window, the drawn line segment gets corrected into a perpendicular line to the previous line if the Related Angle mode is on, and the drawn line segment is nearly perpendicular to the previous line with a margin of ±5 degrees. A point indicated using the dynamic input or the snap keys will not be corrected.
Using the current control position
By emptying one of the dynamic input fields in the Coordinate mode you can use the width or height value of the current control.
Example: The current control coordinate is (122, 2500), meaning frame number 122 and height of 2500 millimeters. You want to draw a vertical line segment from the current control to the height of 2000 millimeters. To do this, empty the first field on the dynamic input, type "2000" into the second field, and press Enter. If you want to draw a horizontal line segment in the Coordinate mode, enter the width value in the first field and empty the second field on the dynamic input.
Fixed angle, line intersection
To draw a line segment with a specific angle and intersecting another line segment, empty the length (first) field of the dynamic input in the Length and Angle mode, type in the desired angle, press Enter, and point to the intersecting line.
The pictures below show how to draw from the current control a line segment with an angle of 40 degrees and intersecting another line.
|
|
|


Fixed length, line angle
To draw a line segment with a certain length and parallel to another line, type the desired line length into the first field of the dynamic input in the Length and Angle mode, empty the angle field, press Enter, and point to a line segment.
The pictures below show how to draw from the current control a line segment with a length of 100 millimeters and parallel to another line.
|
|
|


Copy line segment
To use the length and angle of the pointed line segment, empty the distance field and the angle field in the dynamic input. The direction of the new line segment is the same as the direction of the nearest end point to the indicated point.
Between two circles
To create a tangent line segment between two indicated arcs/circles, point to an arc or a circle and press the tangent snap key J.
Construction lines
In the Construction Mode the drawn line segments are construction lines. A construction line is a line with infinite length in both directions. You can use the construction items as a framework for the actual 2D shape that you want to draw. All the construction items are created with the pen number 29.
To activate the Construction mode, select the CON check box in the status bar, or press Ctrl+Shift+C. To deactivate the Construction mode, clear the CON check box.
See also Indicating points and Line Style toolbar.
Line Divider
Divide the indicated line or spline into equal parts by placing construction lines. This function is useful when you want divide a line/spline into smaller parts having the same length. By indicating the starting point, the ending point, and the number of parts, the system will place construction lines perpendicular to the indicated item.
- Indicate line: Indicate the line or the spline for which you want create dividers.
- Indicate first point: Indicate the starting point by clicking on the item, using the snaps, or pointing to another line which has an intersection point with the indicated item. In case of pointing to another line, the intersection point of the pointed line and the originally selected item is used as the first point. Pressing Enter selects the position of the current control.
- Indicate second point or enter distance: You can type in the distance between each divider, or indicate the ending point. If you type in a distance the direction of the dividers is the same as the direction of the mouse pointer. Pressing Enter sets the value shown in the Dynamic Input as the distance between the dividers.
- Indicate number of parts: By pressing Enter the current default value 2 is used. This means that the indicated (sp)line will be divided into two parts by placing one construction line. The system measures along the indicated (sp)line from the first point to the second point, and creates construction lines where needed.
You can select and remove these construction lines interactively or by using Tools > More Tools > Selection Tool.
See also Indicating points.
Line Perp. to Line
Create a line segment which is tangent to the indicated circle or arc and which is perpendicular to the indicated line.
- Indicate line to be duplicated: Indicate a line by clicking on it, or by pressing the space bar.
- Indicate right side of circle: Indicate an arc or a circle by clicking on it, or by pressing the space bar.
See also Line Style toolbar.