Indicating points
A point can be indicated in three ways: by clicking on the graphical window, using the snap shortcuts, or entering a point on the dynamic input.
Clicking on the graphical window means a single left mouse button click. If the Latching mechanism is activated, this point may be corrected by the latching.
Using the snap shortcuts means indicating a point by using the keyboard snap shortcuts such as e, m, and p. The snap shortcuts are also accessible via the shortcut menu.
Entering a point on the dynamic input means indicating an absolute point or a relative point, depending on the dynamic input mode. See Dynamic Input.
Absolute point
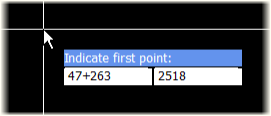
For entering an absolute point the dynamic input must be in Coordinate mode.

Note: Using a width grid whose direction is towards the port side is not reflected in the presentation of the breadth (width) values here. The presentation of breadth is always according to the default grid direction, which is towards the starboard. Therefore the port side always has negative breadth values, and the starboard side has positive values.
By using the Tab key the input focus goes to the first input field on the dynamic input. If you are in a view where the frame numbers are defined, like 'Side View', your entered value like 47 will be evaluated as a frame number. If you want enter an absolute value in millimeters you have to use the prefix '0+'. For instance, for indicating 4500 millimeters from the origin you enter 0+4500 in the first field of the dynamic input.
If you are in a view where the frame numbers are not defined, the entered value is always granted in millimeters.
For indicating a point related to the current control position you can use the direction prefixes e for east, w for west in the first field and the prefixes n for north and s for south can be used in the second field.
Emptying the first field means use the current control's breadth and emptying the second field means use the current control's height.
By pressing the Tab key again the focus goes to the second field where you can enter a height value, like 2500. By pressing Enter your input is granted as a point.
Relative point
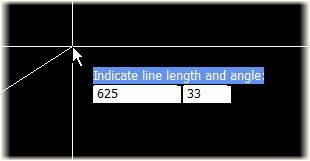
For indicating a relative point the dynamic input must be in Length Angle mode.

By using the Tab key the input focus goes to the first input field. Here you can type the distance from the current control in millimeters, for instance 625 millimeters. By pressing the Tab again the focus goes to the second field where you can type the angle of the point from the current control, for instance 30 degrees. By pressing Enter your input will be granted as a point.
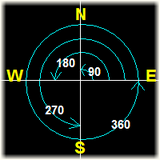
Use the direction prefixes e for east, w for west, n for north and s for south in the first field. In the picture below you see the four quadrants in degrees and the direction prefixes. When a direction prefix is used the contents of the angle field is ignored.

For instance entering n2000 in the first field and pressing Enter the cursor is moved 2000 millimeters over an angle of 90 degrees (to the north).
By emptying the first field, typing an angle and pressing Enter, the system asks you to indicate a line. The distance between the current control and the intersection point with the indicated line is used as the length value.
By typing a 'length' in the first field, emptying the second field and pressing Enter, the system asks you to indicate a line. The angle of the indicated line is used as the angle value.
See also Latching, Snap keys, Context menu.