Project Management Centre
In Project Management Centre (PMC), you can see all projects registered to the hull centre and their administration information, such as which COS servers and databases are used for projects. In addition, you can easily exchange data by opening the Check Out/In from the PMC. This way, you do not need to switch between COS projects to update the data to and from the COS server. In the PMC, you can also add and remove standalone projects.
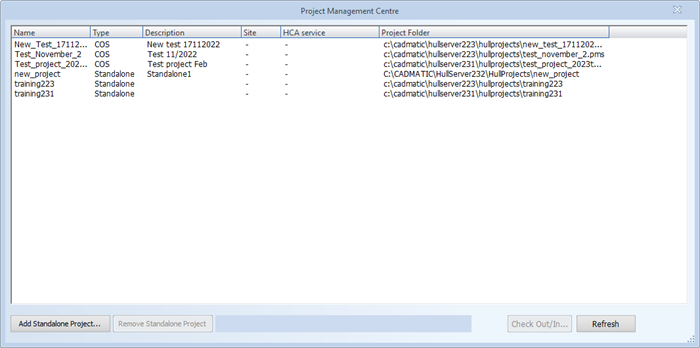
The dialog shows the following information:
Name – Name of the project; either the name of the project directory (standalone projects), or the name of the COS database without the .pms extension (COS projects).
Type – Project type: standalone or COS.
Description – Description of the project.
Site – Name of the COS site (only projects included in the projectlist.xml administration file).
HCA service – Name of the HCA service for the project.
Project Folder – Location of the project folder.
Adding and removing standalone projects
To add a standalone project, do the following:
-
Open System Management > Projects > Project Management Centre.
-
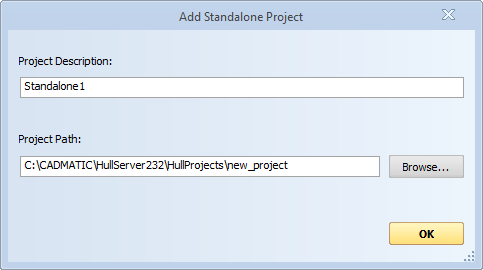
Click Add Standalone Project. The Add Standalone Project dialog opens.
-
In the Project Description field, enter a description for the standalone project (optional).
-
Define the project path by clicking Browse and browsing to the project location. If you select a non-existing or empty directory, the project is added as predefined. You will then need to create the project via File > New > Project/Block.
-
Click OK. If you selected to import an existing HDX project, you are prompted to confirm the conversion.
Important: After the conversion is done you can no longer open the project in older (HDX) versions of Hull. For more information on the conversions, see Project conversion.
Click OK to confirm the conversion.
The project is now available in the project list.
When removing a standalone project, it is removed from hull administration but no files are removed from the disk. To remove a standalone project from hull administration, select it in the list and click Remove Standalone Project. Click OK to confirm the removal.
Checking out and In
When dealing with several projects, you do not need to switch between them to update the data to and from the COS server. Instead, you can exchange data for the selected COS project by opening the Check Out/In dialog from the PMC.
Important: The project administration must be upgraded in Hull versions from 2023T2 onwards. The project data is not affected, but the converted projects are not accessible anymore in Hull versions 2023T1Rx or earlier.
Important: All Hull users must exit the COS projects before project conversion, otherwise the project administration conversion fails. The failed conversion can be attempted to be corrected manually using the Hull COS Client Command Line Interface (HCC CLI). For more information on the recovery, see the Project Administration subcommands in Hull COS Client Command Line Interface (HCC CLI).
Do the following:
-
Open System Management > Projects > Project Management Centre.
-
Select the project you want to exchange data for.
-
Click Check Out/In. The Check Out/In dialog opens.
The Check Out/In function is not available when a standalone or predefined project is selected.
-
Select the desired data, and exchange it as necessary. For more information on the actions in this dialog, see Check Out/In.
Note: If you check in or save data in a different project than the active one and there are out-of-date 3D models, the system will not be able to update them. In this case, you can cancel the operation if needed. If you choose to continue, COS will contain 3D models that are not up-to-date.