Robot file for Robot Nesting
With the Production > Report > Robot Nesting function it is possible to generate a single robot file that contains nesting data for multiple profiles.
Important: The robot file generated using this function is only compatible and meant to be used with Perficut profile cutting machine by Martec.
Robot files must be generated for the individual profiles first. Then the profiles must be nested in the normal way (profile nesting list must be created). Running the Robot Nesting function then generates a robot input data file *.pnf in the PI folder of the active block.
The robot nesting report must be created using a special robot nesting layout. This report collects and combines the data from the individual profile robot files.
Prerequisites
The following files must be present in the active norms for this function to work:
-
Robot layout file robotnestlyst.ind. The system uses this file to generate the robot input data file in the Create Production Information function. It gives the profiles that are nested in one bar the same bar name (Nestname). This layout must be added to the profile nesting layout selection list.
 Adding robotnestlyst.ind to the profile nesting layout selection list:
Open file nestlyst.dat in the active norms folder %ncgnorms% in a text editor, and add a line for robotnestlyst.ind:
'Robot nesting' robotnestlyst.ind

The text in quotes is shown in the profile nesting dialog as the report layout name, and can be freely chosen.
-
Report layout file report\profilenestreport.rpt for generating profile robot nesting reports in the Create Report function. See Checking the nesting data below.
-
Report layout file report\robotn.rpt for generating the robot nesting list in the Profile Nesting function. This report collects and combines the data from the individual profile robot files in the PI folder.
These files are available in the default norms and can be copied from there to the active norms.
Do the following:
-
Make sure that the files mentioned in the Prerequisites are present in the active norms folder, and robotnestlyst.ind has been added to the profile nesting layout selection list.
-
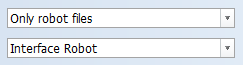
Generate robot files for the individual profiles: Go to Production > Create Production Information.
Select Only robot files (or With robot files if you want to create sketches as well) as the robot input data and Interface Robot as the robot layout, and click OK.
-
Nest the profiles: Go to Production > Report > Profile Nesting and select Robot nesting as the robot layout. This is the layout using robotnestlyst.ind that you added to nestlyst.dat. You may have used a different name.
See Creating a profile nesting list for information on how to nest the profiles with the Profile Nesting function.
-
Start the Production > Report > Robot Nesting function.
-
Select the parts and click Create selection list. The system generates the robot input data file *.pnf in the PI folder of the active block.

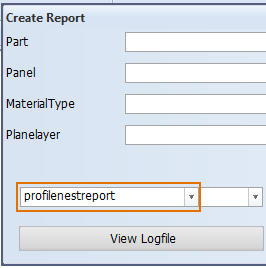
You can check the profile nesting data before running the Robot Nesting function by creating a robot nesting report with the Production > Report > Create Report function.
Select profilenestreport as the report layout.