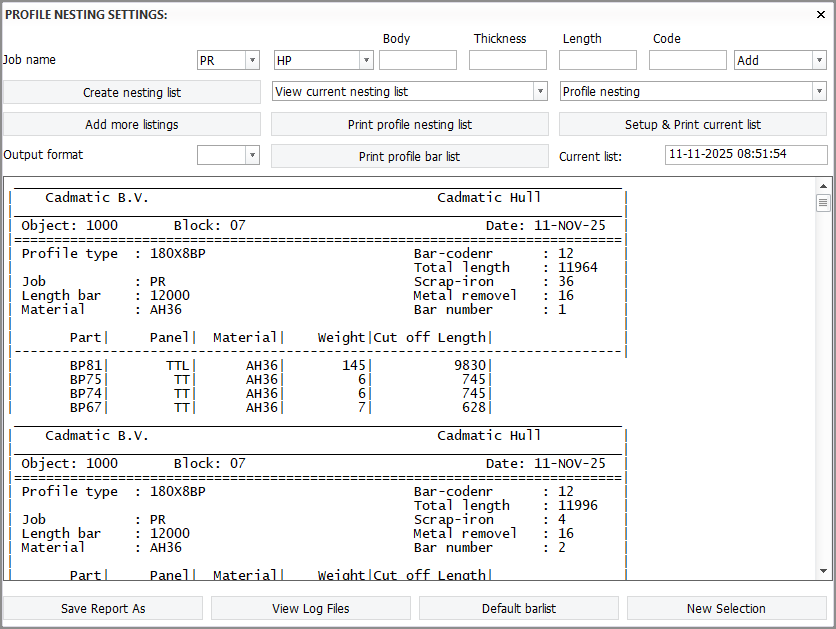
Profile nesting list
The Profile Nesting function generates a profile nesting list where all profiles are classified according to predefined bar lengths.
This function also creates a bar list giving the required number of bars. There are settings to determine the bar length for each profile type, and the thickness of the cutting. The layout of the various lists available and the report can be controlled with the Report Layout function in System Management.
Creating a profile nesting list
Do the following:
-
Select the Production > Report > Profile Nesting function in the menu. The Choose Selection Criteria dialog opens. This is where you choose which selection criteria list to use for selecting the profiles that will be included in the report. Follow the instructions in Creating reports to select the profiles to include in the profile nesting list.
-
Select the job name. The system always creates a profile nesting as part of a job. The job names are presented in the Job name drop-down menu.
The job name can be set with the Logistics > Using a logistical data menu menu option. For more information, see Processing codes for parts.
-
Select the profile type. This must be done before the bar list can be modified. Also, View bar input file must be selected from the view options below the profile type selection.
After this a list of all bars of that profile type will be presented in the dialog and a bar can be selected from the list. This bar will be used as input to Modification, Add or Delete from the bar list.
The Add drop-down menu in the Profile Nesting Settings dialog can be used to add a bar to the list. This menu also contains a Change and a Delete function.
If either the change or the delete function is selected, the current bar list of the selected profile will be displayed in the dialog.
A profile selected from this list will display the Body, Thickness, Length, and Code values. These values can be modified, after which the modifications will be added to the list.
-
Thickness – Cutting thickness is added to each profile's length to allow room for all the profiles in the bar. This is useful especially when there are many small profiles in the same bar.
-
If the values for Body and/or Thicknesss are set to 0, the system assumes that the length and code settings apply to the entire profile type series. The system operates on the principle of "first come, first served".
-
-
Select the default bar list for profiles that should be nested in a bar. Click Default barlist to select the bar list.
The default bar list lengths are set with the Production > Profile Nesting List > Settings > Bar List Information setting in System Management.
-
Create the nesting list by clicking Create nesting list. The system generates the nesting list and the bar list for the selected job name.

Examples
When the following bars are added, a bar length of 12000 will be used for HP 180x0 and HP180x8:
HP 180 0 12000 45
HP 180 8 10000 44
When the following bars are added, a bar length of 10000 will be used for HP180x8, and a bar length of 12000 will be used for the other HP profiles with a body size of 180.
HP 180 8 10000 44
HP 180 0 12000 45
Other available actions
The following actions are available in the dialog:
-
Setup & Print current list – Print the list shown in the main panel of the dialog. You can select the printer and print settings such as the font name and size.
-
View Logfile – View the log file shows the error messages (if any) during the list generation.
-
New Selection – Make a new profile selection.
View options
Select from the view options drop-down menu what is shown in the main panel of the profile nesting settings dialog.

-
View current nesting list – The current profile nesting list.
-
View Current bar list – Summary of all the bars on the current bar list.
-
View input file – An overview of the elements chosen with the Selection menu. The size of each row of this list is determined by the CADMATIC Hull software and cannot be changed by the user.
-
View Bar input file – Shows the profiles that have been set in the profile type drop-down menu.