Hull groups
The imported surfaces and curves can be divided into hull groups or layers. Hull groups and layers have a one-to-one relationship. Depending on the imported file format the layer assignment is (semi-)automatic.
-
For IGES files, the levels (if any) are converted into a layer name. The numerical part of the layer name is converted into a group number. The same is true for 3DM, SAT and DXF files.
-
A NAPA Steel database contains the required information directly.
The position of the surfaces depends on the hull group number (see the table in Layer properties). The hull group determines whether the surfaces are moved or copied over midship or not.
Note: The actual geometry of the surfaces must always be defined on starboard side (y>=0.0).
Select View > Layers or click the toolbar button  to show the layer information panel. The layer information panel opens in the left side of the window.
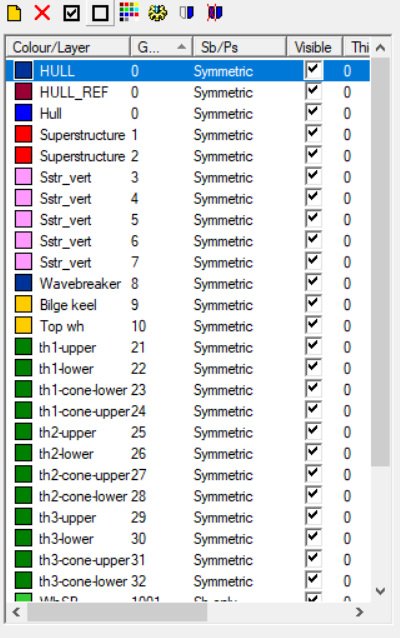
The layer information panel shows all of the available hull groups and their color, name, group number, position and visibility.
At the top of the panel there are eight buttons for different functions. The functions affect the selected hull group(s). For selecting multiple hull groups use the Ctrl and/or Shift keys. You can select a single group by double-clicking it.

The functions are as follows, from left to right:
- New – Add a new layer to the list. The default layer name starts with "Group ".
- Delete – Remove the selected hull groups. A hull group can only be deleted if it is not used by any of the curves and surfaces.
- Show – Show hidden hull groups.
- Hide – Hide selected hull groups.
- Color – Change the color of the selected hull groups.
- Properties – Modify the properties of the selected hull group. See Layer properties.
- Mirror over midship – Mirror the selected groups over midship to the other side.
- Cut portside – Remove all curves and surfaces of the selected groups on port side.