Placement of the information in the revision table
Users enter revision information with the Home > Create > Sheet > Title Field > Revision Table function. The revision information is shown in the revision table, which is placed in the sheet drawing above the title field.
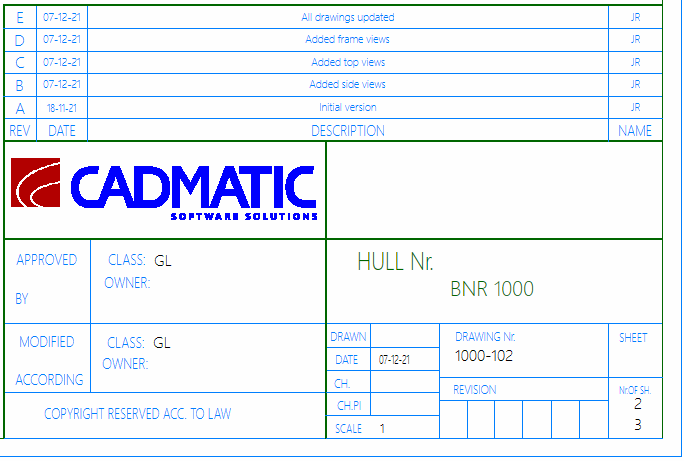
Title field at the bottom, revision table above the title field
The Hull administrator can modify the title field model to customize the placement of the revision information in the revision table. The placement of the information is based on 10 points which are set in the title field model file titlefield.mod. This file is located in the project's norms folder %ncgnorms%.
The 10 points that define the position of the revision information in the default title field model are as follows:
-
First row (the bottom row) – P90, P100, P110, P120, P130
-
Second row – P91, P101, P111, P121, P131
When revisions are added, the system calculates the positions of the points needed for the extra lines based on these 10 points. This way the administrator only needs to set the positions of 10 points at most, regardless of the number of lines needed for the revisions. The calculation of the extra points is done in the change.cmd macro.
Defining the placement of the revision information
Important: Before starting to make any changes to your currently used title field model file, it is recommended to make a backup of it in case of unwanted changes.
Do the following:
-
Open the System Management application and select File > Open Model.
-
In the Open dialog browse to the project's norms folder and select the current title field model file titlefield.mod.
The model opens in the graphical window. The coordinate points are hidden by default.
 Show/hide image
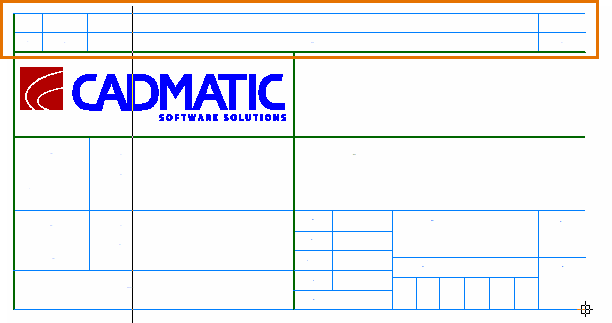
Title field model, revision table at the top. Coordinate points are hidden.
-
Make the coordinate points visible:
-
First open the Hull Command Window by selecting Help > Supporting Tools > Command Window. The Command Window opens at the bottom of the graphical window.
-
Enter where in the Command Window and press Enter. The points are now shown in the model.
Show/hide image
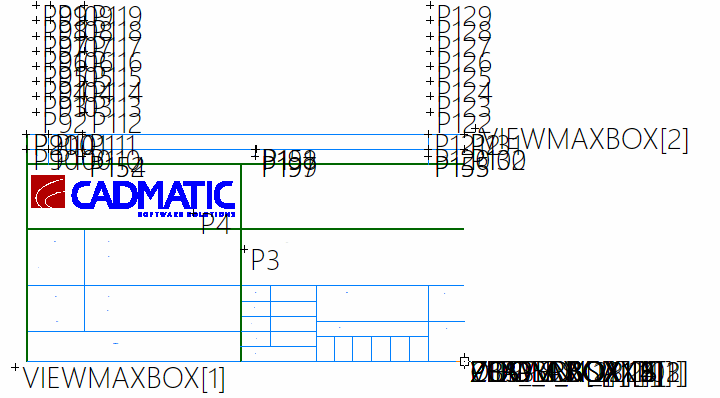

Top: Title field model, revision table at the top, all points visible
Bottom: The 10 points of the revision table
Note: When you scroll or zoom, the system hides the points. Use the where command after scrolling or zooming to show them again.
To show a specific point, enter where p#, where # is the point number. For example, to show point P90 enter where p90.
To show the coordinates of a point (x, y, z), enter tell p#, where # is the point number. For example, to show the coordinates of point 90 enter tell p90. The coordinates are shown in the Message Window above the Command Window.
Show/hide example

Message Window above the Command Window showing the last entered commands. At the bottom, the x, y, z coordinates of point P90, resulting from the tell p90 command.
-
-
To modify the location of the revision information, place the desired coordinate point to the desired position. You can do this in the following ways:
-
Place the point to a specific coordinate position. Enter p#=(x coordinate, y coordinate, z coordinate) in the Command Window, for example p90=(-4350,2200,0).
The (0,0,0) point is located at the bottom right corner of the sheet drawing.
Note: The z coordinate is not used for sheet drawings, and it is recommended to set the z coordinate to zero.
-
Set the point to the current control position in the graphical window. First use the snap keys or the Snaps option in the context menu to set the current control position. See Snap keys and Context menu.
Then enter p#=c in the Command Window. The point is moved to the current control position.
Repeat to as many points as needed.
-
-
Once you have repositioned the points as desired, select File > Save Model As.
Note that using the same model file name overwrites the currently open model file, so if you want to create a new title field model, use a different file name.