Corner holes and snipes
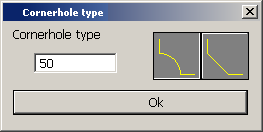
If it should be possible to choose between a corner hole and a snipe for the bracket to be created, the value of the CheckCorner variable must be changed. This means that when under label 2 the value of CheckCorner is changed by means of a line CheckCorner= , the program knows that it should display the panel that can be used to select a snipe or a corner hole. The value of CheckCorner then indicates which icon has been clicked. If CheckCorner=True, the icon for the corner hole has been clicked, if CheckCorner=False, the icon for the snipe has been clicked.

The CheckProfCut constant can be used to set the CheckCorner variable. The value True is assigned to CheckProfCut if the size of the hole between the end of the profile and the part it abuts against is 0:

Normally, the panel for corner holes and snipes is displayed when all values in the main panel have been accepted and the user has clicked OK. If more than one corner hole or snipe should be placed or if the data for the corner hole or snipe should be known before the main panel is opened, this can be done by calling the lb3/brackcorner.cmd macro. If necessary, the CornerTitle and CheckAfter variables should be used here.
CornerTitle contains the title of the panel that is displayed by calling lb3/brackcorner.cmd, while setting CheckAfter to False in label 2 ensures that brackcorner.cmd is executed before the execution of label 3.
For example:
LABEL 2
Quest[1]= 2
Quest[2]= 10
Quest[3]= 3
if CheckProfCut=FALSE : CheckCorner=False ; CornerValue=Corner_dist;
else CheckCorner=TRUE ; CornerValue=50
The next two lines are only needed if two corner holes or snipes have to be placed.
CornerTitle='Cutout with section profile'
CheckAfter=FALSE
exit
LABEL 3
Ans[1]=Def_HP_Fact*HP[1]+Def_Par_Dist
Ans[3]=DP[1]
if CheckCorner=FALSE : Ans[2]=75;
else Ans[2]=120
# Corner hole/bevel with section profile
At this moment, the values of CheckCorner and CornerValue have already been set by the first call of brackcorner.cmd, which means that the Cornerhole type panel has already been displayed.
if CheckCorner=TRUE : RigRad[1]=0 ; RigRad[2]=CornerValue ;
else RigRad[1]= CornerValue ; RigRad[2]=0
# Corner hole/bevel with plate in plan view or plate in section.
if CheckProfCut=TRUE then
{
CornerTitle='Cutout with profile in plan view'
CheckCorner=FALSE ; CornerValue=10;
s50=Hint
Hint='Select hole type with profile in plan view or plate in section.'
Brackcorner.cmd is now explicitly called from within the type macro. In most cases however, the bracket will only have one corner hole or snipe. Then by changing the value of CheckCorner in label 2 the macro Brackcorner.cmd is executed automatically. Only when a second choice is needed which is indicated with CheckAfter the macro must be called from the type macro.
do lb3/brackcorner
Hint=s50
if CheckCorner=TRUE : RigRad[3]=0 ; RigRad[4]=CornerValue ;
else RigRad[3]= CornerValue ; RigRad[4]=0
}
else
{
Rigrad[3]=0 ; RigRad[4]=0
}
exit
If CheckAfter has been set to False so that the Cornerhole type panel had already been displayed before label 3 was executed, the CheckCorner variable was modified in accordance with the choices made by the user in this panel. If he selected a hole, CheckCorner will be True, while the selection of a snipe results in False.
The corner holes themselves must be defined in the type files with the available options.
In the example above, the generic RigRad variables are used to send values to the type file. This allows the creation of a corner hole or snipe with the same type file. Two different type files can also be used for this purpose.
If CheckAfter has not been set to False in label 2, CheckCorner is set just before label 5 is executed. Thus, if the user has selected a hole in the Cornerhole type panel, CheckCorner=True, else CheckCorner=False when label 5 is executed.
The CornerValue variable contains the value that may be set in the panel. The default value of this variable must be assigned in label 3. In the example above, CornerValue is set to the same value as Corner_Dist, if CheckCorner=False. If CheckCorner=True, CornerValue is set to 50. This means that when a snipe should be created in a corner, CornerValue equals the length of the sides of the corner that must be cut off. Corner_Dist is the default length, which is set to 10. Thus, a section of 10 by 10 will be cut off in the corner. With holes, CornerValue is the radius of the hole in the corner.
If another value is required for Corner_Dist, it can be changed with the setting Construction > Cornerholes > Distance straight cornerhole in the System Management application. Note however, that this variable is not only used for the creation of brackets.
In the same way as Corner_Dist represents the standard snipe, Corner_Rad provides the standard radius for corner holes. This constant can be set with Construction > Corner holes >Radius cornerhole in the System Management application.
Label 10 is called from within the macro brackcorner.cmd, which means that label 10 need only be present if this option for creating corner holes is used (so, when the value of CheckCorner is changed in label 2). So if CheckAfter is not used, this macro is executed after the user has inserted and confirmed all values by clicking OK in the main panel.
The commands under label 10 are executed when the value of CornerValue is 0. This label then may be used, for example, to initialise the variable CornerValue for the Cornerhole type panel
For example:
LABEL 10
if CheckCorner=TRUE & CreateMod<>'M' then
{
CornerValue=0.25*Ans[2]
If CornerValue > 75 : CornerValue=75;
}
exit
However it must be clear that the above described mechanism is only needed if the user must have the possibility to choose between a corner hole or a snipe. If it is always clear that a corner hole or a snipe must be placed in a certain situation the variables CheckCorner and CornerValue should not be used.