Hullshape database
CADMATIC Hull offers functionality for using external NAPA hullshape databases, which can be accessed directly from CADMATIC Hull. Surfaces and curves from several other file formats can be imported with the Hullshape Import Manager (see Hull Shape Import) and can then be stored in the CADMATIC Hull surface format.
Hull groups
The main part of the shape of the ship should be defined by one surface (hull line), and stored in hull group 0. This surface is automatically mirrored over the center line (from starboard to port side). Other surfaces can be used to define special areas of the shape. Each surface is stored in a separate hull group. A surface can be set as a reference plane for an inner structure, such as a deck.
Hull group numbering is used to designate the side of the hullshape:
- 0 - 2999 are the starboard side and can be mirrored to port side.
- 3000-3999 are reference surfaces either on starboard side or port side. These surfaces will not be mirrored.
Recommendations for use in CADMATIC Hull
For CADMATIC Hull to work correctly with an external database, the external database should meet some specific requirements.
These requirements have been set up for NAPA hullshape databases, but most are valid for all types of external databases.
It is recommended to pay attention to the following points in particular:
- The surfaces should have a nice fit to each other (trimmed). If not explicitly meant, they should not cross each other, but the surface borders should stop at their junctions. This means that when a line is interpolated over a surface (or combined surface), the interpolated hull line should be a single continuous line with one start point and one endpoint.
- Hull shape lines (grid) should be made in such a way, that differences between the grid and the surface in the same hull group are as small as possible. Particular strong bended areas in the surface should be examined. If necessary, add some more curves to the grid in order to decrease the size of the patches in those areas and automatically the differences.
- The tolerances in the external database should be set fairly small (0.1 mm would be in line with the cutting machine tolerance).
- The hullshape that is defined in the external database should be defined in as much detail as possible. This means that also items such as stern profile, pipes, and so on, should be taken into account.
- NAPA: A shape that is not smooth will have an undesirable effect on shell plate calculation and elongation results. Check the surfaces in the external database thoroughly and resolve the differences between the grid creating the surface and the surface itself. The warnings that occur when generating the surfaces (pre <surfacename>) should be eliminated as much as possible.
- Check if the defined surfaces in the NUPAS_SHAPES table are really present in the NAPA database. Also check the curves in the NUPAS_LINES table for their existence in the database.
-
A frame coordinate list must be present before the NAPA Steel model integration process can start.
- Select the surface with the largest area to be defined as group zero in the table for the CADMATIC Hull system. This is to avoid problems when creating construction parts in other groups (defined surfaces). In many cases an area ship is carried out, and then the minimum and the maximum dimensions are taken from the surface defined as group zero in the NUPAS_SHAPES table. In most cases the normal hull is the ideal group zero defined surface.
- The defined surfaces in the table should not overlap of each other to avoid the selection of the wrong hull line.
Example:
Suppose that surface hull is a combination of surface hull_after and surface hull_fore, then the table should only contain surface hull to be defined as group 0.
Note: Do not define hull_after and hull_after as additional surfaces in the NUPAS_SHAPES table. The NUPAS_SHAPES table has no use for CADMATIC Hull, and using it may even cause problems.
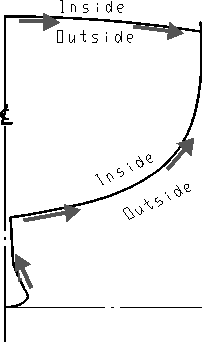
- The orientation of the surfaces in NAPA is important for the direction of the hull lines in CADMATIC Hull. The figure above shows the inside and outside of the hull as it should be within NAPA. It is important to check this in the NAPA system, otherwise the default body directions for shell frames and thickness direction for shell plates are incorrect in the CADMATIC Hull system. To check this in the CADMATIC Hull, look for the line direction, that is, from centre line outwards in frame view and from aftship to foreship within top and side views. Within NAPA it is possible to check the orientation for example by using the I and O options of the PLOT surface command with the filling on. Consult your NAPA manual. Keep in mind that changing the surface orientation during the engineering process causes problems for the construction.
Settings in NAPA
The preparations made in NAPA for the CADMATIC Hull NAPA Link consist of defining two tables, NUPAS_SHAPES and NUPAS_LINES. These tables must explicitly have these names. Also a frame coordinate system must be defined.
The NUPAS_SHAPES table
In the NUPAS_SHAPES table, the NAPA surfaces are mapped (connected) to the CADMATIC Hull hull groups.
Important: When defining the surfaces in the NUPAS_SHAPE table in NAPA, you must define all surfaces to be interpreted as starboard only hull groups, except those surfaces that should be interpreted as asymmetrical hull groups. This is because, apart from asymmetrical surfaces, CADMATIC Hull only uses the starboard side hull surfaces and mirrors them to the port side. This means that a surface that should be available in the port side in CADMATIC Hull should be defined as a starboard surface in NAPA.
A table as follows must be made:
SHAPE NAME
0 HULL
1 DECK
where:
- SHAPE = CADMATIC Hull Hull group number
- NAME = NAPA surface
Notes:
- The main hull must get the group number 0 in the table.
- Hull group 0 must be defined.
- The NAPA Surface name must be in capitals.
The NUPAS_LINES table
In the NUPAS_LINES table the NAPA curves are connected to the CADMATIC Hull lines, therefore a table as follows must be made:
LINE TYPE NAME SURF
3 10 KNFA HULL
1 500 FBA DECK
where:
- LINE_TYPE = CADMATIC Hull line type. The following numbers can be used:
- 1 Angle lines
- 2 Function curves
- 3 Knuckle lines
- 4 Dimension lines (3D lines)
- 5 Diagonals
- 6 Frames
- 7 Buttocks
- 8 Waterlines
- Butts
- Seams
- NUMBER = CADMATIC Hull line number
- NAME = NAPA curve name
- SURF = NAPA surface the curve belongs to (always in capitals)
- The SURF column is optional.
Note that because of the functionality of the NAPA database, the lines defined in the table are only meant to be presented on screen.
Line and group numbers:
-
If the optional SURF column is present int the NUPAS_LINES table, the CADMATIC Hull line number is the number in the NUMBER column.
-
The hull group the curve belongs to is the corresponding number in the SHAPE column of the NUPAS_SHAPES table.
-
When the SURF column is not present or is empty the line and hull group number are taken from the NUMBER column in the following way:
#All the numbers below 100 belong to hull group 0.
#Above number 100 the last two digits of a line number are an identifier for the hull group, for example:line 100 = line no. 100 of hull group 0 line 200 = line no. 200 of hull group 0 line 101 = line no. 101 of hull group 1 line 1230 = line no. 1230 of hull group 30 And so on.
Settings in CADMATIC Hull
The preparations that have to be done in CADMATIC Hull to use the CADMATIC Hull-NAPA Link are as follows:
- Copy the NAPA databases <database_name>.db to a subdirectory of the %ncgshape% directory, with the same name as the database.
- In the System Management application, select Projects > Update Hull Database. When creating a new project, you can choose the copied NAPA shape database directly.
With this action the NAPA databases are copied into the ncgdb directory, and all the settings for a proper use of the NAPA databases are installed. You will be asked for the version of the NAPA database that should be used (for example, A, B, C, and so on).
Once done, the NAPA database is ready for use and you can continue working as usual. If necessary, set the frame coordinate list.