Importing existing COS (distributed) projects
This topic instructs you on importing existing (HDX) projects to be used in the current version of Hull. If you want to add completely new COS (distributed) projects, see Creating COS (distributed) projects.
In order to be able to open an existing project in Hull, you first need to create the project in the CADMATIC desktop. During this process some conversions take place. Also, when saving a block for the first time (using either Save or Save Construction), the old HDX construction parts, welds and Work Breakdown objects belonging to the block will be deleted to avoid duplicate information—if the Hull Agent was created at the main site (that is, the main site owns the objects), the first save should also be done at the main site.
Create the project in the CADMATIC desktop as follows:
-
In the CADMATIC desktop, browse to the projects folder, and then select Object > Create Project.
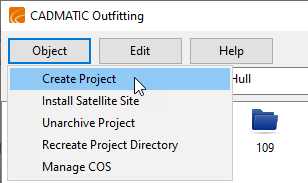
The Create New Project wizard opens.
-
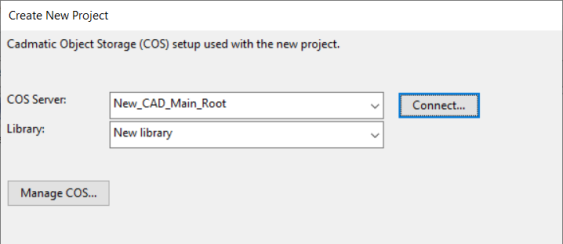
Specify which COS server and library to use:
-
From the COS Server drop-down menu, select the COS server where the master project database is to be hosted. This defines the main site for this project, and later you can replicate the database to any satellite sites that connect to this main site.
If the required server is not listed, click Connect. You are prompted to define the address and port of the server to connect to.
-
From the Library drop-down menu, select the desired library. If you want to create a new library, select New library.
-
Click Next. One of the following occurs:
-
-
Click Next. The Project Properties Setup page opens.
-
Define the project properties:
-
Click Browse, and select the root directory for the project. The project folder will be created here. The path should either be a mapped drive or a direct UNC path.
Note: The following characters are not allowed in the project path: ' ^ # & $ , ~
-
In the Project Name field, enter a name for the project. This will be the name of the shared project folder. Also consider that the project database will be replicated to satellite sites that participate in this project.
-
If you want, enter a description in the Description field.
-
Below Optional Modules, select Hull:
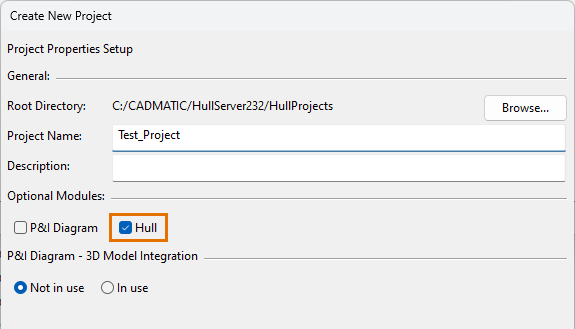
The .pms extension is automatically added to the name.
-
-
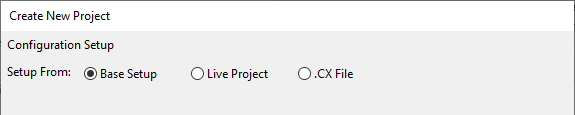
Click Next. The Configuration Setup page opens.
-
Select from where to take the initial setup for the new project.
Note: If you previously chose to create a new library, the new library will contain the data required by the objects in the template setup.
-
Base Setup – Use the standard CADMATIC setup provided with the software. The base setup contains a minimum set of configuration objects as well as a small example project for Outfitting.
-
Live Project – Import the setup from an existing project in your COS network. You are prompted to select the COS server and project from which to import the data.
-
.CX File – Import the setup from a .cx file in the file system.
-
-
Click Configure. If you selected to get the base setup from a live project, the Export Objects wizard opens—see Exporting a project. The setup you export is then used by the project wizard. Otherwise, the Hull settings page opens.
-
Configure the Hull data as follows:
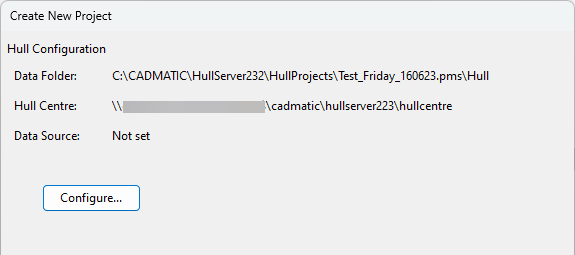
-
Click Configure. The Configure Hull Data dialog opens.
-
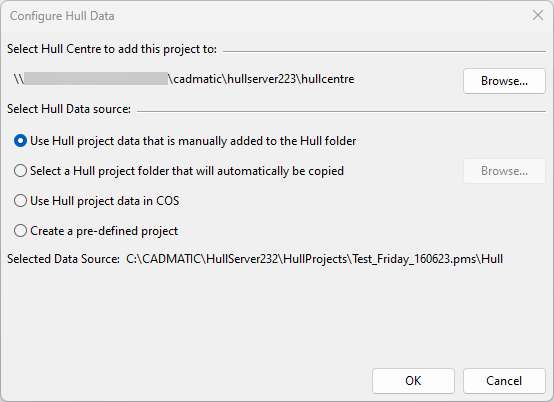
Click Browse and select the Hull Centre that this project will be coupled with.
The system checks whether the given Hull Centre looks like a valid Hull Centre. If at least one of the following subfolders is found, the folder is recognized as a valid Hull Centre location: client, codscripts, Eagle, hullcos, hull_library, ncgh, shapes, userstd.
-
Select the Hull project data source and click OK.
The data can be copied manually or automatically, an external .cx file can be used, or a predefined project can be used.
Note: If a .cx file was chosen as the initial project creation setup source, for a project that already includes Hull data, the option Use Hull project data in COS should be chosen as the Hull data source.
-
-
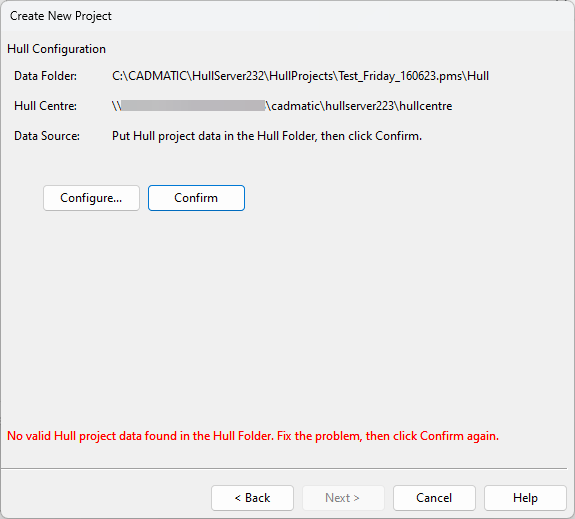
Click Confirm to verify that Hull project data is present in the folder defined.
Note: The Confirm option is available only if the Use Hull project data that is manually added to the Hull folder option was selected as the Hull data source.
If you have defined a wrong path for the Hull data or no valid Hull data is found, you need to move the Hull data in the folder to fix the problem.
-
Click Next. The eShare Integration Setup page opens.
-
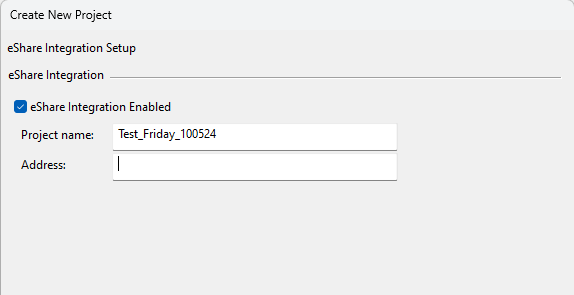
If your site is using eShare and the project should be able to export data to eShare, select the option eShare Integration Enabled and specify the settings.
 Show/hide details
-
Project name – Enter the project name to use in eShare.
-
Host – Specify the address of the eShare server.
-
Port – Specify the port of the eShare server.
Click Next. The Ready to create the new project page opens.
-
-
Click Create. The Importing Objects wizard opens.
The base setup of a new project contains objects that are typically needed in projects, and these can usually be automatically mapped to the target server's schema. However, the project template file might also contain completely new attributes or new choices for enumerated attributes.
If the wizard reports that there are user attributes that need to be mapped to the target server's schema, click Map Attributes and modify the mappings as necessary.
Show/hide details
The Map Attributes from Foreign Schema dialog opens.
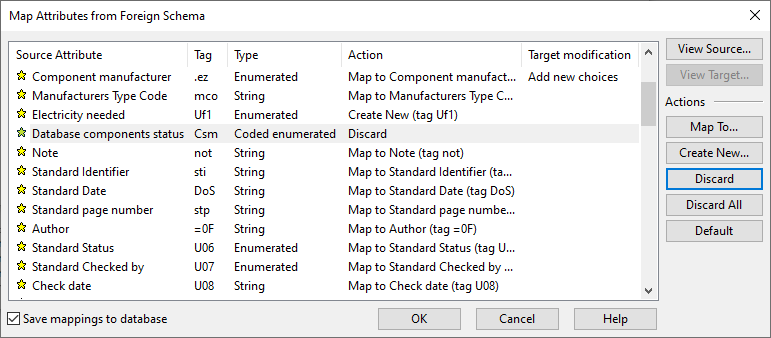
You can do the following:
-
View attribute properties.
-
Map a source attribute to an existing target attribute.
-
Map a source attribute to a new target attribute.
-
Discard a source attribute (attribute will not be imported).
-
Restore default mappings.
-
Select to save the mappings in the database, so that the mappings can be applied the next time you import a similar CX.
Then, click OK.
-
-
Click Next. A list of objects opens.
Show/hide details
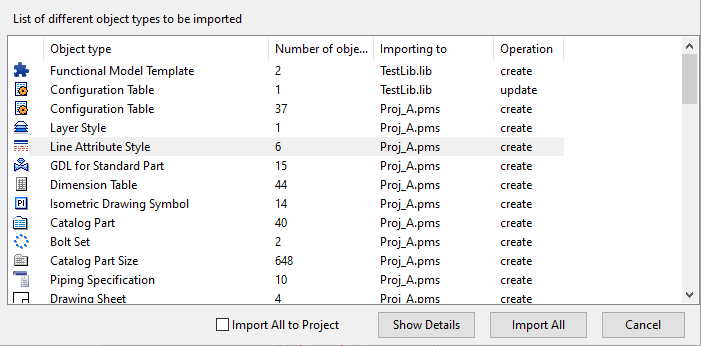
You can see how many objects of each type there are, whether they will be imported to the library or the project, and whether they will come in as new objects or update existing data.
-
To see the objects of a given object type, select the row and click Show Details.
-
If you do not want any objects to be imported to the library, select the option Import All to Project.
To start the import, click Import All and confirm it when prompted. The system starts to copy the data to the project folder.
Important: Make sure no users are active in the project that you are using as the project source during the import.
-
-
When the import is completed, review the import report and then click Finish. The Project Space dialog opens.
-
The project space sets the boundaries of the project (ship). If the imported Hull data source contains blocks, the system determines the initial project space values by combining the areas of all the blocks in the import.
Show/hide details
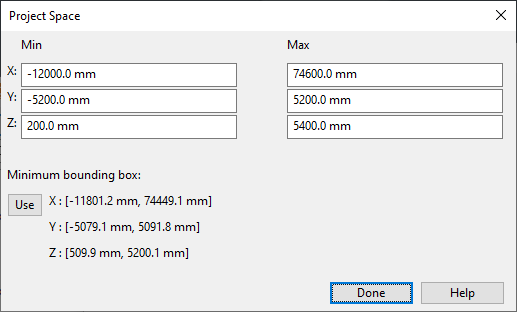
If you click Use, the project space is defined as the minimum bounding box around the objects currently in the project.
It is possible to change the automatically determined settings here, or later in the CADMATIC desktop in Object > Manage Project > Project Space.
Once you are satisfied with the settings, click Done. The Project Space dialog closes.
-
Click Finish in the Create New Project dialog. The What Next? dialog opens.
-
Review the information, and then click Continue.
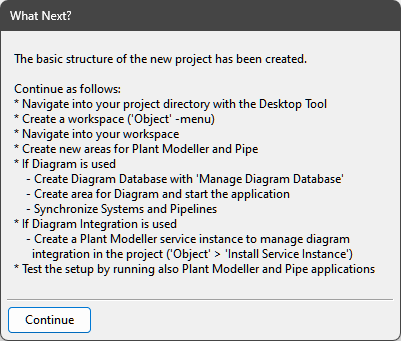
You can now open the project in CADMATIC Hull. When the project is opened for the first time, some additional conversions (a minor change in the norms, and cleanup of .gdl files from the blocks) are done. At the main site, the user will be notified that there has been a change in the norms and therefore the norms need to be saved to COS. It is up to the user to decide when to do this.
After the import, titlefield layouts for sheet drawings must be re-saved and some settings related to Outfitting integration should be updated:
-
In System Management, open Drawings > Sheet Drawings > Titlefield Layout, and select each titlefield layout field present in the layout and click Save.
Tip: To enable the Save button if it is disabled, make any change in the titlefield layout field, and then revert the change. For example, change the Angle setting in Text properties, and then change it back to the original value.
-
In System Management, send settings to Outfitting by selecting Projects > Outfitting > Hull Structure > Send Settings.
-
If Hull Agent is still needed in the project, go to Projects > Outfitting > General Hull Agent Settings > Settings and update Hull Installation Directory, Hull Project Directory, and Hull Norms Directory. Clicking Set default should update the directories correctly.
-
After checking the paths, ensure Hull Agent is running and select Projects > Outfitting > General Hull Agent Settings > Send Hull Agent Settings.