Create and Import Hidden Lines Drawing
- Switch to Another Application
- Save Drawing as Position and Import to Sheet Drawing
- Show Block
- View Tool
- Import Views to Sheet Drawing
Now you will switch to the application 3D-Show to view the active block in a 3-dimensional environment. You will additionally create an isometric hidden line view of your block and add this view to the existing sheet drawing.
Overview of actions:
- Switch to application "3D-Show"
- Show active block in a 3-dimensional environment
- Save block as isometric hidden lines drawing with drawing number "108" and drawing name "iso-rear"
- Show additional block "102" in a 3-dimensional environment
- Hide additional block "102"
- Hide lines from active block
- Shade lines from active block
- View block from different perspectives by means of the view tool
- Open sheet drawing with drawing number "108" and sheet number "1"
- Add isometric hidden lines view to sheet drawing
- Save sheet drawing with drawing number "108" and sheet number "1"
- Proceed leave the Sheet Drawing environment by closing the Sheet tab
End situation – Create and Import Hidden Lines Drawing
Additional description of actions:
- Show active block in a 3-dimensional environment
The active block is displayed in the graphical screen when selecting the icon Show Active Block in the Drawing section of the Home tab:
![]()
- Hide additional block "102"
Hiding block "102" is done in the same way as showing it, only now you deselect the block in the panel Blocks.
- Hide lines from active block
Within the application 3D-Show you can remove hidden lines from the current view of presented blocks. To do this, you select the toolbar icon Hide mode:
![]()
- Shade lines from active block
Within the application 3D-Show you can remove hidden lines from the current view of presented blocks and shade the resulting picture in one action. To do this, you select the toolbar icon Shade mode:
![]()
- Open sheet drawing with drawing number "108" and sheet number "1"
You can use the Open Drawing function within 3D-Show, and proceed to activate Sheet in the View column. Select sheet number "1" and click Open.
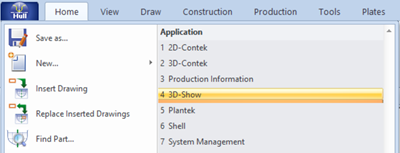
Switch to Another Application
You can switch to another application by clicking the Hull application button and selecting one of the following:
- 2D-Contek
- 3D-Contek
- Production Information
- 3D-Show
- Plantek
- Shell
- System Management.
After you have selected the appropriate one, the system will switch to the new application and present the menu bar as well as the toolbars specifically belonging to that application.
During this tutorial, you will only switch between 3D-Show and 3D-Contek:
- To switch from 3D-Contek to 3D-Show, you select the Hull application button > 3D-Show:
- To switch from "3D-Show" back to "3D-Contek" again, you select the Hull application button > 3D-Contek.
Save Drawing as Position and Import to Sheet Drawing
The application "3D-Show" offers the possibility to save isometric hidden-line drawings. These are created from the selected block(s), taking into account the actual viewing perspective.
In this case you will create an isometric hidden-line view from your block and save it with drawing number "108" and drawing name "iso-rear". Because the active block is already shown in isometric view, you don't have to change the viewing perspective!
Let's create our hidden-line drawing of the active block by selecting the icon Save in the Drawing section of the Home ribbon tab. Select in panel Save as the option Position and hidden model and accept the default values for the Drawing number and Drawing name:
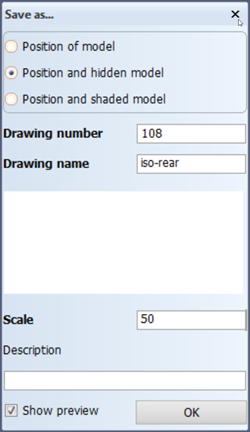
Because there is only a small amount of space left on the sheet drawing, you will change the value for Scale from 25 into 50. Select the option Show preview for a preview of the end result later on. You can ignore the optional field Description and click the OK button.
Next you are presented with two panels Turn model and Remove parts to enable you to turn the displayed block around one of its axes and to remove items from the displayed block.
Because many blocks are generally built upside down, you will also turn your block upside down. This can be realized by turning the block 180° around the east-west axis. Place your cursor in the entry box of the option East-West axis within panel Turn model and the default value of 180 appears:
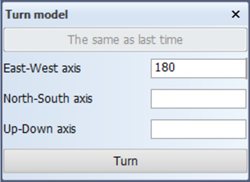
By clicking the Turn button, the block will be turned upside down.
In order to obtain a nice view of your block, you also turn the block 180° around the up-down axis. Place the cursor the entry box of the option North-South axis and the default value of 180 appears:
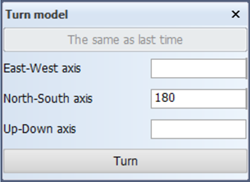
Click the Turn button and the block will be turned around the up-down axis.
After turning the block, you could remove items from the displayed block by means of the panel Remove parts if you find it necessary:
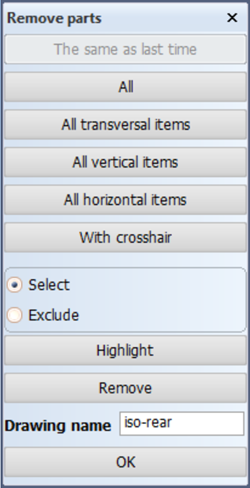
The purpose of removing items is to get a better view of the actual structure. Please notice that with this option the items are only removed visually and not removed from the database! For the current block you don't have to remove any items. So just click the OK button and the preview of the end result is shown:
Now you are asked for confirmation to save the model. In case you choose otherwise and wish to make a few changes before saving, then the main panel is opened, allowing the model to be modified.
Please confirm to save your isometric hidden-line drawing.
Show Block
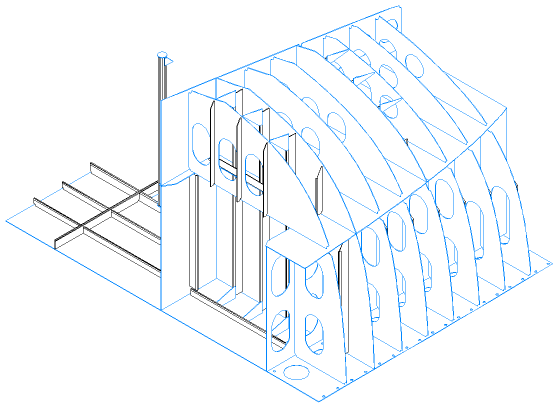
Within the application 3D-Show you can also display other blocks in addition to the active one.
To display additional blocks, you select the arrow under icon Show Active Block and choose Blocks:
![]()
![]()
After selecting this option, you can choose one or more blocks from the list of available blocks, displayed in panel Show Block:
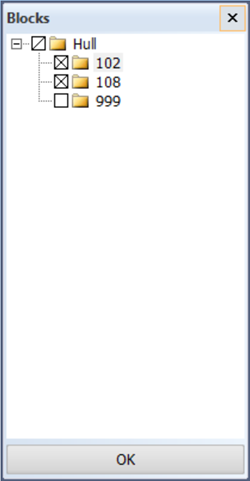
By selecting block 102 and then clicking the OK button, block 102 will be retrieved.
In order to view the combination of 102 and 108 in full screen, you select the icon Full Screen in the View section of the View tab:
![]()
Alternatively you can also press hot key <5>.
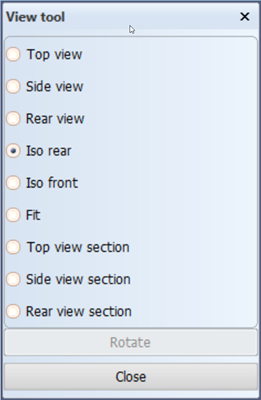
View Tool
In order to view the displayed block(s) from different perspectives, the application 3D-Show contains a viewing tool.
To see the displayed block(s) from a different direction, select the icon View Tool in the General section of the ribbon:
![]()
After selecting this icon, the panel View Tool appears:
Alternatively, you can also click the arrow under the View Tool icon to open a drop down menu containing the same options:
![]()
![]()
The viewing options are briefly explained here:
| Top View |
Show displayed block from the top. |
| Side View |
Show displayed block from the side. |
| Rear View |
Show displayed block from behind. |
| ISO Rear |
Show displayed block in isometric view from behind (stern). |
| ISO Front |
Show displayed block in isometric view from the front (stem). |
| Fit | Display block in a maximum perspective view. The button Rotate Interactively has become available and can be used to view the block from an arbitrary angle. Also the combination of <SHIFT> + <CTRL> can be used to rotate interactively. |
| Top View Section |
Create and show an intersection of the displayed blocks using a plane at a user-defined height. |
| Side View Section |
Create and show an intersection of the displayed blocks using a plane at a user-defined breadth. |
| Rear View Section |
Create and show an intersection of the displayed blocks using a plane at a user-defined frame number. |
All viewing options can be used in combination with the available options for removing hidden lines and shading.
Import Views to Sheet Drawing
You will add the isometric hidden-line view to the sheet drawing "108-1".
You can load additional views to an existing sheet drawing by selecting the icon Insert Drawings in the General section of the Sheet tab:
![]()
Using the Sheet Drawing panel you can load the isometric hidden-line view as follows:
- Select option3D-Show as type of view
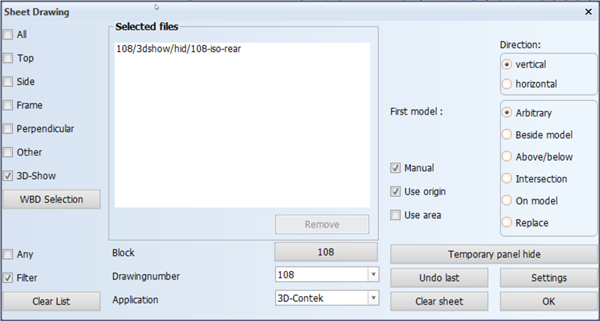
Within this panel you will find a list of all saved isometric hidden-line views. Please select the view "108-iso-rear" and place it at the desired position by indicating a point in the lower left corner of the sheet drawing.
Close the window to stop loading views.