Sheet Drawing – Part 2
When you enter the Sheet Drawing environment and take a look at top views "Deck 3500 above base" and "Deck 6200 above base", you will notice that the views have been updated with the ice frames and the support flat bars that you have created in the previous training step.
However, when you take a look at the hidden biso, you will see that the ice frames are not yet present here. This is because a hidden biso is nothing more than a snapshot of moment in time. You will have to create a new hidden biso to update the sheet drawing to the latest situation.
In the final training step of this tutorial, you will do the following:
- First you will switch to the application 3D-Show to create a new isometric hidden line view of your block;
- Then you will use it to replace the one you have placed on the sheet drawing earlier;
- Then you will create a second sheet drawing for the ice frames and the remaining longitudinal- and frame views.
Overview of actions:
- Switch to application "3D-Show"
- Show active block in a 3-dimensional environment
- Save block as hidden biso drawing to scale 1:50 with number "108" and drawing name "iso-rear-2"
- Open sheet drawing with drawing number "108" and sheet number "1"
- Replace old isometric hidden lines view in sheet drawing with new
- Save sheet drawing
- Create a second sheet drawing with paper size A0 and scale 1:25
- Select views to open inside the empty sheet drawing
- Save sheet drawing with drawing number "108" and sheet number "2"
End situation – Sheet Drawing - Part 2
Additional description of actions:
- Select views to open inside the empty sheet drawing
Start with loading the longitudinal views, and place the four remaining frame views below the longitudinal views, proceeded by placing the ice frame views to the right of the frame views.
Although all structural modifications should be carried out within single views, some modifications can be executed at sheet drawing level:
- Change titlefield of sheet drawing;
- Add change number to sheet drawing;
- Replace views within sheet drawing;
- Perform 2D modifications to individual views within sheet drawing.
For each modification function a brief explanation will be given.
- Change title field of sheet drawing
You are able to modify the current values which are presented in the title field of a sheet drawing by clicking the icon Change Title Field in the General section of the Sheet tab.
![]()
After clicking this button, the system will display panel Fill title field [General] with the current values:
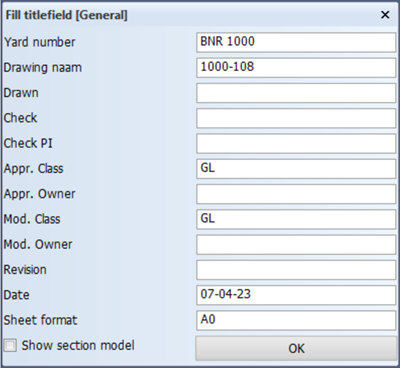
After modifying these values, you click the OK button to accept your changes and to update the information within the title field.
- Add revision to sheet drawing
You can add a revision to a sheet drawing by clicking the arrow under icon Change Title Field and selecting Revision Table:
![]()
![]()
Then you can enter information about a specific revision by means of panel Enter Revision:
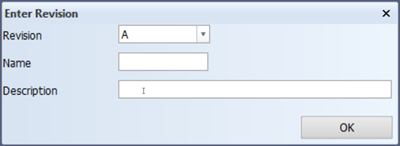
The system automatically keeps track of your revisions and comes up with an appropriate revision value for the option Alteration as a default. Our advice is to supply information about this revision by entering your initials for Name and a clear distinctive description of the revision for Description.
After clicking the OK button, all information about this revision will be added to the revision list of the sheet drawing, located above the title block.
- Replace views within sheet drawing
To replace views within a sheet drawing you select the icon Replace Inserted Drawings in the General section:
![]()
Within panel Sheet Drawing, you select option Replace and select the new view to be loaded in the sheet drawing. Next, you select the view which needs to be replaced by the new one by means of either selecting it from panel Select a model or clicking on the view you wish to replace in the sheet drawing itself.
- Perform 2D modifications to individual views within sheet drawing
You can perform 2D modifications within individual views, belonging to a sheet drawing, without leaving the sheet drawings environment. Some examples of 2D modifications are: moving standard text, adding text, drawing lines, drawing circles, adding dimensions, etc.
Note: No construction modifications can be performed.
To enable the modification of individual views within a sheet drawing, you select the icon Modify Inserted Drawing in the General section:
![]()
Next, you determine the view to be modified by either clicking on the to be modified view in the sheet drawing itself, or by selecting it from a list of available views in the panel Select:
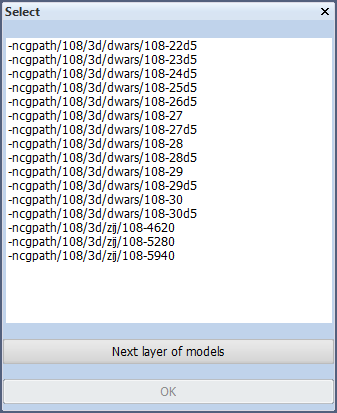
By means of the Next layer of models button you are able to modify a drawing which has been loaded into another drawing.
As soon as you have selected a certain view, this view will be highlighted for a moment. After clicking the OK button, you will notice that the selected view will keep its original colors but all other views will be displayed entirely in one color. This means that only the selected view can be modified and not the other views.
After modifying the selected view, you can modify several other views by clicking Modify Inserted Drawing button again. Each time you select a certain view to be modified, the previous selected view will be saved automatically.
After executing all the necessary modifications, you click the icon Save Drawing in the Drawing section to save your changes to the sheet drawing:
![]()
Next, you can select the icon "Full Screen" in the 'View' section of the 'View' tab, or press hot key <5> to have the whole sheet drawing presented on screen again:
![]()
You will see that all views of the sheet drawing are displayed in their original colors again.