Edit
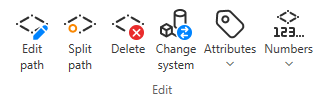
On the Weld tab, the Edit group includes the following tools.
Edit path

You can edit the weld path of an existing weld.
Do the following:
-
Select Weld tab > Edit group > Edit path.
-
Select the weld from the model, and press Enter.
-
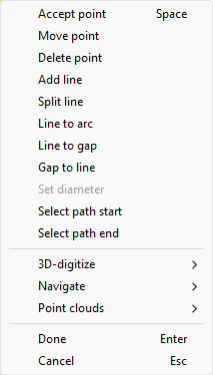
The weld points are displayed as white crosses. You can click a point to select that point; the currently selected point is marked with a little box. Use the commands in the context menu to manage that point.
-
Accept point – Accepts the currently selected location.
-
Move point – Moves the currently selected point to a new location. When action is used you are asked to define a new location for the selected point.
-
Delete point – Deletes the currently selected point. Deleting the point in the middle of an arc converts the arc to a linear segment.
-
Add line – Adds a new linear segment starting from the currently selected point.
-
Split line – Splits a segment in two. When action is used you are asked to pick a segment to split.
-
Line to arc – Converts a linear segment into an arc. When action is used you are first asked to pick a linear segment to convert and after that you are asked to define the location for the middle point on the arc.
-
Line to gap – Converts a linear segment to a gap. When action is used you are asked to pick a linear segment to convert into a gap.
-
Gap to line – Converts a gap segment to a linear segment. When action is used you are asked to pick a gap segment to convert into a linear segment.
-
Select path start and Select path end can be used to select either the start or end point of the weld path.
-
-
Press Enter to complete the editing.
Split path

You can split the weld path of an existing weld to make it into two separate welds.
Do the following:
-
Select Weld tab > Edit group > Split path.
-
Select the weld from the model by picking a point in the weld path, on top of the segment where you want to split the weld, and press Enter.
A new weld is created with a new weld number but the same attributes as the original weld.
Delete

You can delete existing welds.
Do the following:
-
Select Weld tab > Edit group > Delete.
-
Select the welds to delete from the model, and press Enter.
Tip: Alternatively, you can select welds from the Welds list and then the Delete command.
Change system

You can change the system of existing welds.
Prerequisites
-
The new system has the Allow welds property enabled.
Do the following:
-
Select Weld tab > Edit group > Change system.
-
Select the welds from the model, and press Enter.
-
In the Select System dialog, select the new system, and click OK.
Tip: Alternatively, you can select welds from the Welds list and then the Change system command.
Attributes

On the Weld tab, in the Edit group, the Attributes menu includes the following tools.
Edit
You can edit the attributes of an existing weld.
Do the following:
-
On the Weld tab, select the weld whose attributes to edit from the weld List or from the model.
-
Select Weld tab > Edit group > Attributes > Edit.
-
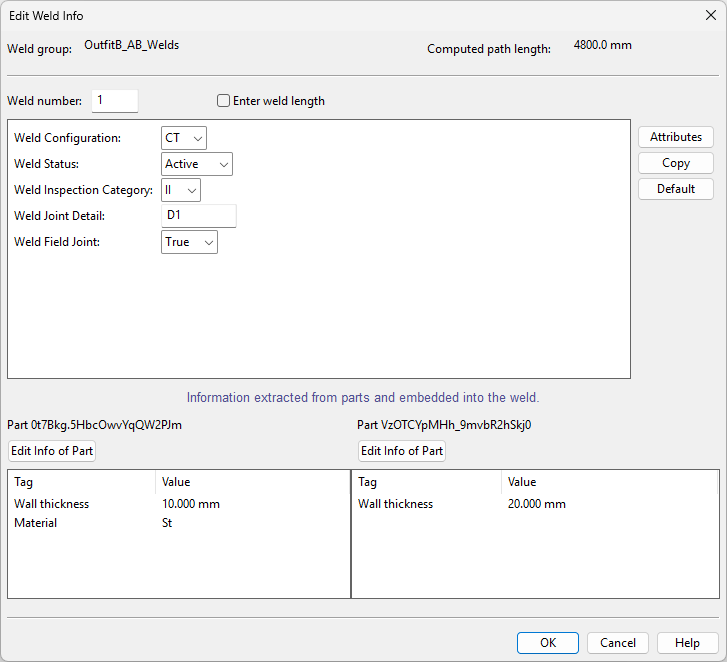
In the Edit Weld Info dialog, define the following information:
-
Weld number – Edit the weld number, if needed. The number must be unique across the weld group and within the range specified for the weld group. The weld numbers assignments are controlled by three attributes assigned to the weld group: 'First weld number', 'Next weld number', and 'Last weld number'.
You cannot modify existing weld numbers if they have been frozen using Freeze.
-
Enter weld length – Select this option to specify the weld length instead of using the computed value.
-
Attributes – Select this to add or remove attributes the COS schema includes for the 'Weld' object type.
-
Copy – Select this to copy the attribute values from another weld. This function does not add new attributes to the weld.
-
Default – Select this to make the current attribute values the default for new welds.
-
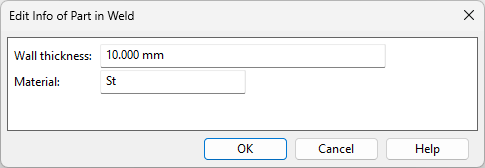
Edit Info of Part – Select this to modify the part properties that the data extractor has copied to the weld. This can be useful if the welded objects have been modified in the 3D model after the welds were added.
-
-
Click OK.
Multi-edit
You can edit the values of attributes shared by multiple welds.
Do the following:
-
Select Weld tab > Edit group > Attributes > Multi-edit.
-
Select the welds from the model, and press Enter.
-
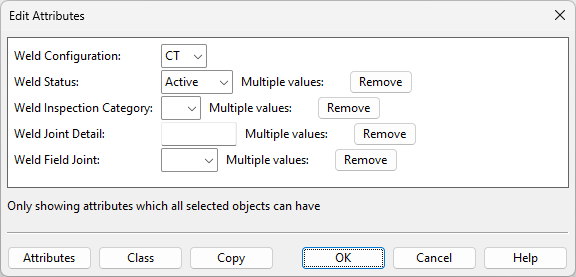
The Edit Attributes dialog displays attributes that all the selected welds have.
-
If the value is the same for all, it is displayed in the value field. You can keep, change, or clear the value.
-
If the values differ, the value field is empty and 'Multiple values' displays next to it. You can keep the existing values by leaving the field empty, assign a single value to all by entering the value in the field, or remove the attribute by clicking Remove.
-
-
Click OK to confirm the changes.
Numbers

On the Weld tab, in the Edit group, the Numbers menu includes the following tools.
Make consecutive
You can make the weld numbers consecutive for the welds selected in the weld list. This is useful if the weld numbers have been modified manually or some welds have been deleted, causing gaps in the numbering.
Do the following:
-
On the Weld tab, select the required welds from the weld List.
-
Select Weld tab > Edit group > Numbers > Make consecutive.
Freeze
You can freeze the current numbering range, up to the largest number in use. After this, new welds cannot have weld numbers from the frozen range. This is something you may want to do when the design has reached a stable state and you are about to publish weld drawings or an Excel report. For example, if weld drawings display labels with weld numbers, you may not want potential new revisions of the drawing to have conflicting use of weld numbers.
Do the following:
-
Select Weld tab > Edit group > Numbers > Freeze.
-
The program finds the largest number in use within the available range, and a dialog opens, prompting you to confirm the action.
-
If the dialog reports that there are unused numbers within the range, you may want to select No and make the numbers consecutive first, using Make consecutive.
-
If you select Yes, then the attribute 'Next weld number' is assigned the value <largest number in use + 1>.
-